


Microsoft Entra ID SAML Setup Guide
This article describes how to connect your Microsoft Entra ID Single Sign-On (SSO) to Fabric. This integration enables streamlined sign-in as well as admin-level control over authentication and authorization.
You can read more about the guidelines at this link: Azure AD, as Fabric is a part of the Microsoft's Entra ID app marketplace.
Table of Contents
- Prerequisite Requirements
- Configuration instructions: For Microsoft Entra ID
- Configuration instructions: For Fabric
Prerequisite Requirements
- Admin access to Microsoft Entra ID.
- Access to Fabric configuration settings. For more information about SAML configuration at Fabric, please read here.
Configuration instructions: For Microsoft Entra ID
In the Microsoft Entra admin center, on the left navigation panel, select Identity → Overview (or simply Microsoft Entra ID).
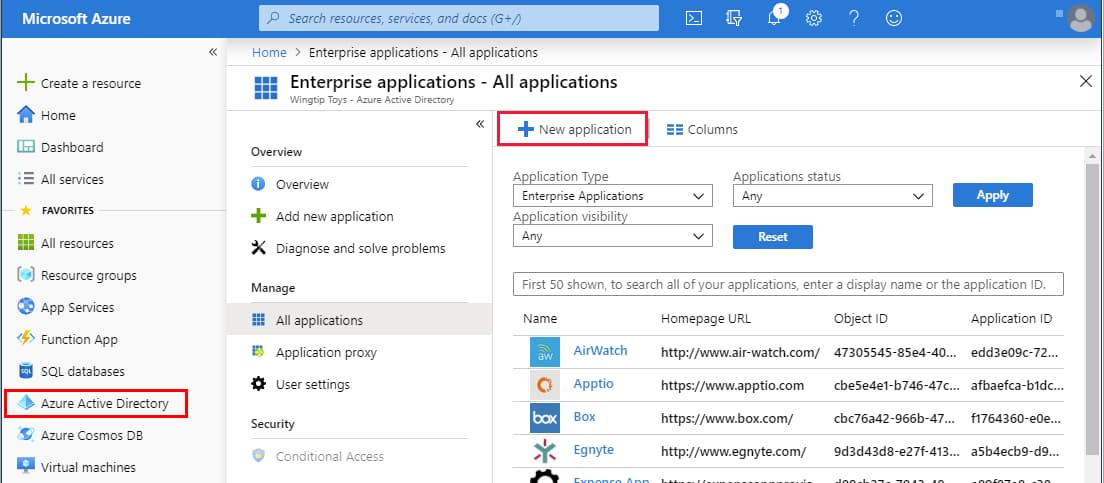
In the Microsoft Entra ID pane, select Enterprise applications. The All applications page opens.
Select New application.
|
In the Add from the gallery section, type Fabric in the search box.
Select Fabric from the results panel and then add the app. Wait a few seconds while the app is added to your tenant.
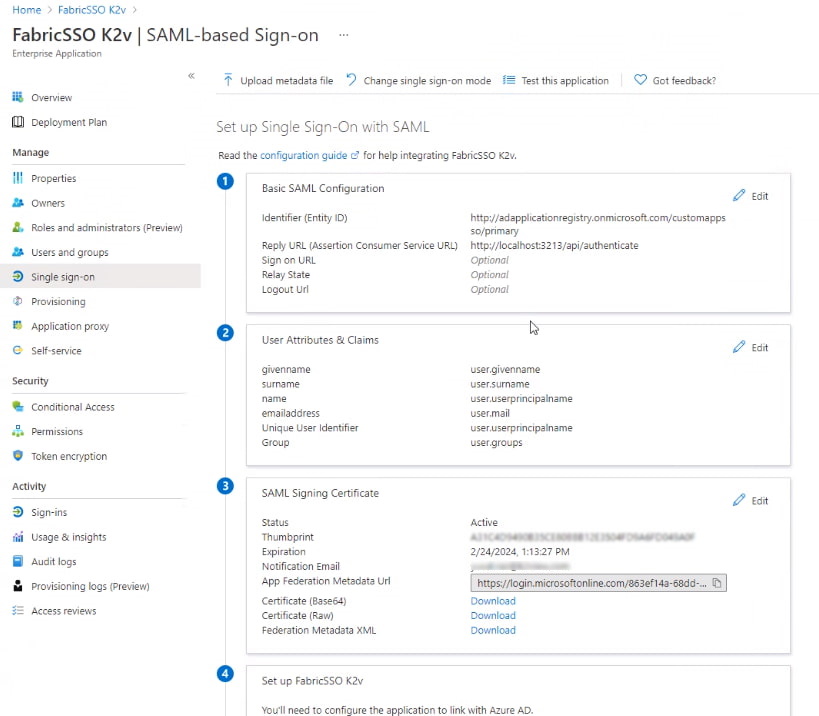
On the Fabric application integration page, find the Manage section and select single sign-on to open the Single sign-on pane for editing.
Select SAML to open the SSO configuration page.
Click to edit the various sections, similar to what is shown below (the app name in this example is "FabricSSO K2v"):
|
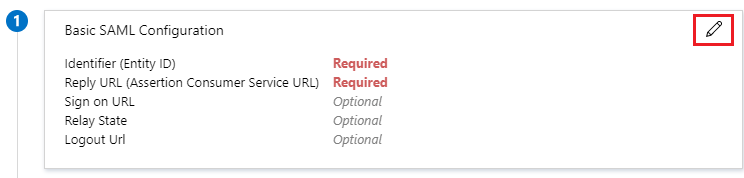
In the Basic SAML Configuration section (1), use values matching your Fabric configuration (see the Fabric SAML Configuration article).
- Identifier (Entity ID)
- Reply URL (Assertion Consumer Service / ACS URL) – where Microsoft Entra will send the SAML assertion; typically
https://<HOSTNAME>:<PORT>/api/authenticatewhere<HOSTNAME>is your Fabric load balancer. - Sign-on URL (if required) – often the same or similar to the Reply URL, depending on your setup.
|
Edit the User Attributes & Claims section (2) and verify that the groups are sent in a claim named "groups".
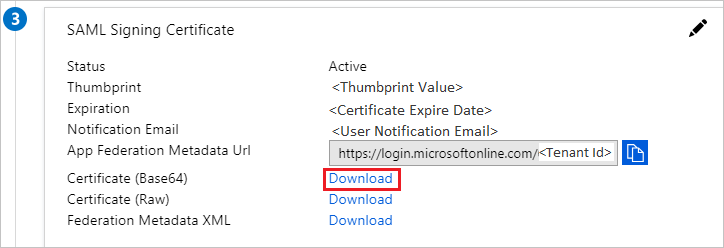
From the SAML Signing Certificate section (3), click Download to obtain the Microsoft Entra ID certificate key, which will be uploaded into Fabric for signing authentication requests.
|
Upload the public key certificate used to encrypt the SAML assertion, as exported from Fabric. Read more here in SAML Configuration > Preparations > Provide to the IDP.

From the 4th section - Set up \
(in our example "FabricSSO K2v") - copy the IDP parameters - Login URL and Microsoft Entra ID Identifier, to be populated at the Fabric SAML configuration for IDP_ENTITYID and IDP_SINGLE_SIGN_ON_SERVICE_URL parameters. 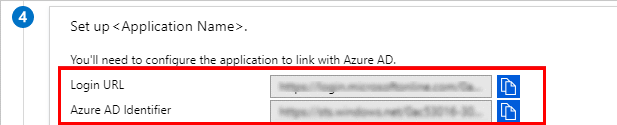
Configuration instructions: For Fabric
In addition to the instructions detailed here, setting up SAML with Microsoft Entra ID requires adding a configuration parameter to the config.ini file: SECURITY_WANT_NAMEID_ENCRYPTED=false


Microsoft Entra ID SAML Setup Guide
This article describes how to connect your Microsoft Entra ID Single Sign-On (SSO) to Fabric. This integration enables streamlined sign-in as well as admin-level control over authentication and authorization.
You can read more about the guidelines at this link: Azure AD, as Fabric is a part of the Microsoft's Entra ID app marketplace.
Table of Contents
- Prerequisite Requirements
- Configuration instructions: For Microsoft Entra ID
- Configuration instructions: For Fabric
Prerequisite Requirements
- Admin access to Microsoft Entra ID.
- Access to Fabric configuration settings. For more information about SAML configuration at Fabric, please read here.
Configuration instructions: For Microsoft Entra ID
In the Microsoft Entra admin center, on the left navigation panel, select Identity → Overview (or simply Microsoft Entra ID).
In the Microsoft Entra ID pane, select Enterprise applications. The All applications page opens.
Select New application.
|
|
In the Add from the gallery section, type Fabric in the search box.
Select Fabric from the results panel and then add the app. Wait a few seconds while the app is added to your tenant.
On the Fabric application integration page, find the Manage section and select single sign-on to open the Single sign-on pane for editing.
Select SAML to open the SSO configuration page.
Click to edit the various sections, similar to what is shown below (the app name in this example is "FabricSSO K2v"):
|
|
In the Basic SAML Configuration section (1), use values matching your Fabric configuration (see the Fabric SAML Configuration article).
- Identifier (Entity ID)
- Reply URL (Assertion Consumer Service / ACS URL) – where Microsoft Entra will send the SAML assertion; typically
https://<HOSTNAME>:<PORT>/api/authenticatewhere<HOSTNAME>is your Fabric load balancer. - Sign-on URL (if required) – often the same or similar to the Reply URL, depending on your setup.
|
|
Edit the User Attributes & Claims section (2) and verify that the groups are sent in a claim named "groups".
From the SAML Signing Certificate section (3), click Download to obtain the Microsoft Entra ID certificate key, which will be uploaded into Fabric for signing authentication requests.
|
|
Upload the public key certificate used to encrypt the SAML assertion, as exported from Fabric. Read more here in SAML Configuration > Preparations > Provide to the IDP.
From the 4th section - Set up \
(in our example "FabricSSO K2v") - copy the IDP parameters - Login URL and Microsoft Entra ID Identifier, to be populated at the Fabric SAML configuration for IDP_ENTITYID and IDP_SINGLE_SIGN_ON_SERVICE_URL parameters.
Configuration instructions: For Fabric
In addition to the instructions detailed here, setting up SAML with Microsoft Entra ID requires adding a configuration parameter to the config.ini file: SECURITY_WANT_NAMEID_ENCRYPTED=false
