


TDM AI-driven Synthetic Generation Installation
K2View’s Test Data Management (TDM) 9.0 equips your QA and development teams with cutting-edge AI-driven synthetic data generation, transforming test data creation from manual rule-based scripts into smart automation:
- AI-First Data Synthesis: TDM seamlessly integrates with AI models to train on your existing data schema and generate realistic, production-grade synthetic entities—all within the platform.
- One-Click AI Workflows: Simply select a business entity, choose your training model, specify volume, and launch a “generate new data” task. The system handles model selection, data ingestion into Fabric, and optional direct loading into test environments
- Robust Implementation Controls: Easily configure AI endpoints using global settings—like AI_DB_INTERFACE, AI_ENVIRONMENT, and AI_EXECUTION—so teams can tailor connectivity, environments, and cleanup protocols
- Hybrid, Business-Ready Approach: Choose between rule-based or AI-based generation per scenario—ideal for use cases ranging from edge-case testing to large-scale synthetic population
- Seamless Integration & Compliance: Generated entities come with built-in handling for sequence IDs, LUI mapping, and referential integrity. All data is cataloged in Fabric and masked as needed.
To learn more, review the TDM-AI project implementation guidelines available here.
This TDM AI installation guide outlines the key infrastructure and application setup steps required to integrate K2View TDM 9.0 with AI-powered capabilities, covering everything from GPU-enabled environment provisioning to project configuration, cleanup processes, and performance testing.
This document describes the infrastructure and the application setup for integrating TDM with AI.
Table of Contents
- Prerequisites
- GPU-based GKE Creation
- TDM Project Configuration
- Manual Cleanup Flow
- AI Tests - Performance Results
Prerequisites
- K2view cloud site
- GCP account
- GCP project with the necessary permissions for creating:
- VPC
- GKE
- AlloyDB (optional)
- Training task image in Artifact Registry
- Generation task image in Artifact Registry
- GCP quota for
- At least 1 NVIDIA A100 40GB GPU
- At least 12 A2 CPUs
- gcloud installed
- kubectl installed
GPU-based GKE Creation
VPC
- Open GCP console
- Go to VPC network section and click on "Create VPC network"
- Populate the following:
- VPC Name
- Subnet creation mode: Custom
- Subnet Name
- Region
- IPv4 range
Keep the default values for the remaining parameters.
GKE
- Open GCP console
- Go to Kubernetes Engine -> Clusters
- Click "Create"
- Click "Configure" in the "Standard: You manage your cluster" option
- Populate the following:
- Cluster basics
- Name
- Location type: Zonal
- Zone (choose a zone from the region that you have created in the VPC section of this document)
- Default Pool
- Name
- Number of nodes: 1
- Nodes
- Machine configuration: GPUs
- GPU type: NVIDIA A100 40GB
- Number of GPUs: 1
- GPU Driver installation: Google-managed
- Select a driver version: Latest
- Machine type: a2-highgpu-1g (12 vCPU, 6 core, 85 GB memory)
- Boot disk size: 500
- Networking
- Network: Choose the network that you have created in the VPC section of this document
- Node subnet: Choose the subnet that you created in the VPC section of this document
- Following the population of all parameters, click "Create".
- Following the creation of the cluster, connect it to your kubectl by clicking on the cluster's name -> Connect -> Command-line access. Copy the content, paste it and run it in your terminal.
- Validate the installation.
kubectl config current-context # Check the kubectl is connected to your cluster
kubectl get ns # Check that you can see the namespaces of the cluster
Admin Token
An admin token enables Fabric to interact with the Kubernetes API server using an HTTP/HTTPS interface.
- Create a file named "admin-user.yaml".
- Copy and paste the following content into that file:
apiVersion: v1
kind: ServiceAccount
metadata:
  name: full-admin-user
  namespace: kube-system
---
apiVersion: rbac.authorization.k8s.io/v1
kind: ClusterRoleBinding
metadata:
  name: full-admin-user
roleRef:
  apiGroup: rbac.authorization.k8s.io
  kind: ClusterRole
  name: cluster-admin
subjects:
  - kind: ServiceAccount
    name: full-admin-user
    namespace: kube-system
---
apiVersion: v1
kind: Secret
type: kubernetes.io/service-account-token
metadata:
  name: full-admin-user-secret
  namespace: kube-system
  annotations:
    kubernetes.io/service-account.name: full-admin-user
- Apply the file
kubectl apply -f admin-user.yaml
- Get the token
token=$(kubectl -n kube-system describe secret $(kubectl -n kube-system get secret | grep "full-admin-user-secret" | awk '{print $1}')| grep token: |awk '{print $2}')
echo $token

# Alternative way to see the token
kubectl describe secrets/full-admin-user-secret -n kube-system
- Copy the token; it is needed for later steps.
TDM Project Configuration
Click here for TDM-AI project implementation guidelines.
Manual Cleanup Flow
The cleanup process, AICleanUp.flow, is located under the TDM LU with the inputs CleanALL (boolean data type), and TrainingExecutionIDs (array data type). If CleanALL is true, the flow deletes all the data in the AI_execution and AI_DB, else you shall populate TrainingExecutionIDs. For example, if you have 2 training models that hold the IDs 1551,1660, you should pass them to the flow as [1551,1660]. The flow extracts all generations done by these training models and deletes all their related data.
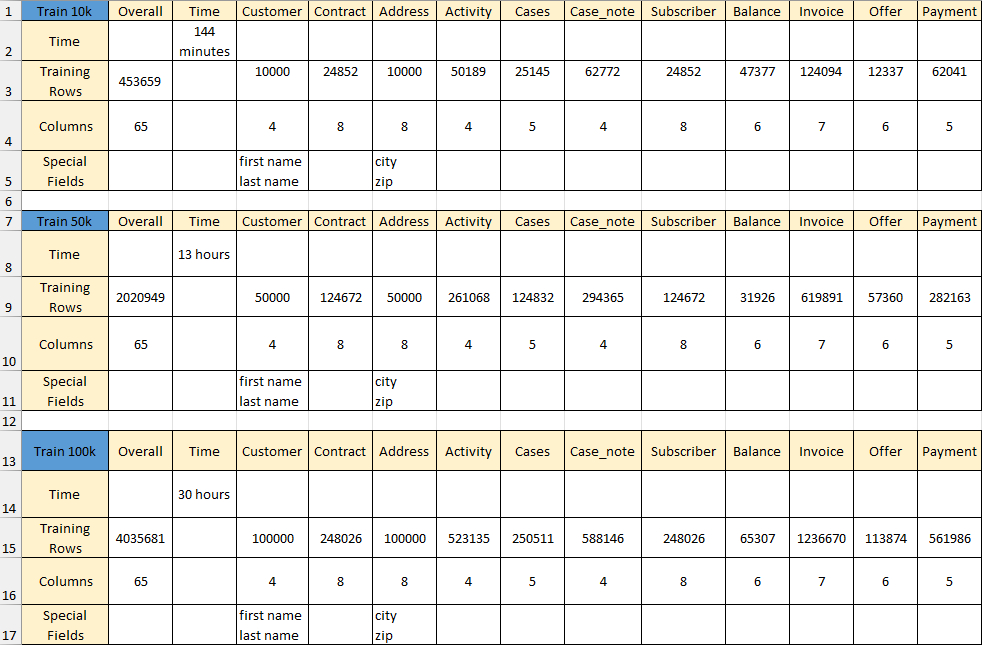
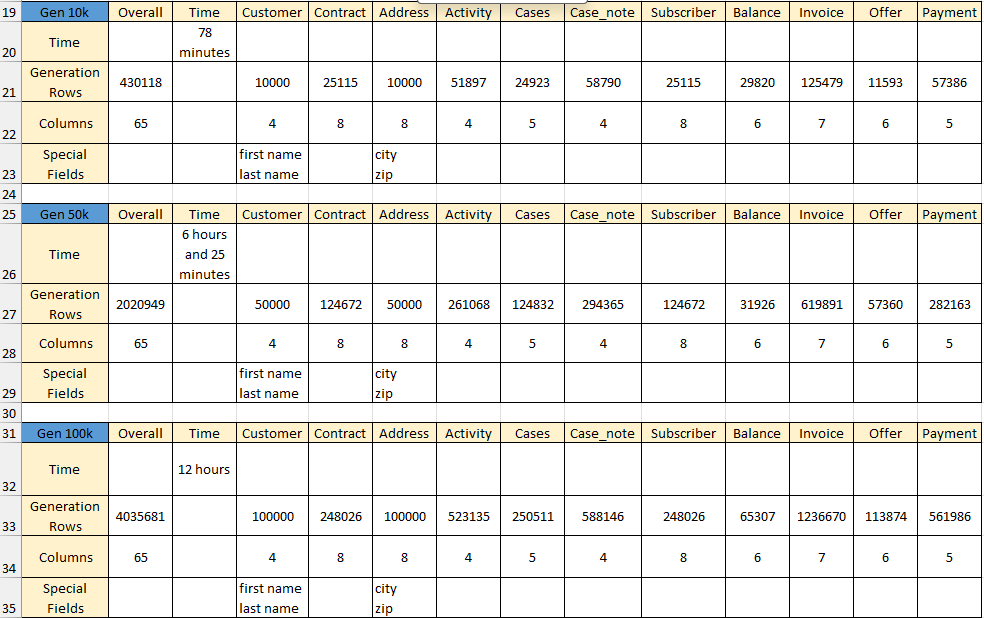
AI Tests - Performance Results
AI Training Results:
AI Generation Results:
TDM AI-driven Synthetic Generation Installation
K2View’s Test Data Management (TDM) 9.0 equips your QA and development teams with cutting-edge AI-driven synthetic data generation, transforming test data creation from manual rule-based scripts into smart automation:
- AI-First Data Synthesis: TDM seamlessly integrates with AI models to train on your existing data schema and generate realistic, production-grade synthetic entities—all within the platform.
- One-Click AI Workflows: Simply select a business entity, choose your training model, specify volume, and launch a “generate new data” task. The system handles model selection, data ingestion into Fabric, and optional direct loading into test environments
- Robust Implementation Controls: Easily configure AI endpoints using global settings—like AI_DB_INTERFACE, AI_ENVIRONMENT, and AI_EXECUTION—so teams can tailor connectivity, environments, and cleanup protocols
- Hybrid, Business-Ready Approach: Choose between rule-based or AI-based generation per scenario—ideal for use cases ranging from edge-case testing to large-scale synthetic population
- Seamless Integration & Compliance: Generated entities come with built-in handling for sequence IDs, LUI mapping, and referential integrity. All data is cataloged in Fabric and masked as needed.
To learn more, review the TDM-AI project implementation guidelines available here.
This TDM AI installation guide outlines the key infrastructure and application setup steps required to integrate K2View TDM 9.0 with AI-powered capabilities, covering everything from GPU-enabled environment provisioning to project configuration, cleanup processes, and performance testing.
This document describes the infrastructure and the application setup for integrating TDM with AI.
Table of Contents
- Prerequisites
- GPU-based GKE Creation
- TDM Project Configuration
- Manual Cleanup Flow
- AI Tests - Performance Results
Prerequisites
- K2view cloud site
- GCP account
- GCP project with the necessary permissions for creating:
- VPC
- GKE
- AlloyDB (optional)
- Training task image in Artifact Registry
- Generation task image in Artifact Registry
- GCP quota for
- At least 1 NVIDIA A100 40GB GPU
- At least 12 A2 CPUs
- gcloud installed
- kubectl installed
GPU-based GKE Creation
VPC
- Open GCP console
- Go to VPC network section and click on "Create VPC network"
- Populate the following:
- VPC Name
- Subnet creation mode: Custom
- Subnet Name
- Region
- IPv4 range
Keep the default values for the remaining parameters.
GKE
- Open GCP console
- Go to Kubernetes Engine -> Clusters
- Click "Create"
- Click "Configure" in the "Standard: You manage your cluster" option
- Populate the following:
- Cluster basics
- Name
- Location type: Zonal
- Zone (choose a zone from the region that you have created in the VPC section of this document)
- Default Pool
- Name
- Number of nodes: 1
- Nodes
- Machine configuration: GPUs
- GPU type: NVIDIA A100 40GB
- Number of GPUs: 1
- GPU Driver installation: Google-managed
- Select a driver version: Latest
- Machine type: a2-highgpu-1g (12 vCPU, 6 core, 85 GB memory)
- Boot disk size: 500
- Networking
- Network: Choose the network that you have created in the VPC section of this document
- Node subnet: Choose the subnet that you created in the VPC section of this document
- Following the population of all parameters, click "Create".
- Following the creation of the cluster, connect it to your kubectl by clicking on the cluster's name -> Connect -> Command-line access. Copy the content, paste it and run it in your terminal.
- Validate the installation.
kubectl config current-context # Check the kubectl is connected to your cluster
kubectl get ns # Check that you can see the namespaces of the cluster
Admin Token
An admin token enables Fabric to interact with the Kubernetes API server using an HTTP/HTTPS interface.
- Create a file named "admin-user.yaml".
- Copy and paste the following content into that file:
apiVersion: v1
kind: ServiceAccount
metadata:
  name: full-admin-user
  namespace: kube-system
---
apiVersion: rbac.authorization.k8s.io/v1
kind: ClusterRoleBinding
metadata:
  name: full-admin-user
roleRef:
  apiGroup: rbac.authorization.k8s.io
  kind: ClusterRole
  name: cluster-admin
subjects:
  - kind: ServiceAccount
    name: full-admin-user
    namespace: kube-system
---
apiVersion: v1
kind: Secret
type: kubernetes.io/service-account-token
metadata:
  name: full-admin-user-secret
  namespace: kube-system
  annotations:
    kubernetes.io/service-account.name: full-admin-user
- Apply the file
kubectl apply -f admin-user.yaml
- Get the token
token=$(kubectl -n kube-system describe secret $(kubectl -n kube-system get secret | grep "full-admin-user-secret" | awk '{print $1}')| grep token: |awk '{print $2}')
echo $token

# Alternative way to see the token
kubectl describe secrets/full-admin-user-secret -n kube-system
- Copy the token; it is needed for later steps.
TDM Project Configuration
Click here for TDM-AI project implementation guidelines.
Manual Cleanup Flow
The cleanup process, AICleanUp.flow, is located under the TDM LU with the inputs CleanALL (boolean data type), and TrainingExecutionIDs (array data type). If CleanALL is true, the flow deletes all the data in the AI_execution and AI_DB, else you shall populate TrainingExecutionIDs. For example, if you have 2 training models that hold the IDs 1551,1660, you should pass them to the flow as [1551,1660]. The flow extracts all generations done by these training models and deletes all their related data.
AI Tests - Performance Results
AI Training Results:
AI Generation Results:
