

Graphit Parameters
Graphit allows you to define input parameters whereby the generated documents are executed using various settings like LUIs, LU table columns and other specific parameters that require processing.
Parameters can be set when:
- Running Graphit in Debug mode in the Fabric Studio.
- Invoking Graphit directly from Swagger or another http link.
- Calling Graphit from a Web Service whereby parameters are parsed as a mapped object.
Graphit Window - How Do I Configure Graphit Parameters?
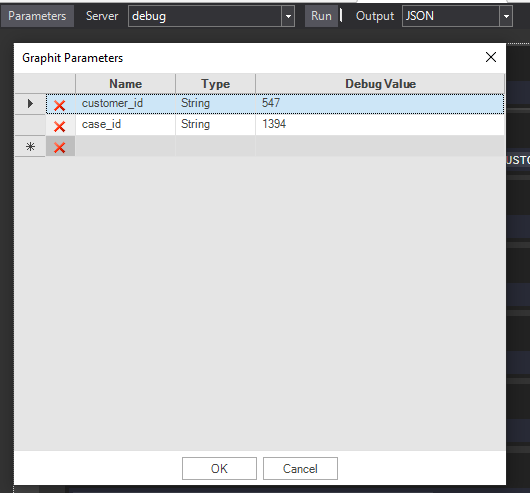
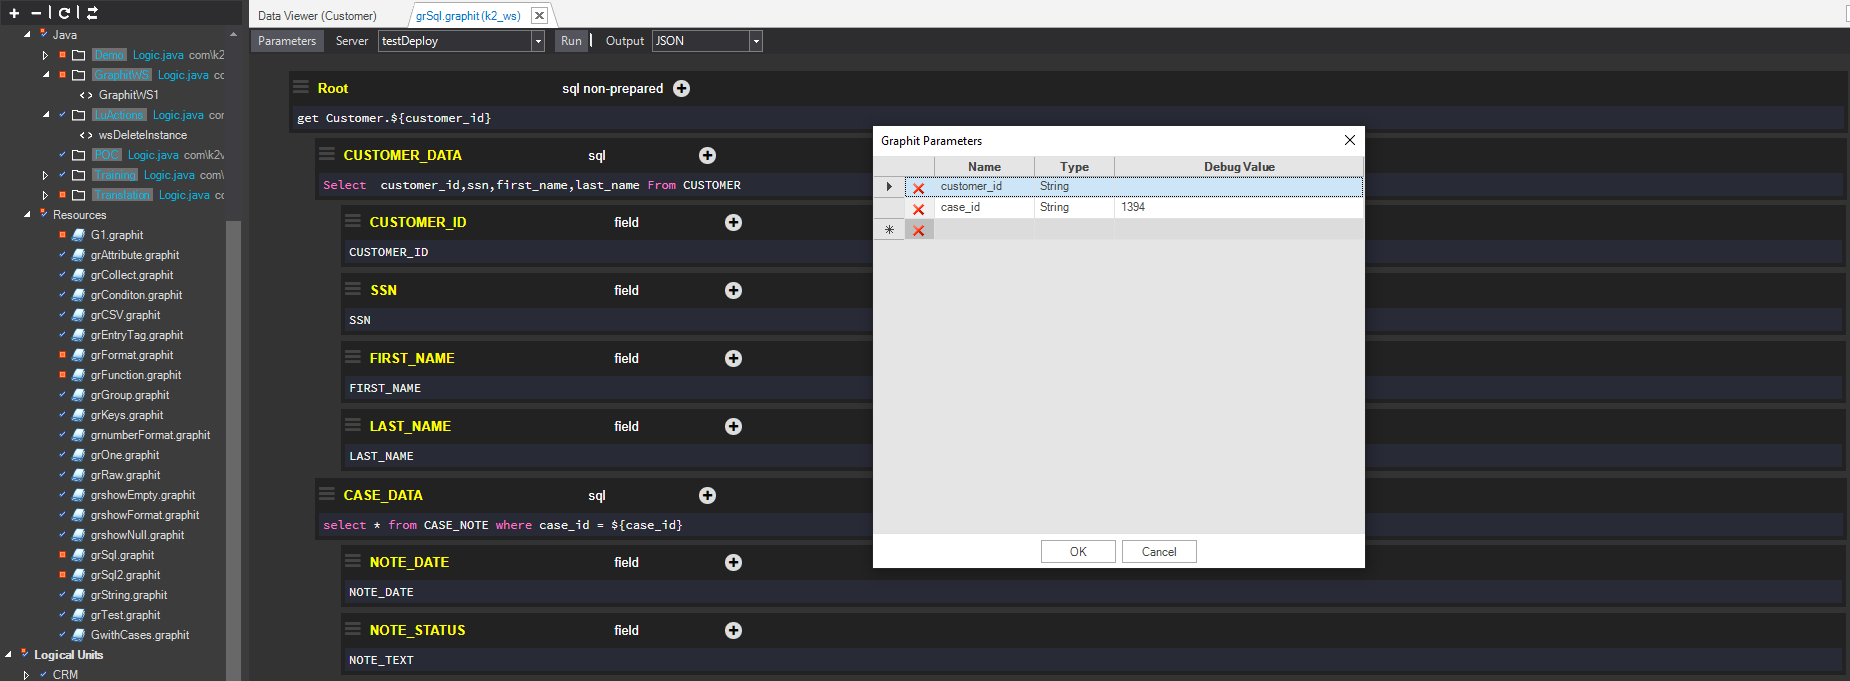
Click Parameters in the Graphit window to open the Graphit Parameters dialog box.
Graphit Parameters are added to support the following:
- Running Graphit from the Fabric Studio in Debug mode.
- Running a GET request for the Graphit file according to the parameters defined in the Graphit Parameters dialog box. The parameters are added to the URL. In addition, the input parameters are displayed when invoking the Graphit file using Swagger.
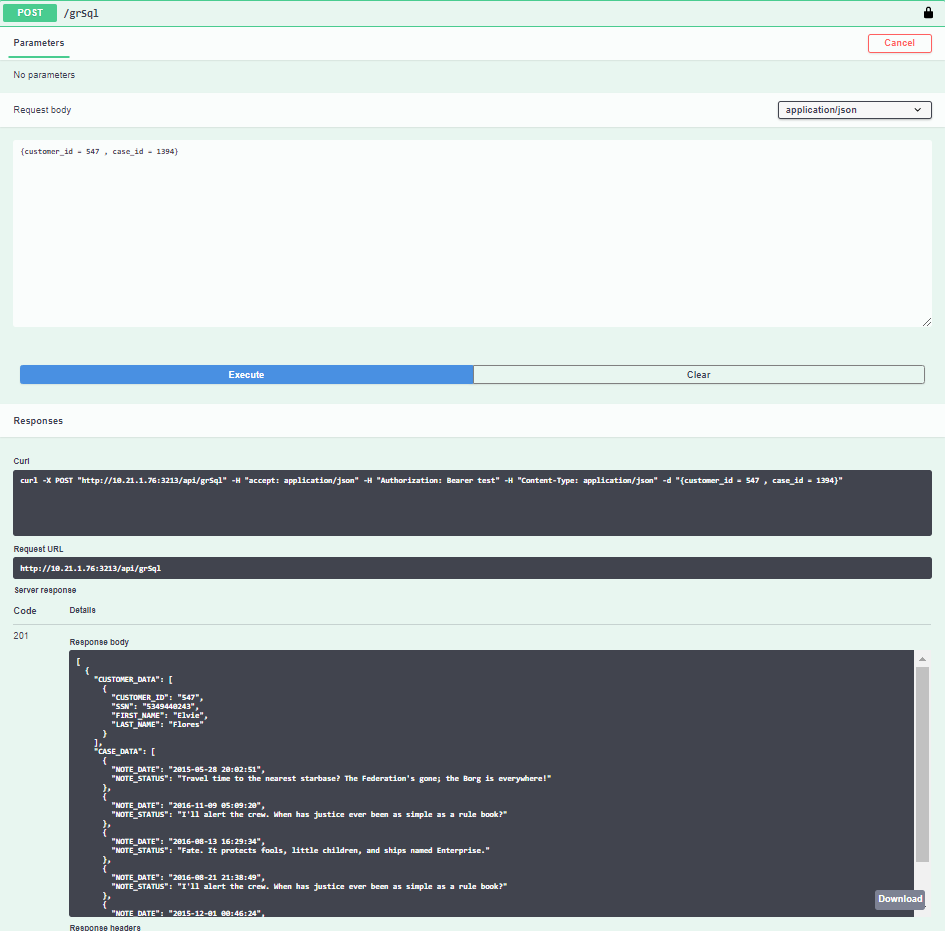
Note that if the parameters have not been added to the Graphit Parameters dialog box, you can create a POST request for the Graphit file and add the parameters in the Request body. Alternatively, you can wrap the Graphit file using a Web Service and send the parameters to the Graphit file via the Web Service.
How Do I Configure Parameters When Running Graphit From Fabric Studio?
When creating a Graphit file, parameters can be defined using the ${} symbols to refer to the value that is set in the Parameters window. In this specific case, you must also define a Debug value in the Parameter window. If not, the response is empty.
Example:
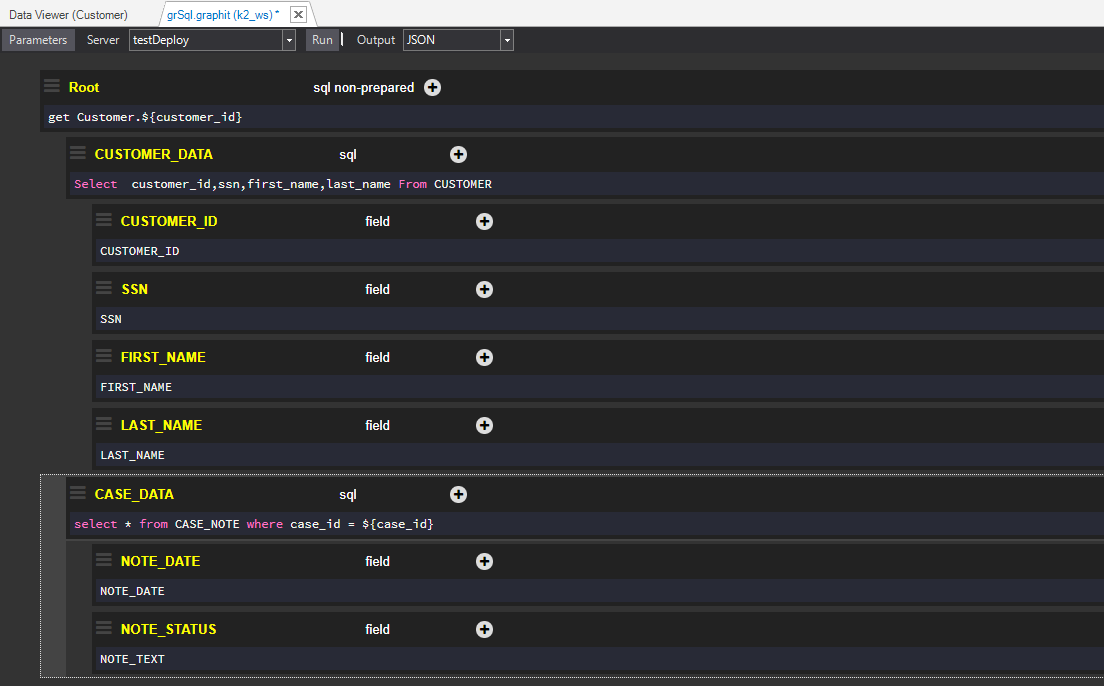
The grSql.graphit file generates a JSON file that returns the values of the following fields:
- Customer_ID, SSN, first_name and last_name of a customer whose Instance ID = 547.
- Date and status of Case ID = 1394.
- Generic SELECT statement that retrieves Instance 547: get Customer.${customer_id}.
The queries for the SELECT statements are:
- Select customer_id,ssn,first_name,last_name From Customer.CUSTOMER where CUSTOMER_ID = ${customer_id}.
- Select * from CASE_NOTE where case_id = ${case_id}
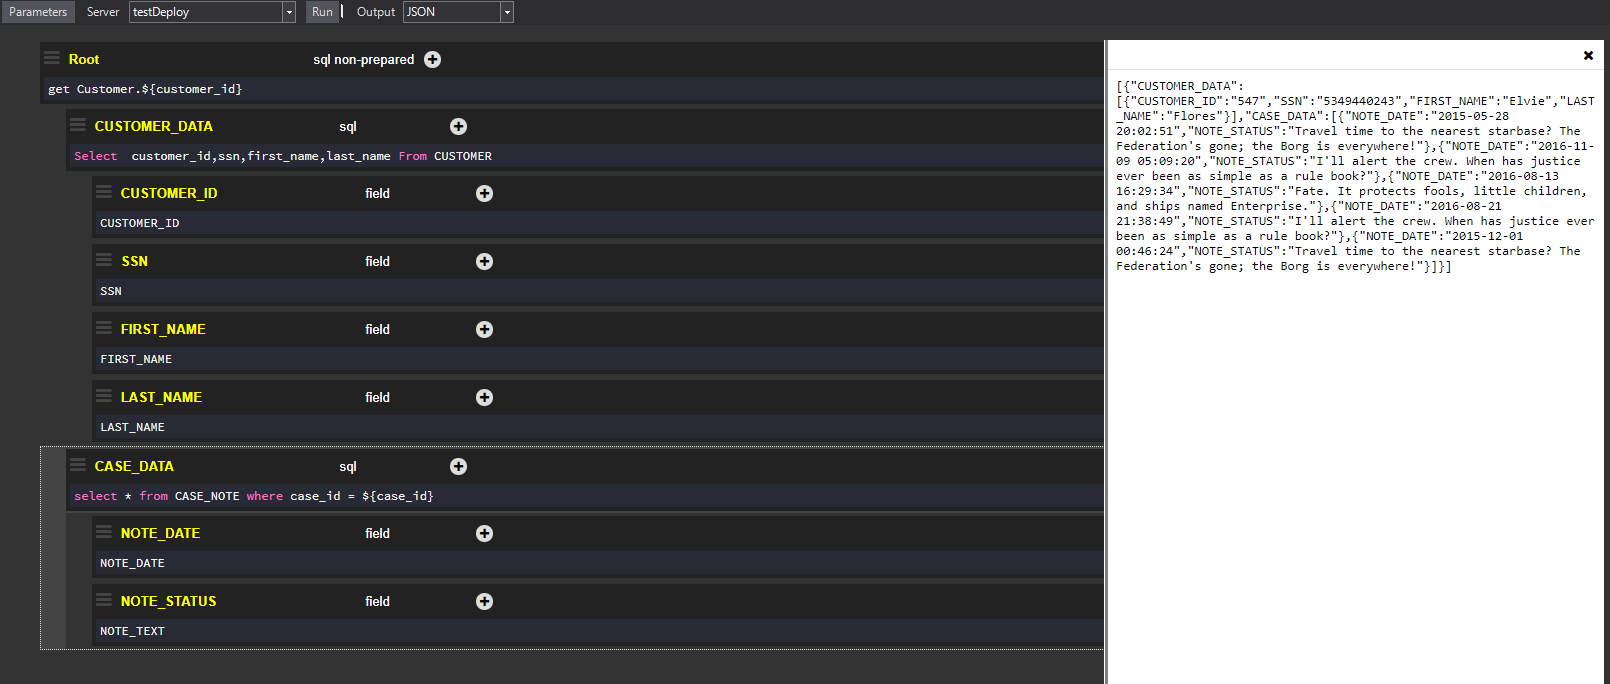
The following screenshot displays the Graphit file:
Before running the file, a Debug value is assigned to the ${customer_id} and ${case_id} input parameters.
Click Run to see the results on the right side of the output window.
How Do I Configure Parameters When Calling Graphit Directly From Swagger?
Add the parameters to the Parameters window to create a GET request for the Graphit file and populate the parameters in Swagger.
Note that to execute the Graphit file, populate the parameter's value in Swagger. The Debug values are only taken as input in Debug mode.
Example:
Using the same grSql.graphit Graphit file as in the previous example, in the following screenshot the customer_id Debug value has been left empty intentionally.
As indicated below, the two Parameters fields are marked as required.

The customer_id=547 and case_id=1394 values are filled in the Parameters fields.
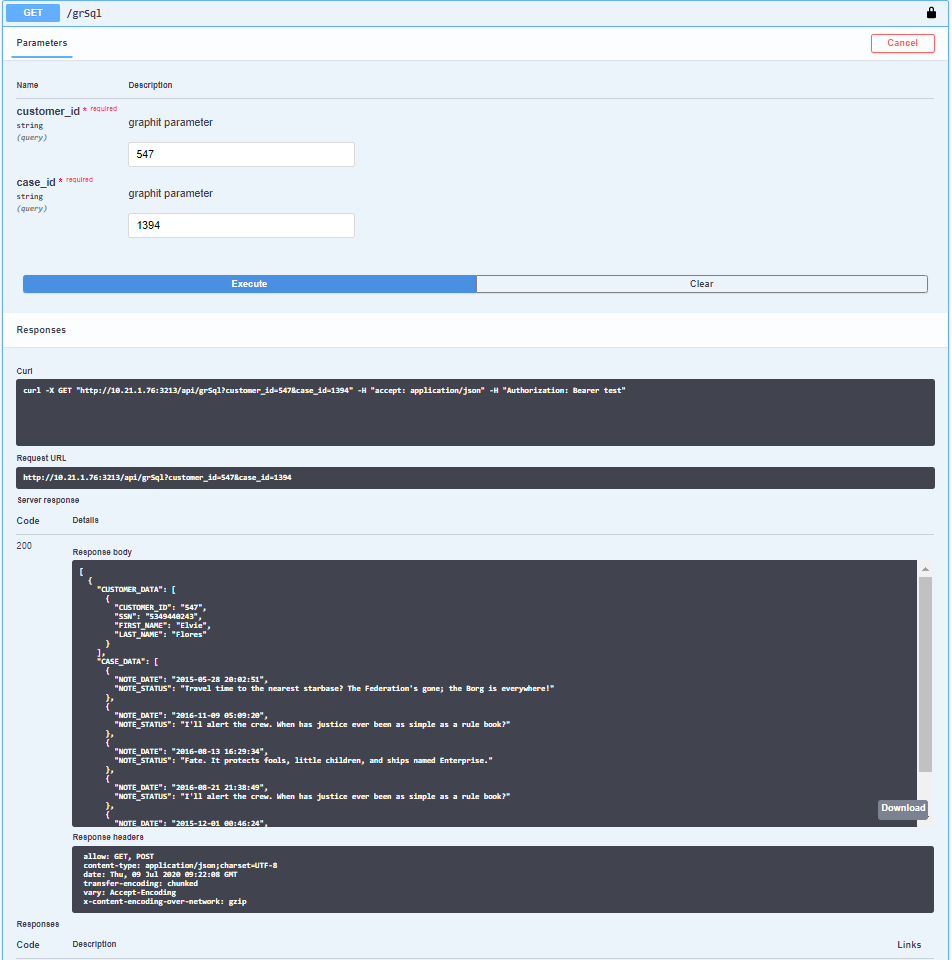
Note that when deleting all parameters in the Parameters dialog box together, the values in the GET section in the Swagger GUI cannot be specified but can be injected in the POST section, with a successful response upon execution.
How Do I Configure Parameters When Invoking Graphit From a Web Service?
A Graphit file can be invoked directly or be wrapped by a WS. When wrapped by a WS, the WS sends the parameters to Graphit which then parses them accordingly when generating the XML, JSON or CSV documents. The input parameters for the Graphit file can be populated by a parameter name or by a map object.
Example:
Map<String, Object> temp = new HashMap<>();
temp.put("input1",1000);
temp.put("input2",2463);
return graphit("grSql2.graphit", temp);
This code calls the following Graphit file which uses ${input1} and ${input2} as parameters for the customer_id and subscriber_id to populate the JSON output with relevant invoices:


Graphit Parameters
Graphit allows you to define input parameters whereby the generated documents are executed using various settings like LUIs, LU table columns and other specific parameters that require processing.
Parameters can be set when:
- Running Graphit in Debug mode in the Fabric Studio.
- Invoking Graphit directly from Swagger or another http link.
- Calling Graphit from a Web Service whereby parameters are parsed as a mapped object.
Graphit Window - How Do I Configure Graphit Parameters?
Click Parameters in the Graphit window to open the Graphit Parameters dialog box.
Graphit Parameters are added to support the following:
- Running Graphit from the Fabric Studio in Debug mode.
- Running a GET request for the Graphit file according to the parameters defined in the Graphit Parameters dialog box. The parameters are added to the URL. In addition, the input parameters are displayed when invoking the Graphit file using Swagger.
Note that if the parameters have not been added to the Graphit Parameters dialog box, you can create a POST request for the Graphit file and add the parameters in the Request body. Alternatively, you can wrap the Graphit file using a Web Service and send the parameters to the Graphit file via the Web Service.
How Do I Configure Parameters When Running Graphit From Fabric Studio?
When creating a Graphit file, parameters can be defined using the ${} symbols to refer to the value that is set in the Parameters window. In this specific case, you must also define a Debug value in the Parameter window. If not, the response is empty.
Example:
The grSql.graphit file generates a JSON file that returns the values of the following fields:
- Customer_ID, SSN, first_name and last_name of a customer whose Instance ID = 547.
- Date and status of Case ID = 1394.
- Generic SELECT statement that retrieves Instance 547: get Customer.${customer_id}.
The queries for the SELECT statements are:
- Select customer_id,ssn,first_name,last_name From Customer.CUSTOMER where CUSTOMER_ID = ${customer_id}.
- Select * from CASE_NOTE where case_id = ${case_id}
The following screenshot displays the Graphit file:
Before running the file, a Debug value is assigned to the ${customer_id} and ${case_id} input parameters.
Click Run to see the results on the right side of the output window.
How Do I Configure Parameters When Calling Graphit Directly From Swagger?
Add the parameters to the Parameters window to create a GET request for the Graphit file and populate the parameters in Swagger.
Note that to execute the Graphit file, populate the parameter's value in Swagger. The Debug values are only taken as input in Debug mode.
Example:
Using the same grSql.graphit Graphit file as in the previous example, in the following screenshot the customer_id Debug value has been left empty intentionally.
As indicated below, the two Parameters fields are marked as required.
The customer_id=547 and case_id=1394 values are filled in the Parameters fields.
Note that when deleting all parameters in the Parameters dialog box together, the values in the GET section in the Swagger GUI cannot be specified but can be injected in the POST section, with a successful response upon execution.
How Do I Configure Parameters When Invoking Graphit From a Web Service?
A Graphit file can be invoked directly or be wrapped by a WS. When wrapped by a WS, the WS sends the parameters to Graphit which then parses them accordingly when generating the XML, JSON or CSV documents. The input parameters for the Graphit file can be populated by a parameter name or by a map object.
Example:
Map<String, Object> temp = new HashMap<>();
temp.put("input1",1000);
temp.put("input2",2463);
return graphit("grSql2.graphit", temp);
This code calls the following Graphit file which uses ${input1} and ${input2} as parameters for the customer_id and subscriber_id to populate the JSON output with relevant invoices: