Create and Edit a Graphit file
How Do I Create a New Graphit File?
Go to Project Tree, click Web Services > Resources.
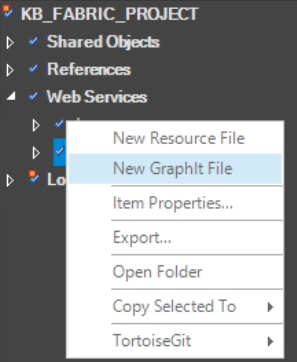
Right click New Resource Files and select New Graphit File.

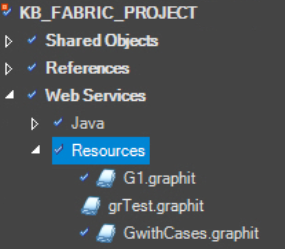
Assign a Name to the new Graphit file and Save it. Note that the filename must have a gr% prefix and contain alpha-numeric characters. Once the file is saved, it is displayed under the project's Web Services folder under Resources.

How Do I Edit a Graphit File?
Once a new Graphit file is created, you can edit it to create the required CSV / XML / JSON document structure.
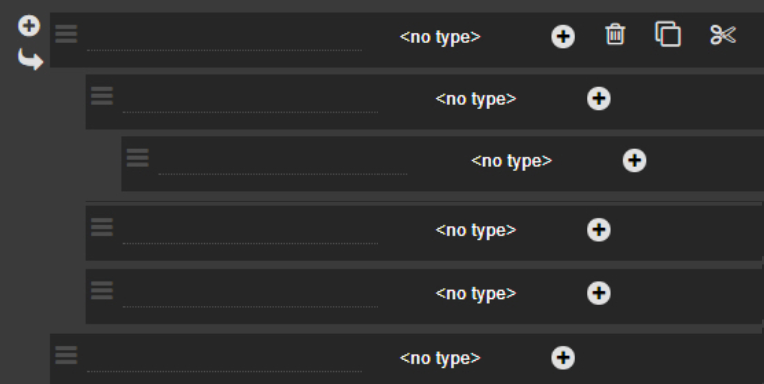
A Graphit file is structured as a hierarchical representation of nodes, where each node defines a tag or condition in the structure of the CSV, XML or JSON document.
Nodes can have children nodes and each child node can have children nodes, whereby creating nested tags in the generated document.
When creating a document, the Node Name, Type and Properties can be defined for each node.

What Are the Hierarchical Structure Options?
- Click
 Parent Node to create a new parent node under the original node on the same level.
 - Click
 Child Node to create a new child node under the parent node.
 - Click
 Delete to delete a node on the node level.
 - Click
 and drag a node to another location in the hierarchy.
How Do I Assign a Name To a Node?
To assign a Tag Name to a node, hover over the left side of the node to display its frame and then type in the Name.
- Only nodes with a tag name are displayed in the output document.
- Nodes without tag names can be used for internal purposes.
Create and Edit a Graphit file
How Do I Create a New Graphit File?
Go to Project Tree, click Web Services > Resources.
Right click New Resource Files and select New Graphit File.

Assign a Name to the new Graphit file and Save it. Note that the filename must have a gr% prefix and contain alpha-numeric characters. Once the file is saved, it is displayed under the project's Web Services folder under Resources.

How Do I Edit a Graphit File?
Once a new Graphit file is created, you can edit it to create the required CSV / XML / JSON document structure.
A Graphit file is structured as a hierarchical representation of nodes, where each node defines a tag or condition in the structure of the CSV, XML or JSON document.
Nodes can have children nodes and each child node can have children nodes, whereby creating nested tags in the generated document.
When creating a document, the Node Name, Type and Properties can be defined for each node.

What Are the Hierarchical Structure Options?
- Click
 Parent Node to create a new parent node under the original node on the same level.
 - Click
 Child Node to create a new child node under the parent node.
 - Click
 Delete to delete a node on the node level.
 - Click
 and drag a node to another location in the hierarchy.
How Do I Assign a Name To a Node?
To assign a Tag Name to a node, hover over the left side of the node to display its frame and then type in the Name.
- Only nodes with a tag name are displayed in the output document.
- Nodes without tag names can be used for internal purposes.


