

Data Population in a Translation
How Can I Populate Translation Data?
There are several options for populating data in a Translation in the Fabric Studio:
- Manual population via the Translation window.
- Importing the Translation’s data from a file. The data is loaded from the file only once.
- Importing the Translation’s data from a database to create a Dynamic Translation. The data is loaded from the database each time the Translation is invoked.
Import options are enabled via the Import screen.
How Can I Import Translation Data from a File?
After defining the Translation Schema do the following:
- Go to Translation Data tab > Import Data.
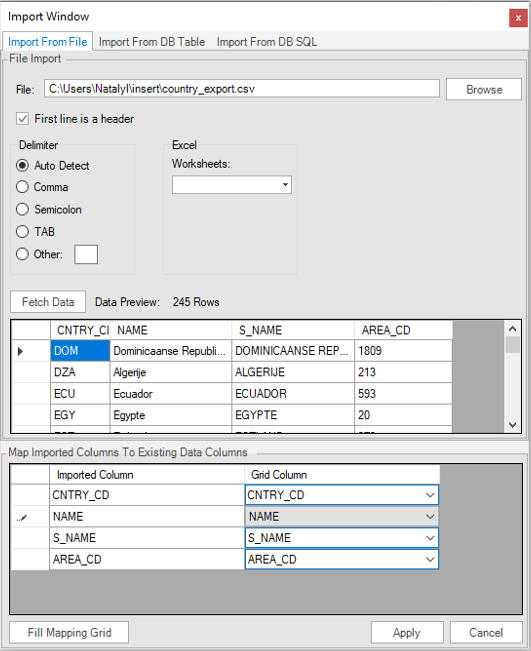
- Click the Import from File tab.
- Do the following in the Main section:
- Enter the location of the file or click Browse and search for it.
- Optional: Check First line as a header if the file includes a header, the first line will be skipped during the import.
- Select the Delimiter Type (for example a Comma delimiter).
- Optional: If the file is an Excel file, select the Worksheet Page from the dropdown list.
- Click Fetch Data to preview the imported file.
- Do the following in the Mapping section:
- Click Fill Mapping Grid to create the association between the fetched data and the Translation fields.
- Check all columns and verify the association is correct. Manually update if needed.
- Click Apply to confirm the association between the Data and Translation fields. A Confirmation notification opens indicating the number of rows imported.
- Click Save.
Example
To create a new Translation named trnCountry:

Import the data from the CSV file as follows:
Notes
- Supported file formats are text, CSV or Excel. When the file format is Excel, specify which worksheet.
- Close the Import file before importing data.
- Manual corrections may be required in the Grid columns mapping.
How Can I Import Translation Data from a Database Table?
After defining the Translation Schema, do the following:
- Go to Translation Data tab > Import Data.
- Go to the Import from DB Table tab.
- Do the following in the Database section:
- Choose the DB Connection from the dropdown list.
- Go to the Source DB Tables Tree and click the table holding the data to be imported.
- Do the following in the Mapping section:
- Click Fill Mapping Grid to create the association between the fetched data and the Translation fields.
- Check all columns and verify the association is correct. Manually update if needed.
- Click Apply to confirm the association between the data and Translation fields.
- Click Save.
How Can I Import Translation Data Using DB SQL?
After defining the Translation Schema do the following:
- Go to Translation Data tab > Import Data > Import from DB SQL tab.
- Do the following in the Database section:
- Choose the DB Connection from the dropdown list.
- Enter the SQL Query to fetch the data.
- In the Mapping section, click Fill Mapping Grid to create the association between the data and Translation fields.
- Click Apply and then click Save.


Data Population in a Translation
How Can I Populate Translation Data?
There are several options for populating data in a Translation in the Fabric Studio:
- Manual population via the Translation window.
- Importing the Translation’s data from a file. The data is loaded from the file only once.
- Importing the Translation’s data from a database to create a Dynamic Translation. The data is loaded from the database each time the Translation is invoked.
Import options are enabled via the Import screen.
How Can I Import Translation Data from a File?
After defining the Translation Schema do the following:
- Go to Translation Data tab > Import Data.
- Click the Import from File tab.
- Do the following in the Main section:
- Enter the location of the file or click Browse and search for it.
- Optional: Check First line as a header if the file includes a header, the first line will be skipped during the import.
- Select the Delimiter Type (for example a Comma delimiter).
- Optional: If the file is an Excel file, select the Worksheet Page from the dropdown list.
- Click Fetch Data to preview the imported file.
- Do the following in the Mapping section:
- Click Fill Mapping Grid to create the association between the fetched data and the Translation fields.
- Check all columns and verify the association is correct. Manually update if needed.
- Click Apply to confirm the association between the Data and Translation fields. A Confirmation notification opens indicating the number of rows imported.
- Click Save.
Example
To create a new Translation named trnCountry:
Import the data from the CSV file as follows:
Notes
- Supported file formats are text, CSV or Excel. When the file format is Excel, specify which worksheet.
- Close the Import file before importing data.
- Manual corrections may be required in the Grid columns mapping.
How Can I Import Translation Data from a Database Table?
After defining the Translation Schema, do the following:
- Go to Translation Data tab > Import Data.
- Go to the Import from DB Table tab.
- Do the following in the Database section:
- Choose the DB Connection from the dropdown list.
- Go to the Source DB Tables Tree and click the table holding the data to be imported.
- Do the following in the Mapping section:
- Click Fill Mapping Grid to create the association between the fetched data and the Translation fields.
- Check all columns and verify the association is correct. Manually update if needed.
- Click Apply to confirm the association between the data and Translation fields.
- Click Save.
How Can I Import Translation Data Using DB SQL?
After defining the Translation Schema do the following:
- Go to Translation Data tab > Import Data > Import from DB SQL tab.
- Do the following in the Database section:
- Choose the DB Connection from the dropdown list.
- Enter the SQL Query to fetch the data.
- In the Mapping section, click Fill Mapping Grid to create the association between the data and Translation fields.
- Click Apply and then click Save.
