Manual Overrides
Overview
The Catalog supports the ability to perform manual overrides.
To start the manual overrides, click Actions > Edit Catalog in the menu bar. To finish the editing, either save the changes or discard them. Upon saving, a new Catalog version is created in neo4j. Once the changes are committed to neo4j, they are marked as manual, which enables keeping them as a part of the Catalog after running the Discovery job again.
The graph's coloring scheme changes in the edit mode to the same theme as in the version comparison mode. This means that all entities and relations become grey and then every change is indicated by either green, red or purple color.
Only the latest Catalog version can be edited. This article includes the description of available manual overrides.
Edit Properties
As part of the Discovery process, properties are created for each node. Some properties are created by the Crawler (e.g., PK or source data type) and some are created by the plugins (e.g., PII or Classification). The Catalog allows to update only the properties that are predefined as editable in the properties-info.json configuration file. This definition can be updated on the project level. Click here for more information about the configuration file.

To edit an existing property:
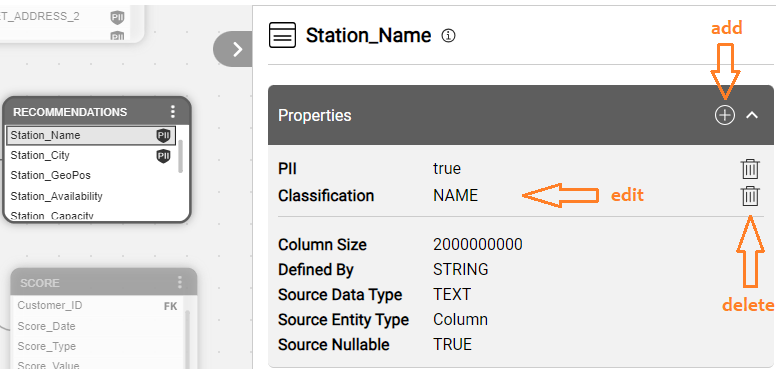
Click the property in the Properties Tab to open the More Info pop-up window and update the Value and Notes fields.
When clicking Submit in the More Info pop-up window – the change is being aggregated on the client side and is not yet sent to the server. The tab indicates the change: the row with the new value is marked in green and the row with the old value is marked in red.
When clicking Cancel – the change performed in the More Info pop-up window is being discarded.
To delete a property, click the
 icon. Only editable or manually added properties can be deleted.
To add a new property, click the
 icon and populate the Name, Value and Notes fields via the More Info pop-up window. An ID will be generated according to the property's path, the Origin will be set to Manual and the Score to 1.
- When adding a new property, you can either select the property name from a predefined list or create a completely new property.
Edit Relations
The relations can be modified as follows:
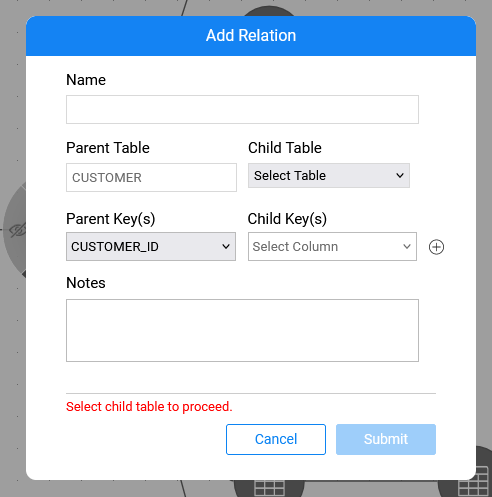
- To add a new relation, click on the Dataset1 (the parent table) and select Add Relation from its context menu. Then, click the Dataset2 (the child table). The Add Relation pop-up window will open with the following:
- The name of the new link: Dataset2 refers to Dataset1.
- Parent Table Name is Dataset1 and Parent Key(s) are the primary key columns of the Dataset1.
- Child Table Name is Dataset2.
- Populate the Child Key(s) and notes, and save the link.
- An alternative way to add a new relation is to select Add Relation To.
- The Add Relation pop-up window will open where you need to first select the Child Table and then populate the Child Key(s).

- To delete a link, click the
 icon in the relation's Properties tab.
Only refers to relations can be edited.
Saving Manual Overrides
While the Catalog is in the edit mode, all updates are aggregated on the client side only. Once the manual changes have been made, the Save button should be clicked in the menu bar. This will trigger saving of all the changes together and would create a new version. The Catalog will then exit the edit mode.
Alternatively, it is possible to exit the edit mode without saving any changes, by clicking the Discard button.
The Save and Discard buttons are only visible when the Catalog application is in an edit mode.
Manual Overrides
Overview
The Catalog supports the ability to perform manual overrides.
To start the manual overrides, click Actions > Edit Catalog in the menu bar. To finish the editing, either save the changes or discard them. Upon saving, a new Catalog version is created in neo4j. Once the changes are committed to neo4j, they are marked as manual, which enables keeping them as a part of the Catalog after running the Discovery job again.
The graph's coloring scheme changes in the edit mode to the same theme as in the version comparison mode. This means that all entities and relations become grey and then every change is indicated by either green, red or purple color.
Only the latest Catalog version can be edited. This article includes the description of available manual overrides.
Edit Properties
As part of the Discovery process, properties are created for each node. Some properties are created by the Crawler (e.g., PK or source data type) and some are created by the plugins (e.g., PII or Classification). The Catalog allows to update only the properties that are predefined as editable in the properties-info.json configuration file. This definition can be updated on the project level. Click here for more information about the configuration file.

To edit an existing property:
Click the property in the Properties Tab to open the More Info pop-up window and update the Value and Notes fields.
When clicking Submit in the More Info pop-up window – the change is being aggregated on the client side and is not yet sent to the server. The tab indicates the change: the row with the new value is marked in green and the row with the old value is marked in red.
When clicking Cancel – the change performed in the More Info pop-up window is being discarded.
To delete a property, click the
 icon. Only editable or manually added properties can be deleted.
To add a new property, click the
 icon and populate the Name, Value and Notes fields via the More Info pop-up window. An ID will be generated according to the property's path, the Origin will be set to Manual and the Score to 1.
- When adding a new property, you can either select the property name from a predefined list or create a completely new property.
Edit Relations
The relations can be modified as follows:
- To add a new relation, click on the Dataset1 (the parent table) and select Add Relation from its context menu. Then, click the Dataset2 (the child table). The Add Relation pop-up window will open with the following:
- The name of the new link: Dataset2 refers to Dataset1.
- Parent Table Name is Dataset1 and Parent Key(s) are the primary key columns of the Dataset1.
- Child Table Name is Dataset2.
- Populate the Child Key(s) and notes, and save the link.
- An alternative way to add a new relation is to select Add Relation To.
- The Add Relation pop-up window will open where you need to first select the Child Table and then populate the Child Key(s).

- To delete a link, click the
 icon in the relation's Properties tab.
Only refers to relations can be edited.
Saving Manual Overrides
While the Catalog is in the edit mode, all updates are aggregated on the client side only. Once the manual changes have been made, the Save button should be clicked in the menu bar. This will trigger saving of all the changes together and would create a new version. The Catalog will then exit the edit mode.
Alternatively, it is possible to exit the edit mode without saving any changes, by clicking the Discard button.
The Save and Discard buttons are only visible when the Catalog application is in an edit mode.


