


Exporting and Importing a Fabric Project
Fabric Studio has a proprietary encapsulation functionality that encapsulates an entire project or selected components. Fabric projects can be backed up and restored using the Export and Import options that trigger the encapsulation and decapsulation processes.
Exporting Selected Project Components
There are 2 Export options:
- Export an entire project, or
- Export a specific object, for example:
- Group of items - Shared Objects, References, Web Services, LUs.
- Sub-groups - Interfaces, Java, Resources, Translations, Tables.
- Java files (categories).
- Objects - you can export a specific object from the Project Tree; however, Java functions cannot be exported using this method.
To export a project, perform the following:
- Right-click on either the Project Group or Object and then click Export.
- Select the exported file’s Name and Location and then click Save. A new file will then be created with a k2export extension.
Importing Selected Project Components
You can import an entire exported project or specific branches of a Project Tree, where the imported objects are attached to an existing project.
Notes
- There is no support for backward compatibility. Importing a project, which is exported from a later version of K2view Fabric Studio, is not supported.
- Only the same type of object can be imported. For example, Logical Unit to Logical Unit, LU Table to LU Table, Java Files to Java Files. You can also copy the same type of object into another group, i.e., Java files from Shared Objects into Reference Java files.
- The Import process is implemented on a Java files level and not on Java functions. Therefore, when a Java file is imported, it overwrites the entire file, including its Java functions.
- When updating a specific function in a Java file, add the function manually to the Java file.
- Java files are imported into the Category level of the Logic File.
- Importing Globals to an existing Globals file does not overwrite the existing Java file. Both files are merged into one file. In case they have the same name, the new file overwrites the existing file with the value of the imported variable.
How Can I Import a K2EXPORT File Into My Project?
Import Options
- Import All - imports the entire exported project; several confirmation messages are displayed during the import process, validating whether to override the existing files, to create a new LU, etc.
- Custom Import - enables you to either select the exported objects or group items to be imported.
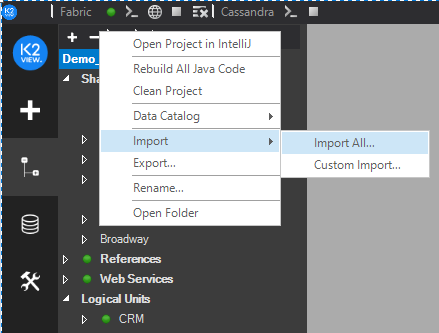
Import All Process
- Right-click on the root of the Project Tree, click on Import and then choose Import All to open the File Browser and select the k2export file to be imported.
Select the file and click Open:
a. Select the LU from the drop-down list to import the files to and click OK, or click Ignore to skip.\ b. When importing files to a non-existent LU, select the targeted LU or create a new LU saved with the exported LU file name.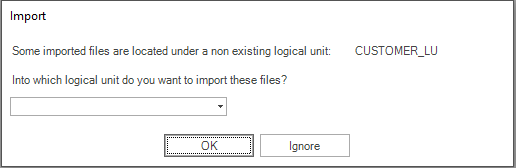
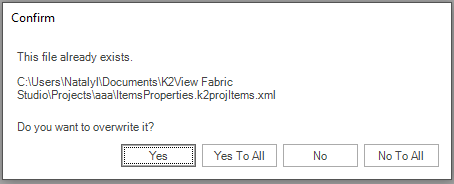
A confirmation message appears in a pop-up window, asking you whether you want to:\ a. Overwrite the specific file.\ b. Overwrite all the conflicting files in the import package.\ c. Decline the overwrite of the specific file.\ d. Decline the overwrite of all the conflicting files.
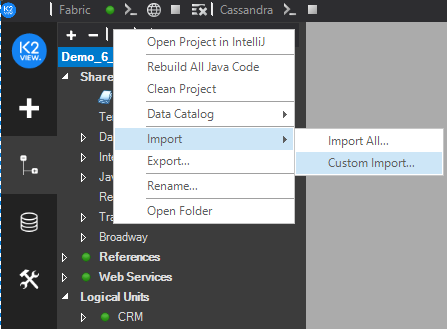
Custom Import Process
- Right-click on the root of Project Tree, click on Import and then click Custom Import.
- Click the branches and items to import from the file and then click and drag the
 icon to the current project’s structure (right pane).
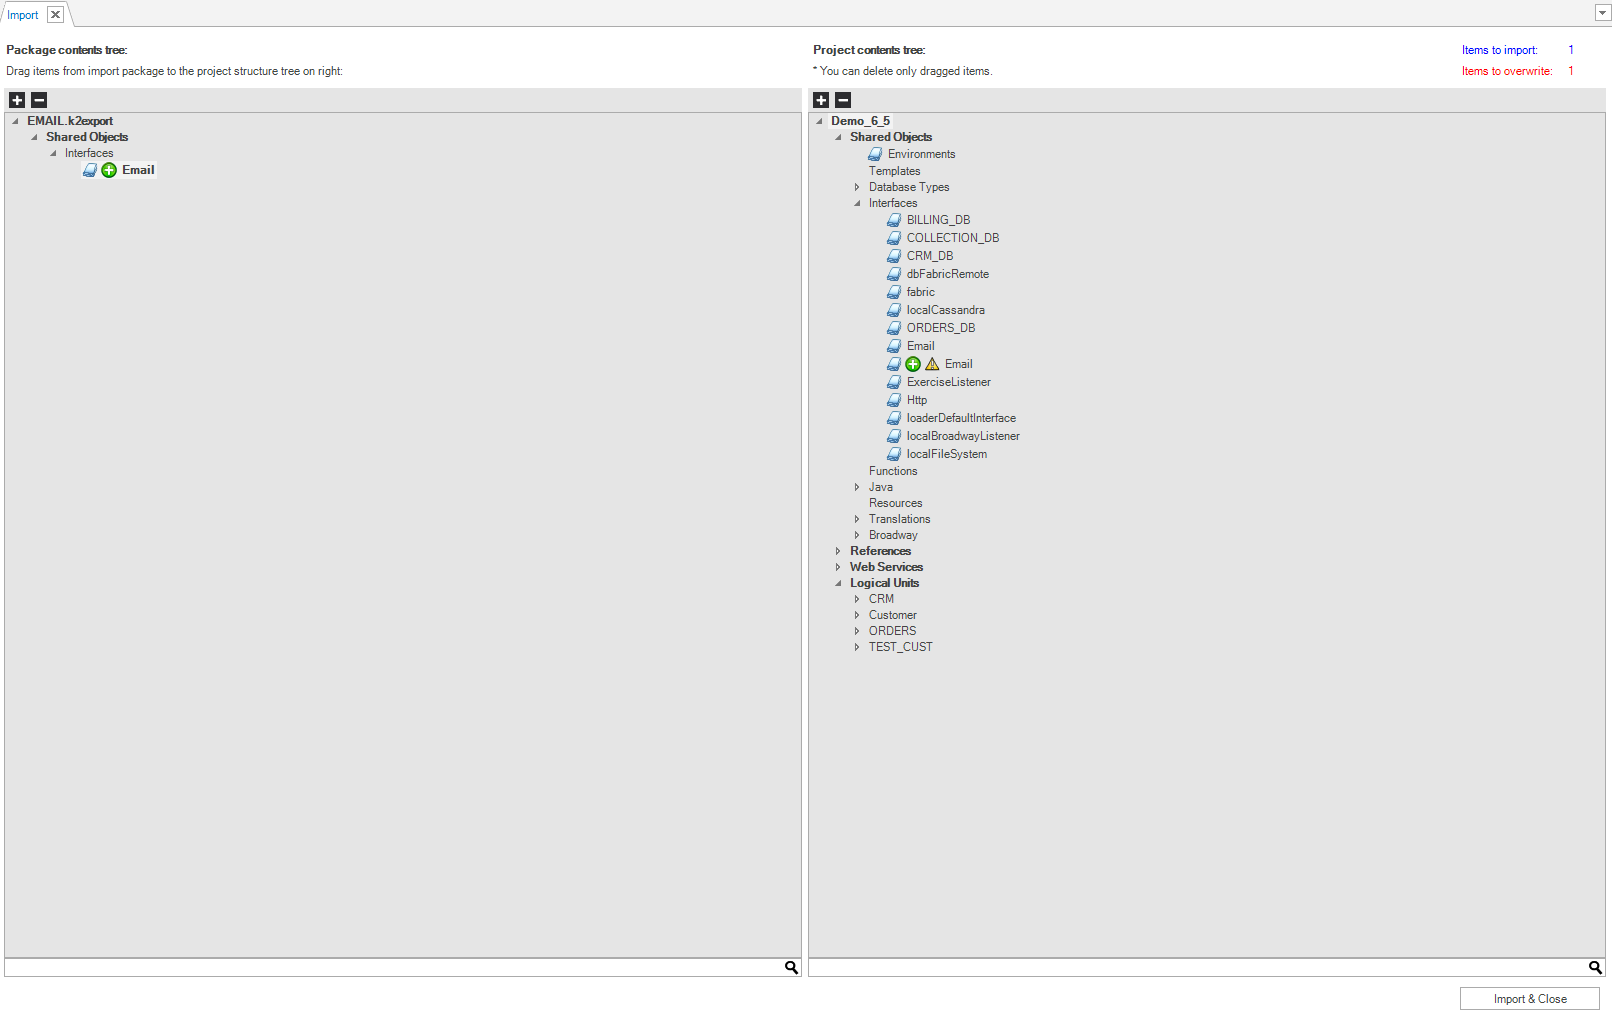
The Custom Import window displays the number of imported and overwritten items.
Right-click the Target Project Tree to display a context menu with the following options:
a. Remove All Conflicted Items - removes all conflicting items from the target, where only new items will remain.\ b. Remove Import Items - removes selected items only. Right-click an item to select it.\ c. Show Conflicted Items Only - displays only items that conflict with existing items.\ d. Show Import Item Only - displays imported items only.\ e. Show All Items - displays all items in the Project Tree.
Click on Import & Close (bottom-right corner of the screen) to confirm the Import process and to close Import tab.
A confirmation window opens, asking whether you want to either:
a. Overwrite the specific file.\ b. Overwrite all the conflicting files in the import package.\ c. Decline the overwrite of the specific file.\ d. Decline the overwrite of all conflicting files.
Notes
When importing objects with the same name and location in the Project Tree, a yellow triangular notification icon is displayed next to the imported objects. The imported objects overwrite the existing objects.


Import / Upload Files
Importing project files or folders into your project can be done by either:
Using the File > Upload Files… available at top menu bar, when the target folder in the Project Tree is selected.
Dragging and dropping them from your PC/Mac folder into the required location.
Using the context menu (right-click) on the target folder in the Project Tree.
The upload progress will be displayed at the bottom-right corner of the screen:

Note:
- As this is a standard IDE file upload action, there is no validation of what you are uploading and whereto.
- When asked about overwriting elements, your selection affects all uploaded files.
Export / Download Project
To export the whole project:
- From Fabric in the top menu bar, choose Export Project To Zip File…
- Type the name of the target zip file.
- The zip file will be generated and located in project's root folder.
- Right-click to download it.
Export / Download Files or Folders
To export files or folders:
- Choose them in the Project Tree, and then
- Use the File > Download available from top menu bar or context menu (right-click) > Download option.
The files and folders are then downloaded into your PC/Mac.
Note: When selecting folders or multiple files, the download outcome is a compressed TAR file.
Exporting and Importing a Fabric Project
Fabric Studio has a proprietary encapsulation functionality that encapsulates an entire project or selected components. Fabric projects can be backed up and restored using the Export and Import options that trigger the encapsulation and decapsulation processes.
Exporting Selected Project Components
There are 2 Export options:
- Export an entire project, or
- Export a specific object, for example:
- Group of items - Shared Objects, References, Web Services, LUs.
- Sub-groups - Interfaces, Java, Resources, Translations, Tables.
- Java files (categories).
- Objects - you can export a specific object from the Project Tree; however, Java functions cannot be exported using this method.
To export a project, perform the following:
- Right-click on either the Project Group or Object and then click Export.
- Select the exported file’s Name and Location and then click Save. A new file will then be created with a k2export extension.
Importing Selected Project Components
You can import an entire exported project or specific branches of a Project Tree, where the imported objects are attached to an existing project.
Notes
- There is no support for backward compatibility. Importing a project, which is exported from a later version of K2view Fabric Studio, is not supported.
- Only the same type of object can be imported. For example, Logical Unit to Logical Unit, LU Table to LU Table, Java Files to Java Files. You can also copy the same type of object into another group, i.e., Java files from Shared Objects into Reference Java files.
- The Import process is implemented on a Java files level and not on Java functions. Therefore, when a Java file is imported, it overwrites the entire file, including its Java functions.
- When updating a specific function in a Java file, add the function manually to the Java file.
- Java files are imported into the Category level of the Logic File.
- Importing Globals to an existing Globals file does not overwrite the existing Java file. Both files are merged into one file. In case they have the same name, the new file overwrites the existing file with the value of the imported variable.
How Can I Import a K2EXPORT File Into My Project?
Import Options
- Import All - imports the entire exported project; several confirmation messages are displayed during the import process, validating whether to override the existing files, to create a new LU, etc.
- Custom Import - enables you to either select the exported objects or group items to be imported.
Import All Process
- Right-click on the root of the Project Tree, click on Import and then choose Import All to open the File Browser and select the k2export file to be imported.
Select the file and click Open:
a. Select the LU from the drop-down list to import the files to and click OK, or click Ignore to skip.\ b. When importing files to a non-existent LU, select the targeted LU or create a new LU saved with the exported LU file name.A confirmation message appears in a pop-up window, asking you whether you want to:\ a. Overwrite the specific file.\ b. Overwrite all the conflicting files in the import package.\ c. Decline the overwrite of the specific file.\ d. Decline the overwrite of all the conflicting files.
Custom Import Process
- Right-click on the root of Project Tree, click on Import and then click Custom Import.
- Click the branches and items to import from the file and then click and drag the icon to the current project’s structure (right pane).
The Custom Import window displays the number of imported and overwritten items.
Right-click the Target Project Tree to display a context menu with the following options:
a. Remove All Conflicted Items - removes all conflicting items from the target, where only new items will remain.\ b. Remove Import Items - removes selected items only. Right-click an item to select it.\ c. Show Conflicted Items Only - displays only items that conflict with existing items.\ d. Show Import Item Only - displays imported items only.\ e. Show All Items - displays all items in the Project Tree.
Click on Import & Close (bottom-right corner of the screen) to confirm the Import process and to close Import tab.
A confirmation window opens, asking whether you want to either:
a. Overwrite the specific file.\ b. Overwrite all the conflicting files in the import package.\ c. Decline the overwrite of the specific file.\ d. Decline the overwrite of all conflicting files.
Notes
When importing objects with the same name and location in the Project Tree, a yellow triangular notification icon is displayed next to the imported objects. The imported objects overwrite the existing objects.
Import / Upload Files
Importing project files or folders into your project can be done by either:
Using the File > Upload Files… available at top menu bar, when the target folder in the Project Tree is selected.
Dragging and dropping them from your PC/Mac folder into the required location.
Using the context menu (right-click) on the target folder in the Project Tree.
The upload progress will be displayed at the bottom-right corner of the screen:
Note:
- As this is a standard IDE file upload action, there is no validation of what you are uploading and whereto.
- When asked about overwriting elements, your selection affects all uploaded files.
Export / Download Project
To export the whole project:
- From Fabric in the top menu bar, choose Export Project To Zip File…
- Type the name of the target zip file.
- The zip file will be generated and located in project's root folder.
- Right-click to download it.
Export / Download Files or Folders
To export files or folders:
- Choose them in the Project Tree, and then
- Use the File > Download available from top menu bar or context menu (right-click) > Download option.
The files and folders are then downloaded into your PC/Mac.
Note: When selecting folders or multiple files, the download outcome is a compressed TAR file.
