


Building Web Applications in Web Studio
Introduction
In today's fast-paced development environment, having an all-in-one platform for implementing and deploying applications is crucial. Web Studio IDE is designed as a one-stop shop, allowing you to seamlessly develop and deploy solutions in an end-to-end manner – from building and populating an LU to easily creating related APIs and web applications that consume them. Web Studio integrates multiple technologies to accomplish these tasks, offering built-in support for various languages such as Java, JavaScript, HTML, and CSS, along with intelligent code completion and error notifications.
This above-mentioned initiative allows to develop web applications within Web Studio as part of the Fabric solution, catering to various users such as CRM representatives, internal teams, or clients.
One of the key advantages of Web Studio is its live update capability, which also applies when developing a React app that typically requires a build step for any changes. Using Web Studio, developers can instantly see changes, as they make modifications, which significantly streamlines the development process.
In this article, we will walk through the steps of building a web application inside Web Studio while illustrating the process with examples and showcasing its powerful features.
Setting Up a New Web Application
In the Project Tree, select the LU in which you intend to create the web application, and navigate to the Web folder.
Right-click and choose 'New Web App…'
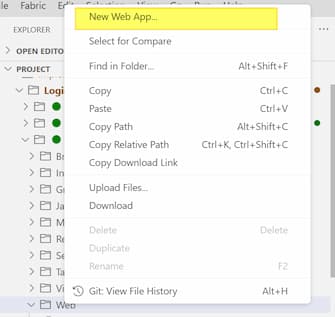
In the pop-up window, enter a name for your app.
In the pop-up window that follows, choose the app type from the following options:
- react – a React framework-based app, in which foundational React source files are pre-generated for your convenience. Additionally, files related to the Vite framework are included to support live updates.
- vanilla – a basic setup with initial files created for your usage (index.html, main.js, and style.css), along with Vite framework files for live update support.
- empty – no files are created, allowing you to start from scratch.
Once the app has been created, a new app subfolder appears under the Web folder. In addition to the generated files, your app is automatically added to the apps.json file, making it available for selection in the K2view web framework's menu (top-left hamburger menu).
Note: It is recommended to manage all apps in the apps.json file located in the Web folder within the Web Services LU. As the Web Services LU is deployed last, its apps.json file overrides all other files. This is particularly relevant in case there are customized apps.json files in your project.
Editing and Managing Your Web Application
It is now possible to edit the web application code while benefiting from built-in intelligent code completion and error notifications.
Web Studio also enables you to manage — create, edit and debug — the APIs used by the web application, and to view the data expected to be shown in the app, through the Studio Query Builder tool. This whole sequence makes the editing process more efficient and reduces development timelines.
Previewing your HTML files can be done using a built-in Preview view rather than going to the app itself.
To do so, open the HTML file and click on the preview icon  , which is located at the top-right corner of the HTML Editor.
Live Editing and Instant Updates
One of the most powerful features of Web Studio is its real-time preview. As the code is modified, updates are immediately reflected in the preview window, eliminating the need for manual builds and deployments. This feature significantly accelerates the development cycle and enhances productivity.
To activate it:
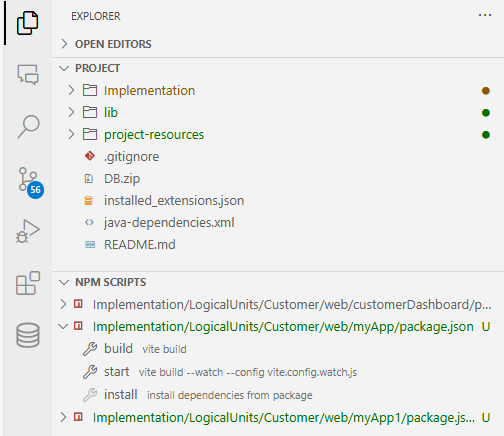
- In the Explorer View, go to the NPM SCRIPTS section, which appears underneath the PROJECT section.
- Expand the entry with the app name.
- Hover over the install command; you can either click the arrow aside it or right-click it and then select ‘Run’.
- Similarly, click on the start command, which would start the live preview watcher.
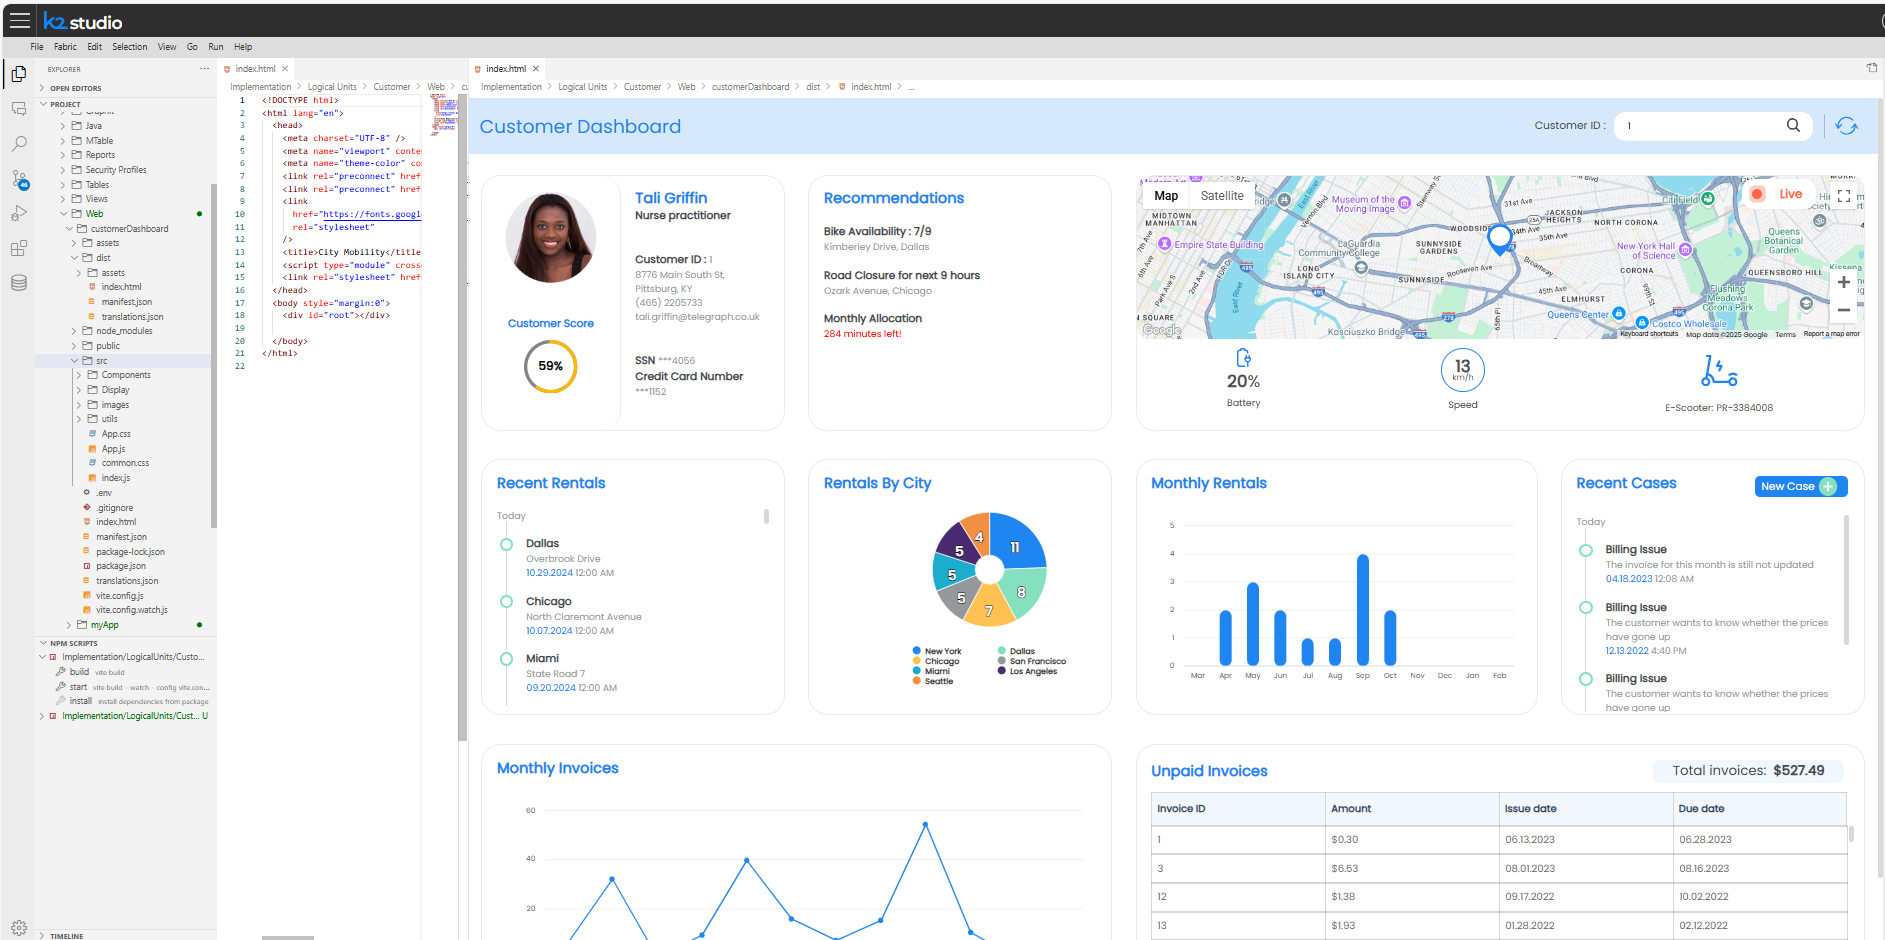
Below are screenshots from our City Mobily C360 Demo project, where its React dashboard web application is developed within the Studio. The web application calls the customized project APIs (Java and Graphit files) that enable retrieval and saving of the data inside the LU. Altogether, this allows for the development, debugging and preview to occur in one single place.

Integrate an Application into the Framework
To introduce a new application — using the Fabric web framework — follow these steps:
Under the relevant LU folder, create a new subfolder named web (right-click the LU > Open Folder, and create the subfolder in Windows Explorer).
There, under the web subfolder, create an additional subfolder representing your new application and place all the web static resources under this folder.
Add the new application to the apps.json file. Copy this file from its server location (path example in which Fabric 8.2 is installed: c:\K2View\Fabric_8.2\Server\fabric\staticWeb) into the web subfolder and edit it there. Fabric prioritizes the apps.json file located in the web subfolder.
The presented order of the applications in the context menu list is determined by their order in the apps.json file.
Example
To add the My Web App application to the framework, add the following to the apps.json file:
   {
      "name": "My Web App",
      "appId": "myApp",
      "hidden": false
   }
The ‘appId’ value — myApp — in this case, is the subfolder’s name under the web subfolder.
Notes
• In addition to adding the web subfolder upon its content, it also has to be added to the source control, such as GitHub, as should be done with any other project file.
• More applications may be added by adding them under the web subfolder and following the above steps.
Fabric Web Framework Tools
The Fabric web framework exposes a k2api object with various methods that can be used by the application, such as navigation, formatting and Fabric commands invocation. Application styles can be set by using either the K2view web framework style sheets (k2.css) for a unified 'look & feel' or a different set of style sheets. The framework supports any application type (multi-page or single-page) and any routing method (History API, hash-based or regular links).
For detailed documentation about the integration development guidelines, supported methods and code examples, refer to the K2view web framework's menu (top-left hamburger menu) and select Documentation > Web Framework API / Styles.
To override default web framework styling, you should specify the relevant elements in your project web application files.
Building Web Applications in Web Studio
Introduction
In today's fast-paced development environment, having an all-in-one platform for implementing and deploying applications is crucial. Web Studio IDE is designed as a one-stop shop, allowing you to seamlessly develop and deploy solutions in an end-to-end manner – from building and populating an LU to easily creating related APIs and web applications that consume them. Web Studio integrates multiple technologies to accomplish these tasks, offering built-in support for various languages such as Java, JavaScript, HTML, and CSS, along with intelligent code completion and error notifications.
This above-mentioned initiative allows to develop web applications within Web Studio as part of the Fabric solution, catering to various users such as CRM representatives, internal teams, or clients.
One of the key advantages of Web Studio is its live update capability, which also applies when developing a React app that typically requires a build step for any changes. Using Web Studio, developers can instantly see changes, as they make modifications, which significantly streamlines the development process.
In this article, we will walk through the steps of building a web application inside Web Studio while illustrating the process with examples and showcasing its powerful features.
Setting Up a New Web Application
In the Project Tree, select the LU in which you intend to create the web application, and navigate to the Web folder.
Right-click and choose 'New Web App…'
In the pop-up window, enter a name for your app.
In the pop-up window that follows, choose the app type from the following options:
- react – a React framework-based app, in which foundational React source files are pre-generated for your convenience. Additionally, files related to the Vite framework are included to support live updates.
- vanilla – a basic setup with initial files created for your usage (index.html, main.js, and style.css), along with Vite framework files for live update support.
- empty – no files are created, allowing you to start from scratch.
Once the app has been created, a new app subfolder appears under the Web folder. In addition to the generated files, your app is automatically added to the apps.json file, making it available for selection in the K2view web framework's menu (top-left hamburger menu).
Note: It is recommended to manage all apps in the apps.json file located in the Web folder within the Web Services LU. As the Web Services LU is deployed last, its apps.json file overrides all other files. This is particularly relevant in case there are customized apps.json files in your project.
Editing and Managing Your Web Application
It is now possible to edit the web application code while benefiting from built-in intelligent code completion and error notifications.
Web Studio also enables you to manage — create, edit and debug — the APIs used by the web application, and to view the data expected to be shown in the app, through the Studio Query Builder tool. This whole sequence makes the editing process more efficient and reduces development timelines.
Previewing your HTML files can be done using a built-in Preview view rather than going to the app itself.
To do so, open the HTML file and click on the preview icon , which is located at the top-right corner of the HTML Editor.
Live Editing and Instant Updates
One of the most powerful features of Web Studio is its real-time preview. As the code is modified, updates are immediately reflected in the preview window, eliminating the need for manual builds and deployments. This feature significantly accelerates the development cycle and enhances productivity.
To activate it:
- In the Explorer View, go to the NPM SCRIPTS section, which appears underneath the PROJECT section.
- Expand the entry with the app name.
- Hover over the install command; you can either click the arrow aside it or right-click it and then select ‘Run’.
- Similarly, click on the start command, which would start the live preview watcher.
Below are screenshots from our City Mobily C360 Demo project, where its React dashboard web application is developed within the Studio. The web application calls the customized project APIs (Java and Graphit files) that enable retrieval and saving of the data inside the LU. Altogether, this allows for the development, debugging and preview to occur in one single place.
Integrate an Application into the Framework
To introduce a new application — using the Fabric web framework — follow these steps:
Under the relevant LU folder, create a new subfolder named web (right-click the LU > Open Folder, and create the subfolder in Windows Explorer).
There, under the web subfolder, create an additional subfolder representing your new application and place all the web static resources under this folder.
Add the new application to the apps.json file. Copy this file from its server location (path example in which Fabric 8.2 is installed: c:\K2View\Fabric_8.2\Server\fabric\staticWeb) into the web subfolder and edit it there. Fabric prioritizes the apps.json file located in the web subfolder.
The presented order of the applications in the context menu list is determined by their order in the apps.json file.
Example
To add the My Web App application to the framework, add the following to the apps.json file:
   {
      "name": "My Web App",
      "appId": "myApp",
      "hidden": false
   }
The ‘appId’ value — myApp — in this case, is the subfolder’s name under the web subfolder.
Notes
• In addition to adding the web subfolder upon its content, it also has to be added to the source control, such as GitHub, as should be done with any other project file.
• More applications may be added by adding them under the web subfolder and following the above steps.
Fabric Web Framework Tools
The Fabric web framework exposes a k2api object with various methods that can be used by the application, such as navigation, formatting and Fabric commands invocation. Application styles can be set by using either the K2view web framework style sheets (k2.css) for a unified 'look & feel' or a different set of style sheets. The framework supports any application type (multi-page or single-page) and any routing method (History API, hash-based or regular links).
For detailed documentation about the integration development guidelines, supported methods and code examples, refer to the K2view web framework's menu (top-left hamburger menu) and select Documentation > Web Framework API / Styles.
To override default web framework styling, you should specify the relevant elements in your project web application files.
