


Data Product (LU) Tables Reconciliation
The Tables Reconciliation is a feature that enables analysis of changes made to the connected source data platform tables upon which your project’s tables are based. It provides a valuable solution for two primary scenarios, throughout the project lifecycle:
- Data Product Business Entity Model Changes: During the initial setup of project tables from source data platforms, implementors may decide to select only those essential for the business entity model of the data product. Subsequent requirements may necessitate the incorporation of columns previously omitted. The Tables Reconciliation feature facilitates the identification of these columns for the potential addition.
- Source Data Platforms changes: Over the course of a project, changes may occur in the source data platform tables that are linked to it - columns could be added or removed. Tables Reconciliation can be used to spot these differences between the source and project tables, enabling informed decision-making within the Table Editor.
Note: The Tables Reconciliation process is relevant only for those tables that were built based on source data platforms, using the DB Explorer, since introducing this feature - Fabric 8.0. While an LU's table is built, the platform saves additional data - the source data, schema and table it was created upon - as part of the table's metadata in Fabric; this enables the Reconciliation process to find any existing mismatches.
Activating the Reconciliation Mismatches Finder
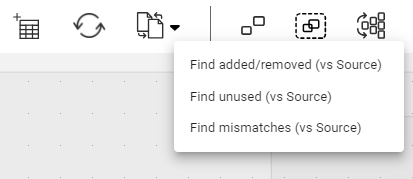
The first step of the Reconciliation feature is to find the mismatches. This can be done according to 1 of the following 3 options: Find only added/removed tables' columns (added to the source or removed from it), Find unused columns in the project tables (comparing with the source), Find all mismatches between the project and the source tables (added/removed/unused).
You can trigger the mismatches finder either in schema level or per table:
Schema
Activating the mismatches finder in the schema - the main tables design surface - provides a mismatches overview of the LU (aka Data Product) schema's tables.
- At the top schema toolbar, look for the
 Reconciliation action icon.
 - Click on this icon to activate the mismatches finder, or click on the arrow next to the icon and choose 1 of the 3 options (image below).
- As a result, the mismatches finding process starts.
Table
You can activate the mismatches finder on a specific table, rather than on an LU schema:
In the schema, choose a table and click to open its Properties panel.
In the Project tree, choose the table and open it; then click to open its Properties panel.
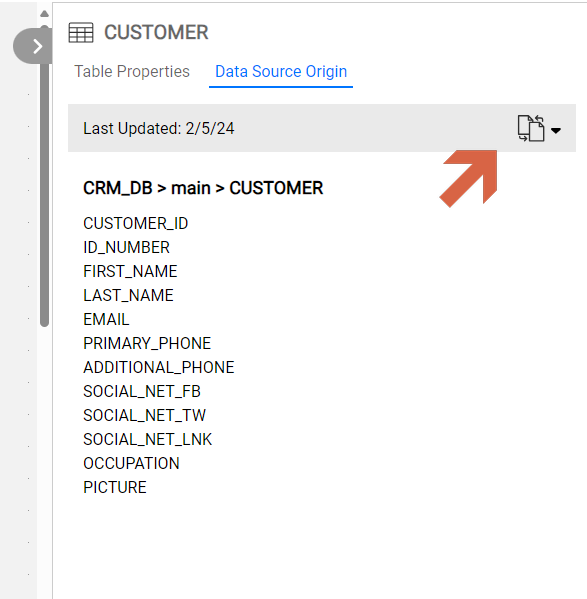
- Switch to the Data Source Origin tab (image below).
- Look for the Reconciliation action icon. You can either click on the icon to activate the mismatches finder or click on the arrow next to the icon and choose 1 of the 3 options.
- As a result, the mismatches finding process starts.
Note: The mismatches finding feature looks either directly at the source data platforms or at the Catalog's Discovery outcome (when the latter is being used).
Reconciliation Mismatches Finder Results
Upon completion of the mismatches finding process:
- When mismatches are found by the finder -
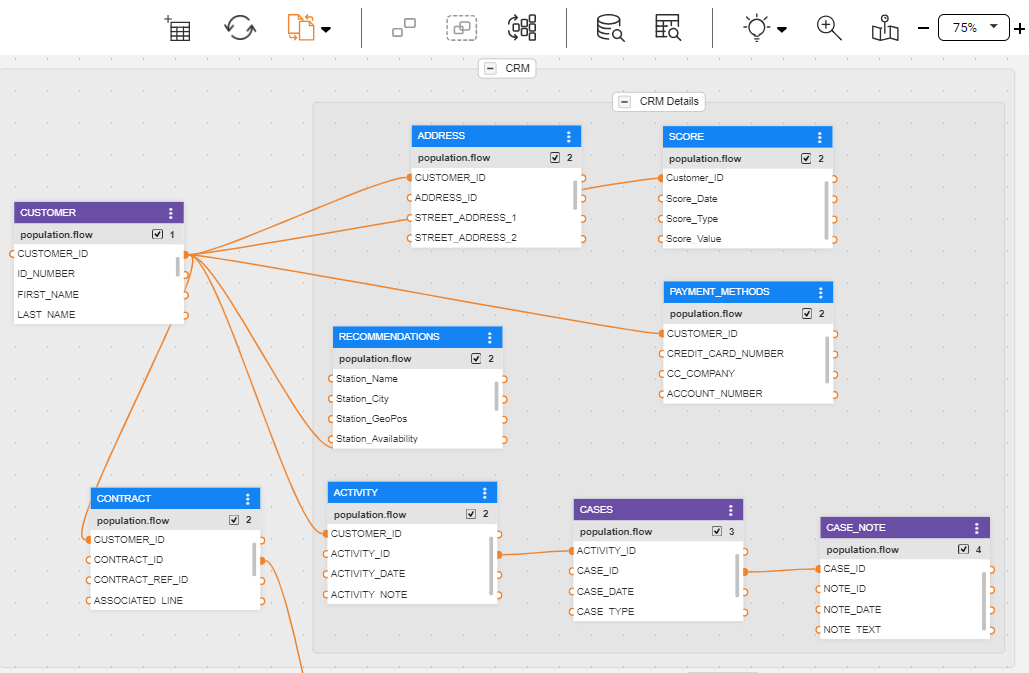
- within a schema, the relevant tables' headers turn purple. Then, examining of each table’s changes can start, by opening the table for editing through the table's menu.
- within a table that was opened for editing from the Project tree, you will immediately see the changes in the table.
- If no mismatches are found, a notification message would appear at the bottom-right side of the window, indicating it.
When the mismatches finding process is activated, the Reconciliation action icon turns orange, hinting to the user that the Reconciliation process is now active. Being in this state:
- You can click on the Reconciliation action icon to turn it off, hiding all the mismatches findings.
- You can switch to one of the other mismatches finder options, by clicking on the down arrow and selecting it. You can do it as long as you did not take any actions on the finder's results. If you have already taken action, you shall first save your changes or discard them, before being able to activate another option.
Table Editor - Reconciliation Mode
Upon opening a table that was marked by the Reconciliation Mismatches Finder, the Table Editor opens in a Reconciliation Mode.

The green and red colored table's entries, are those that are identified with changes in the data source. Gray colored entries are those that exist in the source data platform tables, but not in the corresponding LU table.
The above example illustrates a case where there are various changes (added, removed, not-in-use columns). Usually, within a specific table, fewer changes will be made.
Tables' columns are represented in the Table Editor as entries/lines; the corresponding terminology used in this article is columns or entries.
Reconciliation Actions
According to the Reconciliation Mismatches Finder results, as shown in the Table Editor screen, you can choose - for each one of the mismatched columns - to either take action or postpone such decision and do it later, as follows:
Added column(s) to the source table (green-colored entries):
Decide Later whether to add it or not. For example, you may prefer to postpone your decision for later, as you wish to consult with your team first as to whether this column shall be used in your project.
Add the column also to the project's LU table.
Do not Add the column to the project's LU table.
According to this decision, Studio will not alert you later about this column's existence in the source. However, you will still be able to find it when searching for unused columns.
Removed columns from source (light red-colored entries):
Decide Later whether to remove it or not. For example, you may prefer to postpone your decision for later, as you wish to consult with your team first as to whether this column shall be removed or maybe it is still needed.
Preserve the column, although it was removed from the source. This is probably useful in cases where this column is in use within the implementation and therefore needs to remain. Note that it is your responsibility - from now on - to populate its data as the data will not be retrieved from source.
According to this decision, Studio will not alert you later about the removal of this column from at the source.
- Remove from table and align with the source table.
Not In Use at the LU table, while existing at the source data table:
- Do not Add the column to the project's LU table.
- Add the column also to the project's LU table.
Once done with handling a table - either if you have made a decision regarding the table's entries and have taken action or not - you can close it by 1 of the following 2 options:
- Clicking on OK: the open table is considered as handled, and your changes are preserved. In addition:
- The table heading color turns back into its original blue color.
- Opening the table over again, you will be able to see and examine the decision(s) you have made, as long as you did not save the change (saving the schema if you are in the schema editor, or saving the table if you are in the Table Editor, which opens from the Project tree).
- The Table Properties Source Origin (read below) indicates that the table has been handled.
- You are automatically moved to the next table that was found by the Reconciliation Mismatches Finder. This will be done as long as the bottom 'Move to next table' checkbox is ticked (default). It means that the Table Editor will remain open, ready for the next candidate table to appear.
- Clicking on Cancel: the table is considered as not handled, and accordingly, the above accompanying implications do not hold.
Table Properties Source Origin
The Table Properties Panel's second tab - Data Source Origin - provides an overview and indicates upon which source data platform tables, this LU table is based and built.
The tab's top header shows when was the last time that the table was updated during the Reconciliation process, and it also enables you to activate the Reconciliation Mismatches Finder on this specific table, as explained above.
The tab's body lists the source data platform columns, organized by Interface, the schema and the table in the source data platform.
Highlighting Mismatched Tables
In case you deal with a large schema, which contains many tables, you can easily find these tables that were found during the Reconciliation Mismatches Finder process, by using the Highlighting option:
At the top schema toolbar look for the
 Highlighting action icon.
 Click on the arrow next to this icon and choose the Mismatches vs Source option.
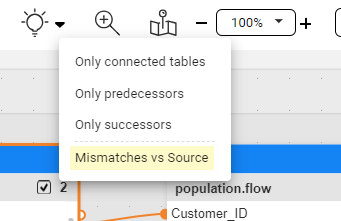
As a result, the relevant tables are highlighted while other are grayed-out.
In case the Reconciliation process is not activated in the schema - this option is disabled.
Data Product (LU) Tables Reconciliation
The Tables Reconciliation is a feature that enables analysis of changes made to the connected source data platform tables upon which your project’s tables are based. It provides a valuable solution for two primary scenarios, throughout the project lifecycle:
- Data Product Business Entity Model Changes: During the initial setup of project tables from source data platforms, implementors may decide to select only those essential for the business entity model of the data product. Subsequent requirements may necessitate the incorporation of columns previously omitted. The Tables Reconciliation feature facilitates the identification of these columns for the potential addition.
- Source Data Platforms changes: Over the course of a project, changes may occur in the source data platform tables that are linked to it - columns could be added or removed. Tables Reconciliation can be used to spot these differences between the source and project tables, enabling informed decision-making within the Table Editor.
Note: The Tables Reconciliation process is relevant only for those tables that were built based on source data platforms, using the DB Explorer, since introducing this feature - Fabric 8.0. While an LU's table is built, the platform saves additional data - the source data, schema and table it was created upon - as part of the table's metadata in Fabric; this enables the Reconciliation process to find any existing mismatches.
Activating the Reconciliation Mismatches Finder
The first step of the Reconciliation feature is to find the mismatches. This can be done according to 1 of the following 3 options: Find only added/removed tables' columns (added to the source or removed from it), Find unused columns in the project tables (comparing with the source), Find all mismatches between the project and the source tables (added/removed/unused).
You can trigger the mismatches finder either in schema level or per table:
Schema
Activating the mismatches finder in the schema - the main tables design surface - provides a mismatches overview of the LU (aka Data Product) schema's tables.
- At the top schema toolbar, look for the Reconciliation action icon.
- Click on this icon to activate the mismatches finder, or click on the arrow next to the icon and choose 1 of the 3 options (image below).
- As a result, the mismatches finding process starts.
Table
You can activate the mismatches finder on a specific table, rather than on an LU schema:
In the schema, choose a table and click to open its Properties panel.
In the Project tree, choose the table and open it; then click to open its Properties panel.
- Switch to the Data Source Origin tab (image below).
- Look for the Reconciliation action icon. You can either click on the icon to activate the mismatches finder or click on the arrow next to the icon and choose 1 of the 3 options.
- As a result, the mismatches finding process starts.
Note: The mismatches finding feature looks either directly at the source data platforms or at the Catalog's Discovery outcome (when the latter is being used).
Reconciliation Mismatches Finder Results
Upon completion of the mismatches finding process:
- When mismatches are found by the finder -
- within a schema, the relevant tables' headers turn purple. Then, examining of each table’s changes can start, by opening the table for editing through the table's menu.
- within a table that was opened for editing from the Project tree, you will immediately see the changes in the table.
- If no mismatches are found, a notification message would appear at the bottom-right side of the window, indicating it.
When the mismatches finding process is activated, the Reconciliation action icon turns orange, hinting to the user that the Reconciliation process is now active. Being in this state:
- You can click on the Reconciliation action icon to turn it off, hiding all the mismatches findings.
- You can switch to one of the other mismatches finder options, by clicking on the down arrow and selecting it. You can do it as long as you did not take any actions on the finder's results. If you have already taken action, you shall first save your changes or discard them, before being able to activate another option.
Table Editor - Reconciliation Mode
Upon opening a table that was marked by the Reconciliation Mismatches Finder, the Table Editor opens in a Reconciliation Mode.
The green and red colored table's entries, are those that are identified with changes in the data source. Gray colored entries are those that exist in the source data platform tables, but not in the corresponding LU table.
The above example illustrates a case where there are various changes (added, removed, not-in-use columns). Usually, within a specific table, fewer changes will be made.
Tables' columns are represented in the Table Editor as entries/lines; the corresponding terminology used in this article is columns or entries.
Reconciliation Actions
According to the Reconciliation Mismatches Finder results, as shown in the Table Editor screen, you can choose - for each one of the mismatched columns - to either take action or postpone such decision and do it later, as follows:
Added column(s) to the source table (green-colored entries):
Decide Later whether to add it or not. For example, you may prefer to postpone your decision for later, as you wish to consult with your team first as to whether this column shall be used in your project.
Add the column also to the project's LU table.
Do not Add the column to the project's LU table.
According to this decision, Studio will not alert you later about this column's existence in the source. However, you will still be able to find it when searching for unused columns.
Removed columns from source (light red-colored entries):
Decide Later whether to remove it or not. For example, you may prefer to postpone your decision for later, as you wish to consult with your team first as to whether this column shall be removed or maybe it is still needed.
Preserve the column, although it was removed from the source. This is probably useful in cases where this column is in use within the implementation and therefore needs to remain. Note that it is your responsibility - from now on - to populate its data as the data will not be retrieved from source.
According to this decision, Studio will not alert you later about the removal of this column from at the source.
- Remove from table and align with the source table.
Not In Use at the LU table, while existing at the source data table:
- Do not Add the column to the project's LU table.
- Add the column also to the project's LU table.
Once done with handling a table - either if you have made a decision regarding the table's entries and have taken action or not - you can close it by 1 of the following 2 options:
- Clicking on OK: the open table is considered as handled, and your changes are preserved. In addition:
- The table heading color turns back into its original blue color.
- Opening the table over again, you will be able to see and examine the decision(s) you have made, as long as you did not save the change (saving the schema if you are in the schema editor, or saving the table if you are in the Table Editor, which opens from the Project tree).
- The Table Properties Source Origin (read below) indicates that the table has been handled.
- You are automatically moved to the next table that was found by the Reconciliation Mismatches Finder. This will be done as long as the bottom 'Move to next table' checkbox is ticked (default). It means that the Table Editor will remain open, ready for the next candidate table to appear.
- Clicking on Cancel: the table is considered as not handled, and accordingly, the above accompanying implications do not hold.
Table Properties Source Origin
The Table Properties Panel's second tab - Data Source Origin - provides an overview and indicates upon which source data platform tables, this LU table is based and built.
The tab's top header shows when was the last time that the table was updated during the Reconciliation process, and it also enables you to activate the Reconciliation Mismatches Finder on this specific table, as explained above.
The tab's body lists the source data platform columns, organized by Interface, the schema and the table in the source data platform.
Highlighting Mismatched Tables
In case you deal with a large schema, which contains many tables, you can easily find these tables that were found during the Reconciliation Mismatches Finder process, by using the Highlighting option:
At the top schema toolbar look for the
Highlighting action icon. Click on the arrow next to this icon and choose the Mismatches vs Source option.
As a result, the relevant tables are highlighted while other are grayed-out.
In case the Reconciliation process is not activated in the schema - this option is disabled.
