


Creating a Custom Discovery Plugin
Overview
The Fabric Catalog solution includes a list of product plugins. When needed, the core solution can be extended with project-specific functionality. It is particularly useful when you need to tailor the core discovery process to specific business requirements, extending the Catalog's capabilities beyond the baseline configuration: to add custom properties, to define new relationships, or to implement entirely custom behavior.
Creating a custom discovery plugin involves two stages:
- Plugin Development in Fabric Studio: Create and deploy a Java class within your Logical Unit.
- Plugin Setup in Catalog: Add the plugin to the Discovery Pipeline and execute the discovery process.
Plugin Development in Fabric Studio
Step 1: Create the Java Class
- Select the Logical Unit where the plugin will reside. The plugin is created within the LU's Java source code.
- In the Project's tree, navigate to
<LU>/Java/src/com/k2view. - Create a new folder named
discovery/plugins. - Create a new Java file (e.g.,
MyCustomPlugin.java).
Step 2: Choose the Plugin Type
Extend the appropriate base class based on your plugin's intended purpose:
- For new custom properties logic, extend the core
PropertyPluginclass:
  public class MyCustomPlugin extends PropertyPlugin {
      // Your implementation here
  }
- For new relations, extend the core
RelationPluginclass:
  public class MyCustomRelationPlugin extends RelationPlugin {
      // Your implementation here
  }
- For fully custom logic, implement the
Plugininterface:
  public class MyFullCustomPlugin implements Plugin {
      // Your implementation here
  }
Step 3: Add Monitor Support
To ensure the plugin's progress is visible in the Discovery Monitor, add status updates to your class:
- For PropertyPlugin or RelationPlugin: The platform handles progress tracking automatically. Use the following to update found items:
MonitorStatusUpdater.getInstance().updateFound(pluginName, uid);
- For Custom Plugins: You must manage progress tracking manually by calling
updateStatuswhen implementing the Plugin interface:
updateStatus(pluginName, uid, count++);
Step 4: Deploy the Logical Unit
After implementing the plugin class, Deploy the Logical Unit to make the plugin available within Fabric.
Plugin Setup in Catalog
Follow these steps to set up the new plugin within the Catalog's pipeline:
Navigate to Catalog app > Settings > Discovery Pipeline.
Click Override on the Baseline rule to create a custom pipeline configuration.
In the Plugins section, click the 3 dots icon to open the context menu.
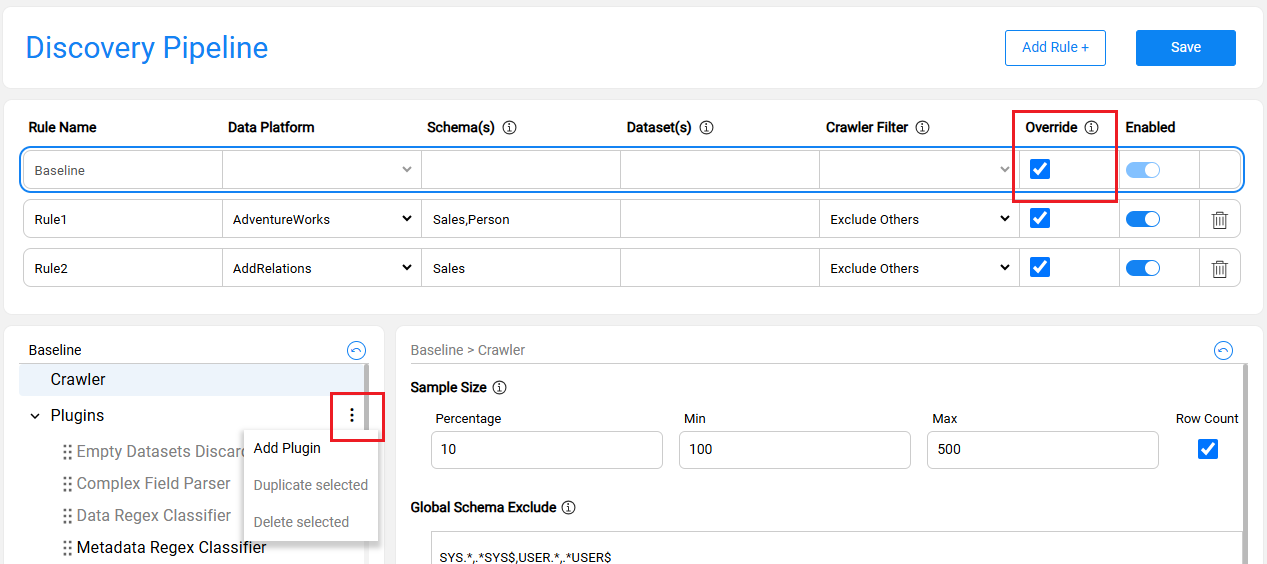
Click Add Plugin, enter a name, then press TAB.
- The plugin name is a free-text string and does not have to match the class name.
- New plugins are added to the end of the list by default. You can reorder them using drag & drop.
Populate the Class field using the following format:
<LU_NAME>:<Full_Class_Path>- For example:
Customer:com.k2view.discovery.plugins.MyPrimaryKeyPlugin.
- For example:
Enter a Discovery Description. This text will appear in the Discovery Monitor.
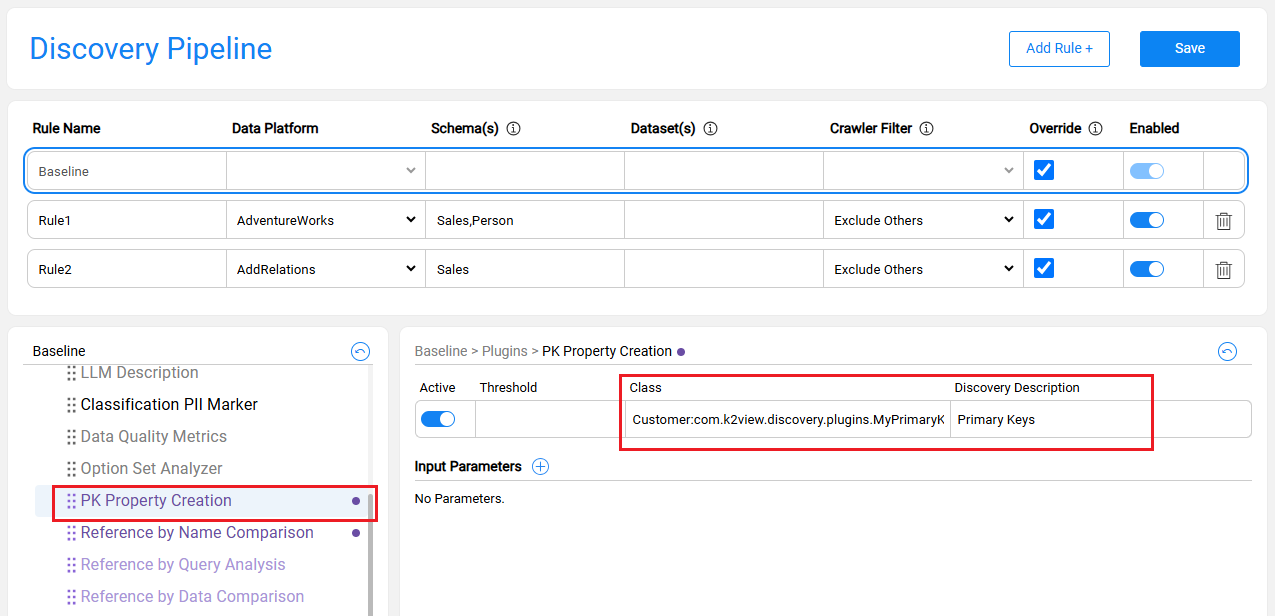
Click Save to apply the changes.
Once the plugin configuration is completed, run the discovery process to execute your custom plugin.
For more information about how to add a new plugin, see the Discovery Pipeline settings.
Creating a Custom Discovery Plugin
Overview
The Fabric Catalog solution includes a list of product plugins. When needed, the core solution can be extended with project-specific functionality. It is particularly useful when you need to tailor the core discovery process to specific business requirements, extending the Catalog's capabilities beyond the baseline configuration: to add custom properties, to define new relationships, or to implement entirely custom behavior.
Creating a custom discovery plugin involves two stages:
- Plugin Development in Fabric Studio: Create and deploy a Java class within your Logical Unit.
- Plugin Setup in Catalog: Add the plugin to the Discovery Pipeline and execute the discovery process.
Plugin Development in Fabric Studio
Step 1: Create the Java Class
- Select the Logical Unit where the plugin will reside. The plugin is created within the LU's Java source code.
- In the Project's tree, navigate to
<LU>/Java/src/com/k2view. - Create a new folder named
discovery/plugins. - Create a new Java file (e.g.,
MyCustomPlugin.java).
Step 2: Choose the Plugin Type
Extend the appropriate base class based on your plugin's intended purpose:
- For new custom properties logic, extend the core
PropertyPluginclass:
  public class MyCustomPlugin extends PropertyPlugin {
      // Your implementation here
  }
- For new relations, extend the core
RelationPluginclass:
  public class MyCustomRelationPlugin extends RelationPlugin {
      // Your implementation here
  }
- For fully custom logic, implement the
Plugininterface:
  public class MyFullCustomPlugin implements Plugin {
      // Your implementation here
  }
Step 3: Add Monitor Support
To ensure the plugin's progress is visible in the Discovery Monitor, add status updates to your class:
- For PropertyPlugin or RelationPlugin: The platform handles progress tracking automatically. Use the following to update found items:
MonitorStatusUpdater.getInstance().updateFound(pluginName, uid);
- For Custom Plugins: You must manage progress tracking manually by calling
updateStatuswhen implementing the Plugin interface:
updateStatus(pluginName, uid, count++);
Step 4: Deploy the Logical Unit
After implementing the plugin class, Deploy the Logical Unit to make the plugin available within Fabric.
Plugin Setup in Catalog
Follow these steps to set up the new plugin within the Catalog's pipeline:
Navigate to Catalog app > Settings > Discovery Pipeline.
Click Override on the Baseline rule to create a custom pipeline configuration.
In the Plugins section, click the 3 dots icon to open the context menu.
Click Add Plugin, enter a name, then press TAB.
- The plugin name is a free-text string and does not have to match the class name.
- New plugins are added to the end of the list by default. You can reorder them using drag & drop.
Populate the Class field using the following format:
<LU_NAME>:<Full_Class_Path>- For example:
Customer:com.k2view.discovery.plugins.MyPrimaryKeyPlugin.
- For example:
Enter a Discovery Description. This text will appear in the Discovery Monitor.
Click Save to apply the changes.
Once the plugin configuration is completed, run the discovery process to execute your custom plugin.
For more information about how to add a new plugin, see the Discovery Pipeline settings.
