Auto Discovery Wizard
Auto Discovery Wizard Overview
The Fabric Studio Auto Discovery Wizard enables you to automatically generate or edit an LUDB schema based on predefined database constraints like a Primary Key or a Foreign Key.
The Auto Discovery Wizard can run in two modes:
- Fast, the Auto Discovery Wizard generates a new Logical Unit schema based on Foreign Keys only.
- Medium, the Auto Discovery Wizard generates a new Logical Unit schema based on Primary Keys, Foreign Keys and Virtual Primary Keys. This mode allows you to be more involved in certain aspects of the process.
How Do I Use the Auto Discovery Wizard?
STEP 1: Define the DB Interface
The first screen displays a list of all DB interfaces defined in a Fabric project. You need to select the DB interface for the Auto Discovery process.
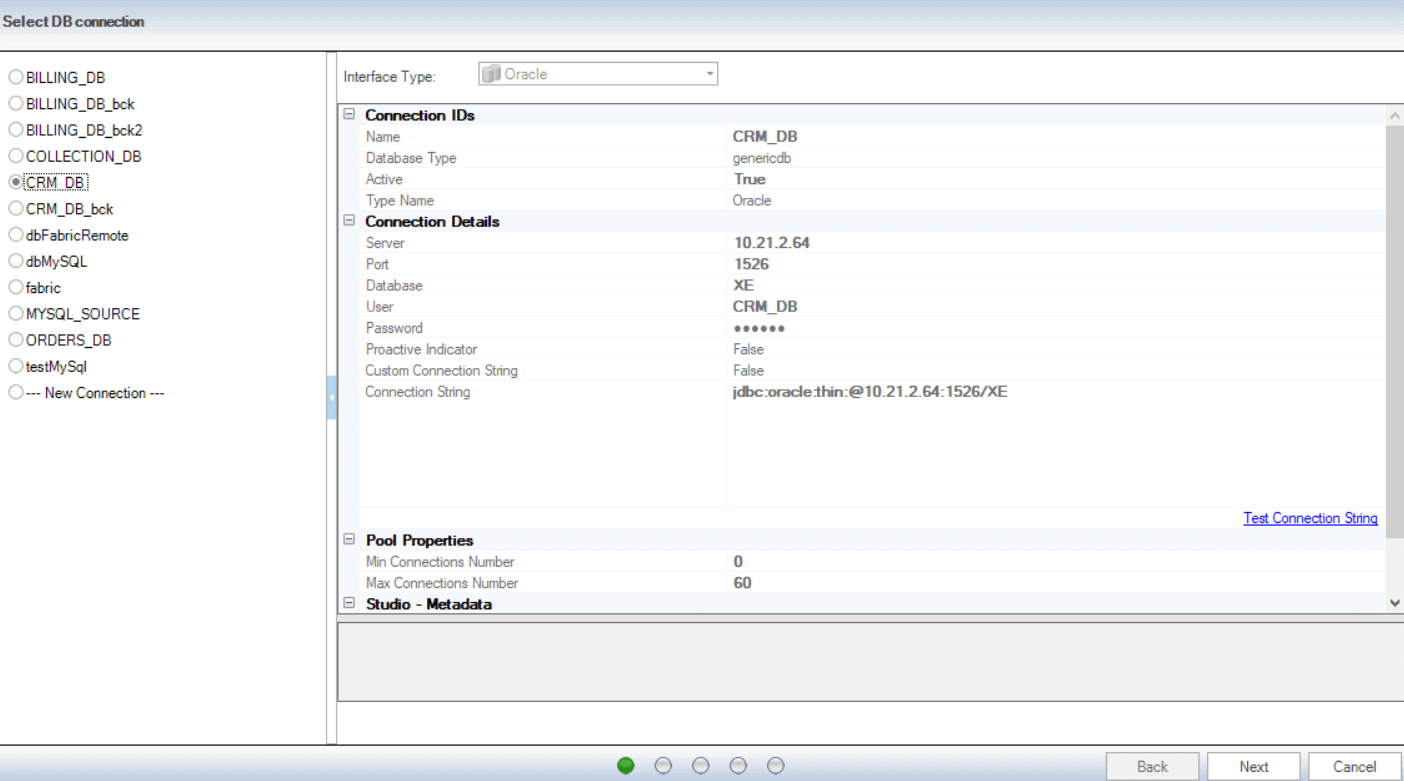
- Click the DB interface to display its connection string.
- To validate the connection settings, click Test Connection.
- Click Next.
STEP 2: Define the Root Table and Field
In this step you will select a DB Table and column as the Root Table and Instance ID of the Logical Unit.
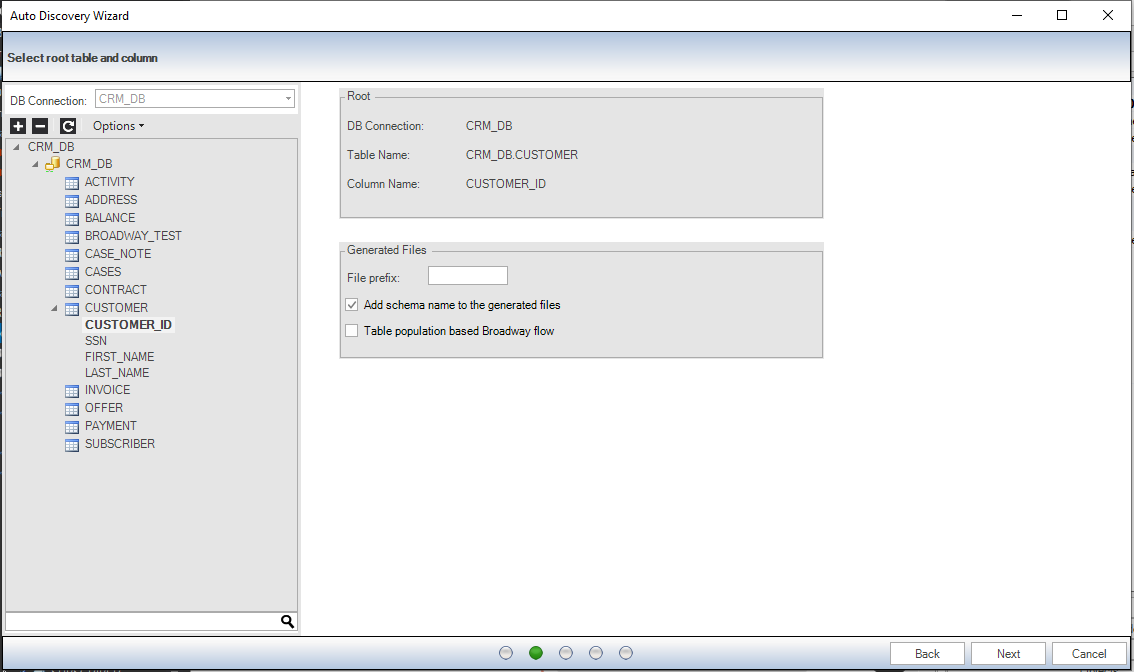
- Go to the Tables list and click the Root Table and then click the Instance ID.
- Optional: In the File Name Prefix field, enter a string prefix for the LU table names. By default, the LU table name receives the name of the original source DB table.
- Optional: Uncheck Add schema name to the generated files. When checked, the Schema Name is concatenated to the LU Table Name.
- Optional: Check Table population based Broadway flow. When checked, all the tables populations are created based on Broadway flows.
- Click Next.
STEP 3: Define the Auto Discovery Mode and Settings
This screen allows you to select the Auto Discovery mode (auto discovery type) and add additional settings to it.
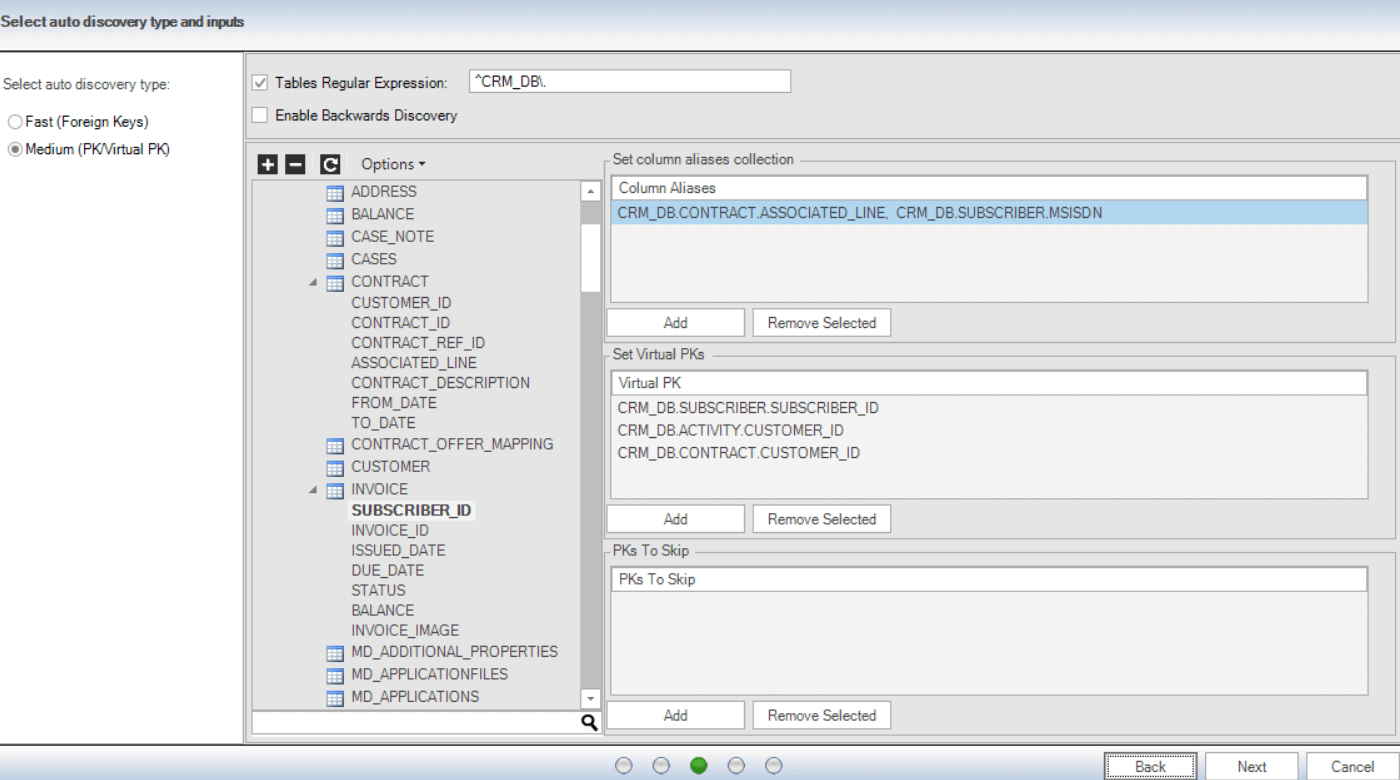
Auto Discovery Mode (Type)
Auto Discovery supports the following modes:
- Fast mode - the default mode. Follow the connections of the physical foreign keys as defined in the selected database to identify the relationships between the database tables.
- Medium mode – allows you to be more involved in certain aspects of the process and checks the primary key fields in the tables to search for a link between the tables. See the list of parameters for Medium Mode in the table below.
Auto Discovery Settings
STEP 4: Check the ERD Diagram
Display the suggested ERD diagram and the selected Root Table (pink) and related tables.
Connections are colored:
- Foreign key connection = blue.
- Primary key connection = green.
- Virtual key connection = olive.
If the selected Root Table is not defined as the root of the identified ERD, consider changing the selected Root Table or check the Enable Backwards Discovery checkbox. If not, the created LU includes only the selected Root Table and its subordinate table.
For Example
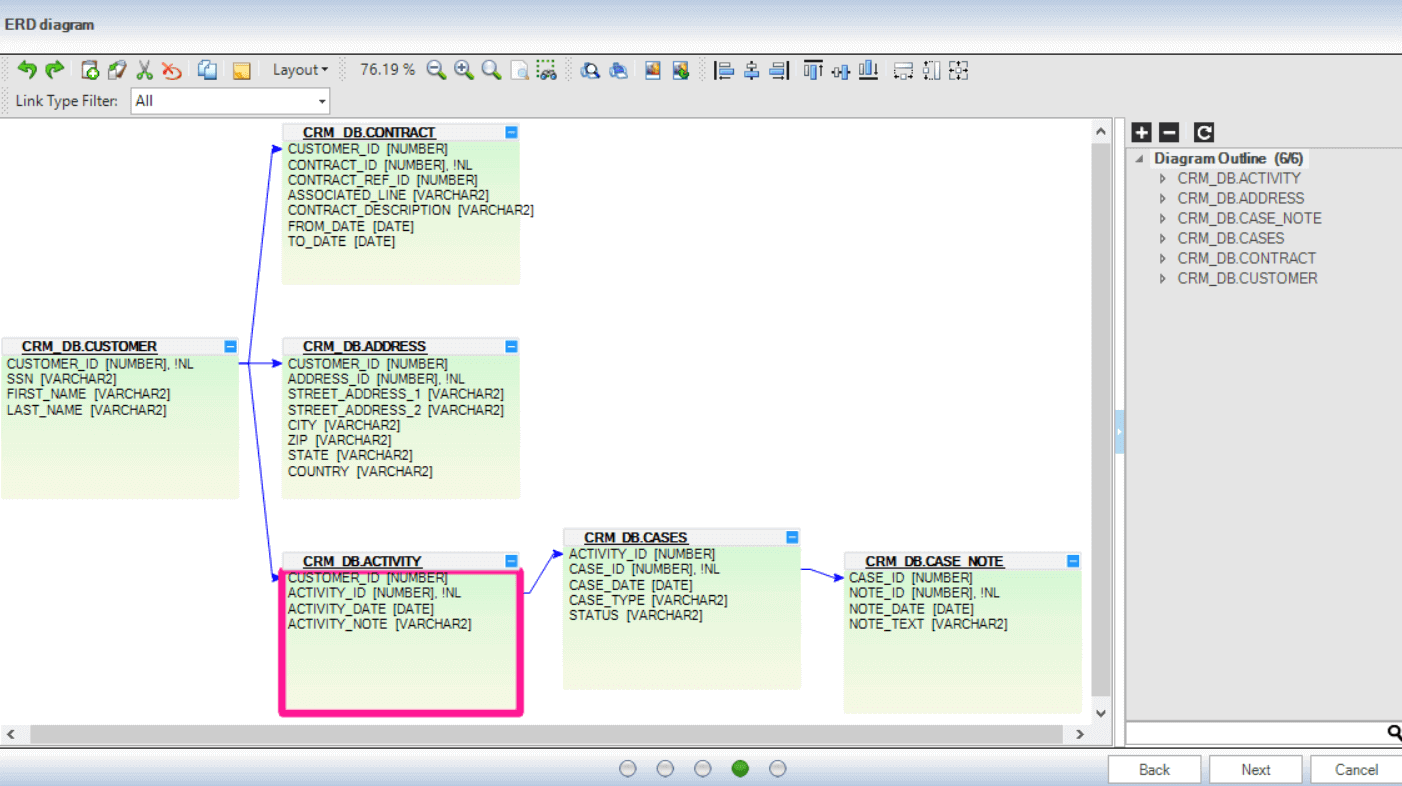
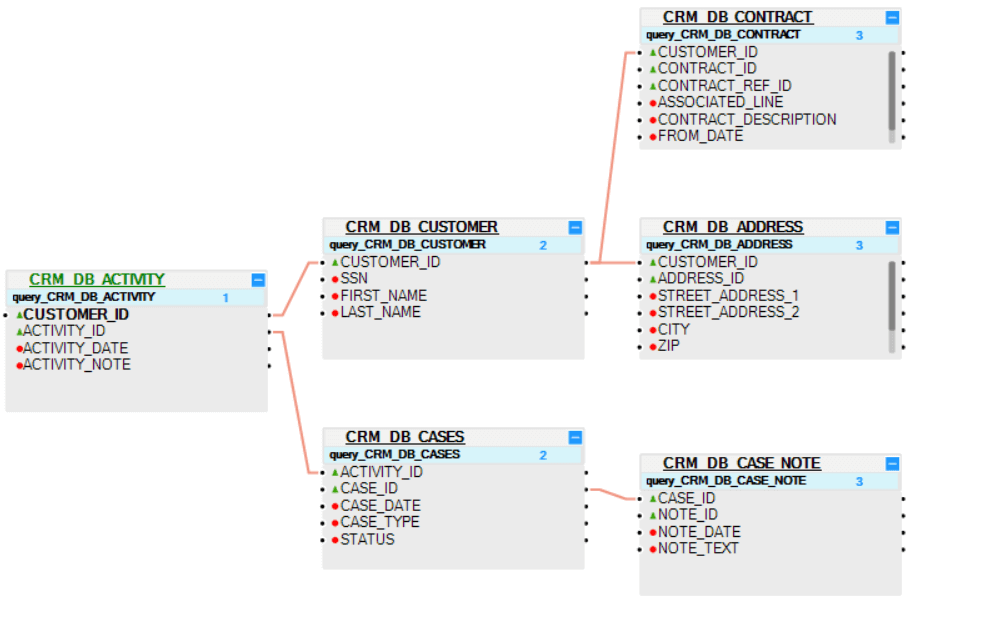
The selected Root Table is CRM_DB.ACTIVITY. However, the Auto Discovery Wizard identifies the CRM_DB.CUSTOMER table as the Root Table of the CRM_DB.
When saving the CRM_DB.ACTIVITY table as a Root Table:
- If Enable Backwards Discovery is unchecked (default), then Auto Discovery creates the following LU and filters out the remaining tables of the ERD diagram.

- When Enable Backwards Discovery is checked, Auto Discovery creates the following LU and links the CUSTOMER table and its subordinate table to the ACTIVITY table.
Create the Logical Unit Diagram
Display the suggested logical unit diagram and click Finish to create the LU.
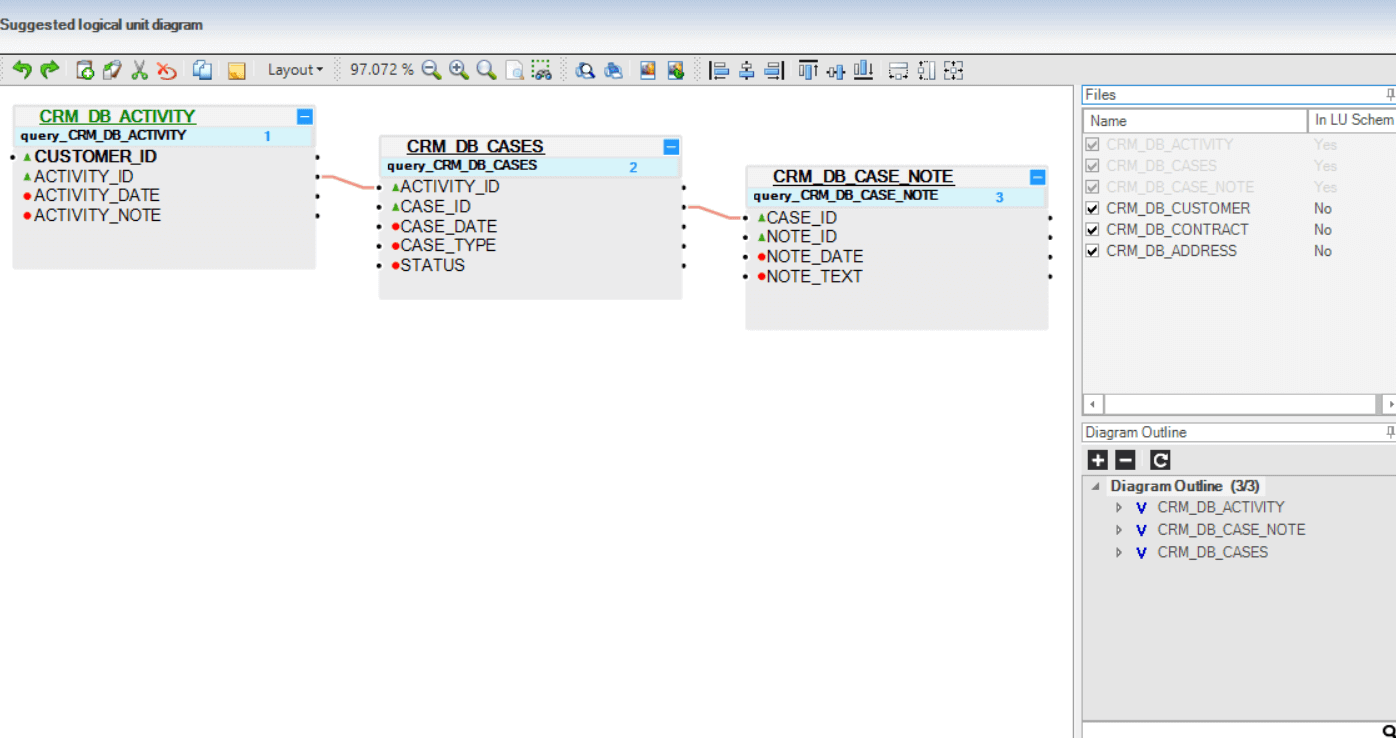
Optional: you can check tables out of the LU schema to create them as LU tables and add them manually to your LU if needed.
Auto Discovery Wizard
Auto Discovery Wizard Overview
The Fabric Studio Auto Discovery Wizard enables you to automatically generate or edit an LUDB schema based on predefined database constraints like a Primary Key or a Foreign Key.
The Auto Discovery Wizard can run in two modes:
- Fast, the Auto Discovery Wizard generates a new Logical Unit schema based on Foreign Keys only.
- Medium, the Auto Discovery Wizard generates a new Logical Unit schema based on Primary Keys, Foreign Keys and Virtual Primary Keys. This mode allows you to be more involved in certain aspects of the process.
How Do I Use the Auto Discovery Wizard?
STEP 1: Define the DB Interface
The first screen displays a list of all DB interfaces defined in a Fabric project. You need to select the DB interface for the Auto Discovery process.

- Click the DB interface to display its connection string.
- To validate the connection settings, click Test Connection.
- Click Next.
STEP 2: Define the Root Table and Field
In this step you will select a DB Table and column as the Root Table and Instance ID of the Logical Unit.

- Go to the Tables list and click the Root Table and then click the Instance ID.
- Optional: In the File Name Prefix field, enter a string prefix for the LU table names. By default, the LU table name receives the name of the original source DB table.
- Optional: Uncheck Add schema name to the generated files. When checked, the Schema Name is concatenated to the LU Table Name.
- Optional: Check Table population based Broadway flow. When checked, all the tables populations are created based on Broadway flows.
- Click Next.
STEP 3: Define the Auto Discovery Mode and Settings
This screen allows you to select the Auto Discovery mode (auto discovery type) and add additional settings to it.

Auto Discovery Mode (Type)
Auto Discovery supports the following modes:
- Fast mode - the default mode. Follow the connections of the physical foreign keys as defined in the selected database to identify the relationships between the database tables.
- Medium mode – allows you to be more involved in certain aspects of the process and checks the primary key fields in the tables to search for a link between the tables. See the list of parameters for Medium Mode in the table below.
Auto Discovery Settings
STEP 4: Check the ERD Diagram
Display the suggested ERD diagram and the selected Root Table (pink) and related tables.
Connections are colored:
- Foreign key connection = blue.
- Primary key connection = green.
- Virtual key connection = olive.
If the selected Root Table is not defined as the root of the identified ERD, consider changing the selected Root Table or check the Enable Backwards Discovery checkbox. If not, the created LU includes only the selected Root Table and its subordinate table.
For Example

The selected Root Table is CRM_DB.ACTIVITY. However, the Auto Discovery Wizard identifies the CRM_DB.CUSTOMER table as the Root Table of the CRM_DB.
When saving the CRM_DB.ACTIVITY table as a Root Table:
- If Enable Backwards Discovery is unchecked (default), then Auto Discovery creates the following LU and filters out the remaining tables of the ERD diagram.

- When Enable Backwards Discovery is checked, Auto Discovery creates the following LU and links the CUSTOMER table and its subordinate table to the ACTIVITY table.

Create the Logical Unit Diagram
Display the suggested logical unit diagram and click Finish to create the LU.

Optional: you can check tables out of the LU schema to create them as LU tables and add them manually to your LU if needed.


