

Actor Editor
Overview
Actor Editor is a tool which enables creation of new Actors either based on an existing Actor or from scratch, based on your own Java class.
The Actor Editor is displayed as a dummy flow with one Actor that can be setup / modified using the extended Actor's Properties window.
When creating a new Actor, you need to do the following:
- Set either the Parent Actor to inherit from the existing Actor or the Class to be used for custom logic.
- Define inputs and outputs as required.
- Test your Actor by running it in Debug mode.
How Do I Create an Inherited Actor?
The Actor Editor can be used to create a new inherited Actor or modify an existing one via its [Actor Name].actor file. The Actor must inherit either from another Actor or from an Inner Flow that has been saved as an Actor.
To create a new Actor, do the following:
- Right click the Broadway > New Actor.
- Populate the new Actor's name and click OK to open the Actor Editor.
- Select the Parent Actor to get the parent's input and output arguments.
- Debug the Actor by running it from the Main menu toolbar. If the Actor receives input parameters, they can be set using the Debug / Run Arguments.
- Save the Actor.
To modify an Actor, do the following:
- Go to the Broadway folder in the project tree and double click the *.actor file to open the Actor Editor.
- Modify the required settings, for example set a value of an input argument.
- Debug the Actor by running it from the Main menu toolbar. The Actor's input parameters can be set using the Debug / Run Arguments.
- Save the Actor. The change impacts every flow where this Actor is used.
How Do I Create a New Actor from Scratch?
Broadway enables you to create an Actor that inherits its properties and behaviors from a custom Java class rather than from another Actor.
To create a new Actor from scratch, do the following:
Create your own Java class: Right click the Java folder in the Project tree either in the Shared Object or under the Logical Unit. Then click New Java File.
Define the class as follows to inherit the core Actor's properties and behaviors:
   public class <class_name> implements Actor {
   }
Or
   public class <class_name> extends <core_actor_name> {
   }
- Implement an action method to define the Actor's logic. For example, when the Actor has an input argument caseId and an output argument status, the method will be as follows:
  @Override
  public void action(Data input, Data output) throws Exception {
      final String caseId = input.string("caseId");
      try {
          //your logic ....
          output.put ("status", "OK");
      } catch (Exception e){
          handleError(e, output);
      }
  }
If the Actor maintains a state, implement a close method to reset it.
Since the Actors are serialized when running in Recovery mode and their input/output values are serialized to be displayed in the Data Viewer, make sure that Actor, its members and input/output fields are either serializable or transient.
Once this new Java class is ready, create a new Actor. Right click the Broadway folder and click New Actor.
Populate the Class with your Java class's path. For example, when the Java class is located under the Logical Unit, the class is:
com.k2view.cdbms.usercode.lu.<lu_name>.<class_name>
- Click Add Input and Add Output to define the Actor's input and output arguments according to the Java class definition. Note that the Actor's input and output arguments must correspond the Java class definition.
How Do I Change the Input Argument Type?
The Actor's input argument type can be changed from the default to other type using the built-in plug-ins.
To change the type, do the following:
Click Add Input to add a input argument and then click
 > Advanced in the input field to open the editor.
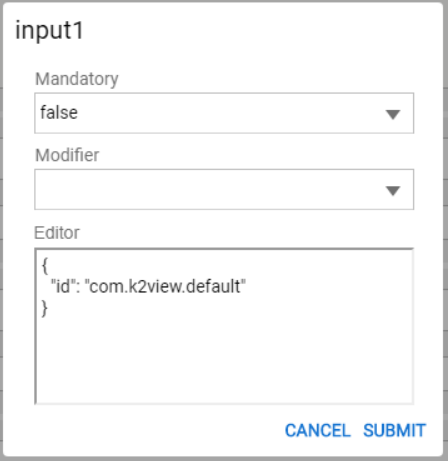
Modify the default to one of the following types as follows:
- To define a drop-down list of values:
{ "id": "com.k2view.dropdown", "options": [ "1", "2" ] }- To define an input from a list of Broadway flows:
{ "id": "com.k2view.innerflow" }- To define an input from a list of Logical Units:
{ "id": "com.k2view.logicalUnit", "addEmptyEntry": true }- To define an input from a list of Interfaces:
 {
   "id": "com.k2view.interface",
   "interfaceType": [
     "database"
   ]
 }
Click Submit to close the editor.
Then click
again and switch the Link Type from Link to Const.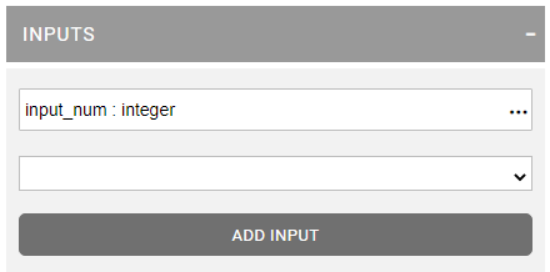
Examples of New Actor Creation
New Actor Which Inherits from Existing Actor
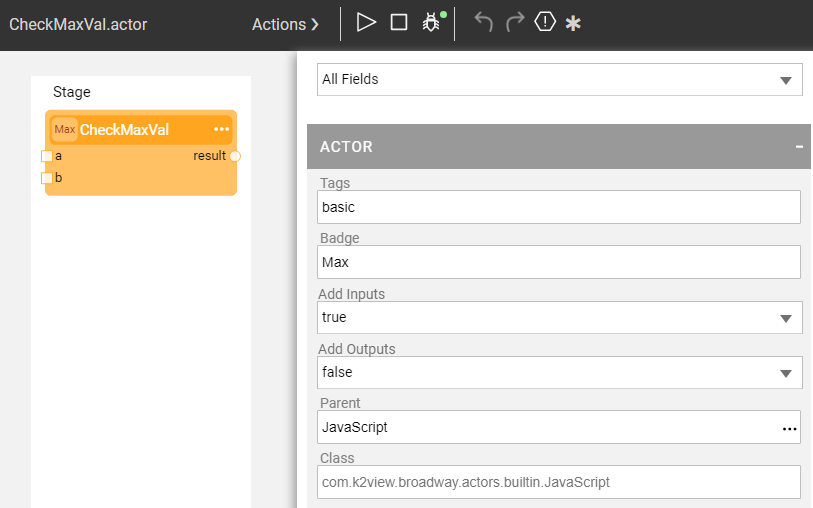
Let's create a new CheckMaxVal Actor that inherits its properties and behaviors from a JavaScript Actor: It receives two integers and returns their maximum value. Do the following:
- Right click the Broadway folder in the Project tree and click New Actor.
- Populate the CheckMaxVal Actor's name and click OK.
- Define the Actor as follows:
- Set Badge to Max.
- Clickin the Parent field to select the parent using the Add Actors window.
- Populate the script input argument with the regex: a > b ? a : b.
- Click Add Input to add two input arguments and update their names to a and b.
- Set the values of an Actor's input parameters using the Debug / Run Arguments in the Main menu toolbar and debug the Actor.
- Once the debug has finished, close the Actor Editor and add the Actor to the required flow.
New Actor Which Inherits from Custom Java Class
When creating a new Actor which inherits from custom Java class, do all the steps until the selection of Parent. Instead, populate the Class with your customer Java class name.
Then define the required input and output arguments and run the Actor to debug it.

If an input field should be different than default, click> Advanced in the input field and change the type in the editor. For example, as follows:
{
  "id": "com.k2view.dropdown",
  "options": [
    "1",
    "2",
    "3",
    "4",
    "5"
  ]
}


Actor Editor
Overview
Actor Editor is a tool which enables creation of new Actors either based on an existing Actor or from scratch, based on your own Java class.
The Actor Editor is displayed as a dummy flow with one Actor that can be setup / modified using the extended Actor's Properties window.
When creating a new Actor, you need to do the following:
- Set either the Parent Actor to inherit from the existing Actor or the Class to be used for custom logic.
- Define inputs and outputs as required.
- Test your Actor by running it in Debug mode.
How Do I Create an Inherited Actor?
The Actor Editor can be used to create a new inherited Actor or modify an existing one via its [Actor Name].actor file. The Actor must inherit either from another Actor or from an Inner Flow that has been saved as an Actor.
To create a new Actor, do the following:
- Right click the Broadway > New Actor.
- Populate the new Actor's name and click OK to open the Actor Editor.
- Select the Parent Actor to get the parent's input and output arguments.
- Debug the Actor by running it from the Main menu toolbar. If the Actor receives input parameters, they can be set using the Debug / Run Arguments.
- Save the Actor.
To modify an Actor, do the following:
- Go to the Broadway folder in the project tree and double click the *.actor file to open the Actor Editor.
- Modify the required settings, for example set a value of an input argument.
- Debug the Actor by running it from the Main menu toolbar. The Actor's input parameters can be set using the Debug / Run Arguments.
- Save the Actor. The change impacts every flow where this Actor is used.
How Do I Create a New Actor from Scratch?
Broadway enables you to create an Actor that inherits its properties and behaviors from a custom Java class rather than from another Actor.
To create a new Actor from scratch, do the following:
Create your own Java class: Right click the Java folder in the Project tree either in the Shared Object or under the Logical Unit. Then click New Java File.
Define the class as follows to inherit the core Actor's properties and behaviors:
   public class <class_name> implements Actor {
   }
Or
   public class <class_name> extends <core_actor_name> {
   }
- Implement an action method to define the Actor's logic. For example, when the Actor has an input argument caseId and an output argument status, the method will be as follows:
  @Override
  public void action(Data input, Data output) throws Exception {
      final String caseId = input.string("caseId");
      try {
          //your logic ....
          output.put ("status", "OK");
      } catch (Exception e){
          handleError(e, output);
      }
  }
If the Actor maintains a state, implement a close method to reset it.
Since the Actors are serialized when running in Recovery mode and their input/output values are serialized to be displayed in the Data Viewer, make sure that Actor, its members and input/output fields are either serializable or transient.
Once this new Java class is ready, create a new Actor. Right click the Broadway folder and click New Actor.
Populate the Class with your Java class's path. For example, when the Java class is located under the Logical Unit, the class is:
com.k2view.cdbms.usercode.lu.<lu_name>.<class_name>
- Click Add Input and Add Output to define the Actor's input and output arguments according to the Java class definition. Note that the Actor's input and output arguments must correspond the Java class definition.
How Do I Change the Input Argument Type?
The Actor's input argument type can be changed from the default to other type using the built-in plug-ins.
To change the type, do the following:
Click Add Input to add a input argument and then click
> Advanced in the input field to open the editor.Modify the default to one of the following types as follows:
- To define a drop-down list of values:
{ "id": "com.k2view.dropdown", "options": [ "1", "2" ] }- To define an input from a list of Broadway flows:
{ "id": "com.k2view.innerflow" }- To define an input from a list of Logical Units:
{ "id": "com.k2view.logicalUnit", "addEmptyEntry": true }- To define an input from a list of Interfaces:
 {
   "id": "com.k2view.interface",
   "interfaceType": [
     "database"
   ]
 }
Click Submit to close the editor.
Then click
again and switch the Link Type from Link to Const.
Examples of New Actor Creation
New Actor Which Inherits from Existing Actor
Let's create a new CheckMaxVal Actor that inherits its properties and behaviors from a JavaScript Actor: It receives two integers and returns their maximum value. Do the following:
- Right click the Broadway folder in the Project tree and click New Actor.
- Populate the CheckMaxVal Actor's name and click OK.
- Define the Actor as follows:
- Set Badge to Max.
- Clickin the Parent field to select the parent using the Add Actors window.
- Populate the script input argument with the regex: a > b ? a : b.
- Click Add Input to add two input arguments and update their names to a and b.
- Set the values of an Actor's input parameters using the Debug / Run Arguments in the Main menu toolbar and debug the Actor.
- Once the debug has finished, close the Actor Editor and add the Actor to the required flow.
New Actor Which Inherits from Custom Java Class
When creating a new Actor which inherits from custom Java class, do all the steps until the selection of Parent. Instead, populate the Class with your customer Java class name.
Then define the required input and output arguments and run the Actor to debug it.
If an input field should be different than default, click> Advanced in the input field and change the type in the editor. For example, as follows:
{
  "id": "com.k2view.dropdown",
  "options": [
    "1",
    "2",
    "3",
    "4",
    "5"
  ]
}
