

Create and Edit Environment
The following steps are used to create an environment in Fabric:
- Creating the environment in the Fabric Studio using the Environments List grid.
- Populating the connection details of the interfaces via the Selected Environment grid.
- Overriding Globals at any Shared, Reference or LU level via the dedicated tab in the Selected Environment grid.
- Deploying all environments to the server while defining the active environment.
Step 1 - Creating the Environment
When editing an existing environment, skip this step.
Go to Project Tree > Shared Objects and double click Environments to open the Environments window.
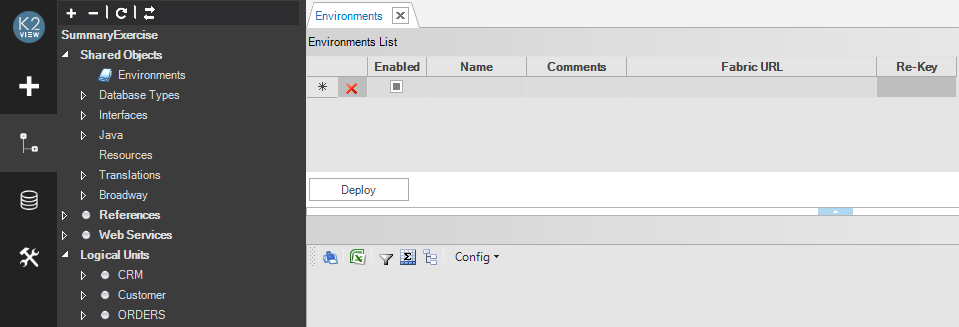
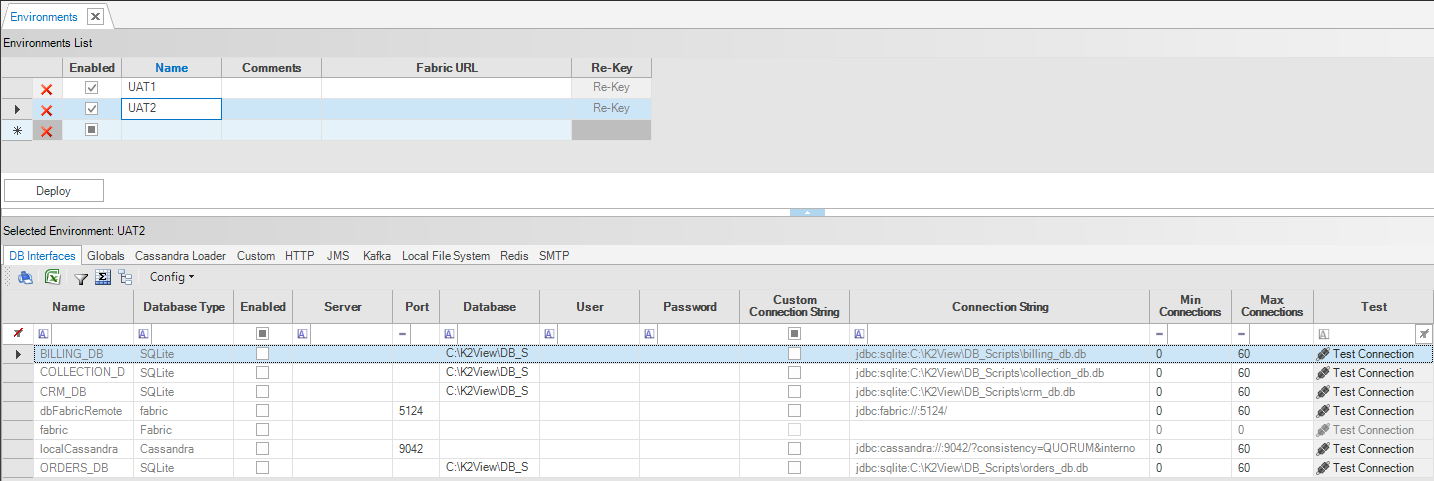
In the Environments List grid, do the following:
Enter a meaningful name for the environment in the Name field.
(Optional) In the Comments field, add a description of the environment.
(Optional) In the Fabric URL field, select the server from the predefined list in the Server Configuration tab in the User Preferences window.
The selected Fabric node is used to encrypt the passwords of all interfaces related to the given environment and to run the test connection. If the node is not selected, Fabric uses the local test connection and previous encryption algorithm.
Click Re-Key to use the most updated encryption mechanism and the latest master key to encrypt the passwords of the interfaces.
Click here for more information about Fabric security hardening.
Step 2 - Defining Interface Settings per Environment
Once Name in the Environments List grid is clicked, all DB and non-DB interfaces in the project are copied to the Selected Environment grid and displayed in the tabs. Each interface type is displayed in a separate tab. For example, if the project has DB, SMTP, Kafka and HTTP interfaces, each type is displayed in a separate tab.
By default, all interfaces are enabled whereby the settings of each interface can be disabled if they are not applicable for the environment.
Select the interface and enable or disable it for the environment by either:
- Clicking the Enabled column checkbox.
- Right clicking the row and clicking Set Selected Rows as Enabled or Set Selected Rows as Disabled. Hold the Ctrl key to select multiple rows.
Populate the relevant fields of each active interface in the Selected Environment grid: Server, User, Password, etc. If the project has several interface types, go through the tabs and populate all mandatory fields.
- Note that when the password is updated, the Fabric Studio re-encrypts it.
Step 3 - Overriding Globals per Environment
In addition to the interfaces that are automatically copied to the created environment, Globals can also be overridden per environment via the Globals tab.
The Globals tab grid has the following columns:
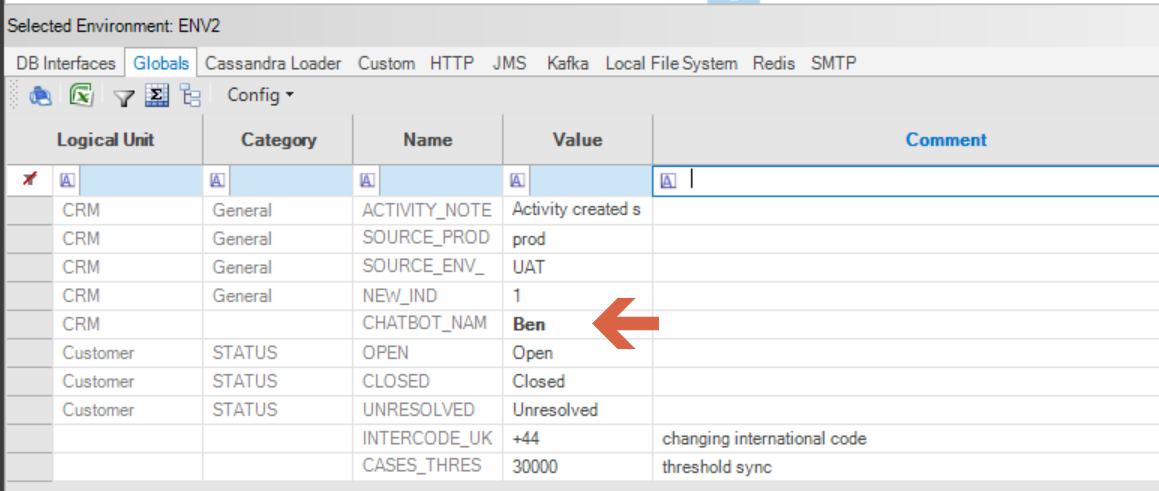
To edit the Global variable value, type in the new value. The new value becomes bold, also when this window is next accessed.
To revert to the previous value, click the left gray area of the Global variable entry and then click Reset To Original Values.
Notes:
- Only non-final Globals are displayed in the Globals environment's table.
- New Global variables cannot be created per environment.
- When an implementation has been updated, for example: adding a new Global in Shared Objects, close and then open the Environment window to see the changes in the Globals grid table.
Step 4 - Deploying the Environments
Repeat steps 1-3 to create the environments and then do the following:
Save the environments definitions:
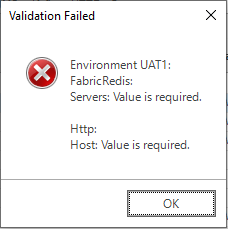
The environment cannot be saved when
 is displayed to indicate that a mandatory field is not populated.
If the mandatory settings are missing, a validation error message opens:
Click Deploy to deploy an environment to the Fabric server. Unlike interfaces, environments are not deployed together with an LUT, Reference tables and Web Services and require an explicit deployment.
Note that environments can be deployed to the Fabric Server either from the Fabric Studio or using a command line to perform an offline deployment from an XML file.


Create and Edit Environment
The following steps are used to create an environment in Fabric:
- Creating the environment in the Fabric Studio using the Environments List grid.
- Populating the connection details of the interfaces via the Selected Environment grid.
- Overriding Globals at any Shared, Reference or LU level via the dedicated tab in the Selected Environment grid.
- Deploying all environments to the server while defining the active environment.
Step 1 - Creating the Environment
When editing an existing environment, skip this step.
Go to Project Tree > Shared Objects and double click Environments to open the Environments window.
In the Environments List grid, do the following:
Enter a meaningful name for the environment in the Name field.
(Optional) In the Comments field, add a description of the environment.
(Optional) In the Fabric URL field, select the server from the predefined list in the Server Configuration tab in the User Preferences window.
The selected Fabric node is used to encrypt the passwords of all interfaces related to the given environment and to run the test connection. If the node is not selected, Fabric uses the local test connection and previous encryption algorithm.
Click Re-Key to use the most updated encryption mechanism and the latest master key to encrypt the passwords of the interfaces.
Click here for more information about Fabric security hardening.
Step 2 - Defining Interface Settings per Environment
Once Name in the Environments List grid is clicked, all DB and non-DB interfaces in the project are copied to the Selected Environment grid and displayed in the tabs. Each interface type is displayed in a separate tab. For example, if the project has DB, SMTP, Kafka and HTTP interfaces, each type is displayed in a separate tab.
By default, all interfaces are enabled whereby the settings of each interface can be disabled if they are not applicable for the environment.
Select the interface and enable or disable it for the environment by either:
- Clicking the Enabled column checkbox.
- Right clicking the row and clicking Set Selected Rows as Enabled or Set Selected Rows as Disabled. Hold the Ctrl key to select multiple rows.
Populate the relevant fields of each active interface in the Selected Environment grid: Server, User, Password, etc. If the project has several interface types, go through the tabs and populate all mandatory fields.
- Note that when the password is updated, the Fabric Studio re-encrypts it.
Step 3 - Overriding Globals per Environment
In addition to the interfaces that are automatically copied to the created environment, Globals can also be overridden per environment via the Globals tab.
The Globals tab grid has the following columns:
To edit the Global variable value, type in the new value. The new value becomes bold, also when this window is next accessed.
To revert to the previous value, click the left gray area of the Global variable entry and then click Reset To Original Values.
Notes:
- Only non-final Globals are displayed in the Globals environment's table.
- New Global variables cannot be created per environment.
- When an implementation has been updated, for example: adding a new Global in Shared Objects, close and then open the Environment window to see the changes in the Globals grid table.
Step 4 - Deploying the Environments
Repeat steps 1-3 to create the environments and then do the following:
Save the environments definitions:
The environment cannot be saved when
is displayed to indicate that a mandatory field is not populated.If the mandatory settings are missing, a validation error message opens:
Click Deploy to deploy an environment to the Fabric server. Unlike interfaces, environments are not deployed together with an LUT, Reference tables and Web Services and require an explicit deployment.
Note that environments can be deployed to the Fabric Server either from the Fabric Studio or using a command line to perform an offline deployment from an XML file.
