

Installation
2.1 SonarLint Installation
To install this plugin in your IntelliJ IDE:
Go to File > Settings > Plugins.
Search for SonarLint
Launch the installation
2.2 SonarQube Installation
1. Download and install SonarQube-10.4 Community edition or higher version.
e.g., install under C:\sonarQube\sonarqube-<version>
2. Modify wrapper.conf (located under C:\sonarQube\sonarqube-\
wrapper.java.command=C:/Program Files/ojdkbuild/jdk-11.0.8/bin/java
Java path might be installed in different location, make sure to use the right path.
Note: You must download and config java 11 to execute SonarQube.
3. Download (right panel) java and xml plugins and copy to C:\sonarQube\sonarqube-\
4. Start SonarQube server:
- open C:\sonarQube\sonarqube-<version>\bin\windows-x86-64\ in File Explorer
- open cmd (windows) pointing to that path by typing cmd in the Address Bar in File explorer
- execute StartSonar.bat in cmd
- wait for server to be up and running, you supposed to see below message:
    jvm 1    | 2020.12.28 12:41:35 INFO  app[][o.s.a.SchedulerImpl] SonarQube is up
5. Open your browser and type http://localhost:9000/ (9000 is default)
log-in using default System Administrator credentials (login=admin, password=admin).
6. Create Quality Profiles.
Quality Profiles are sets of rules to be applied on project when scanned.
Create QP for each plugin, need to run the steps for each plugin (XML/Java)
   - Open SonarQube UI, Go to Home Page --> Quality Profiles --> Create
   - Choose "Extend an existing quality profile"
   - "Language" choose XML or Java
- "Parent" choose "Sonar way (Built-in)", or any default profile used for the project.
- "Name" give a uniqe QP name. (later on you will use this name when applying this QP to your project)
- Open your new QP, under "Rule breakdown" click on "Activate More"
 - On the left panel, open tags, search for k2view, mark "k2view" and "k2view-iidf", click on "Bulk Change" and choose "Activate In <QP name>" and Ok.
  - Apply this QP on your project under: <Project> -> Project Settings -> Quality Profiles and change Current Qualirt Profile to your newly created QP.
Note: For any configuration changes go to conf folder and sonar.properties file. Here you can configure database, LDAP, webserver, SSO authentication, logging, etc.
For port changes, under web-server section, you can add sonar.web.port=9001.
2.3 SonarScanner Installation
1. Download and Install sonarScanner
e.g., install under c:\sonarQube\sonar-scanner-<version>-windows
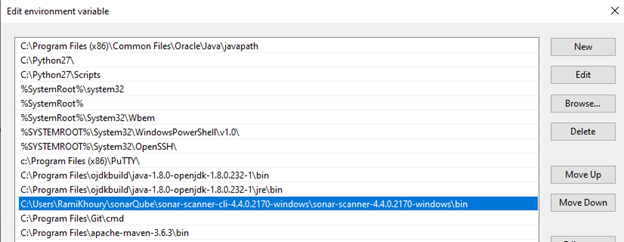
2. In the window, register sonar scanner executable under the "Path" environment variable.
- Type env in Windows Start Search and hit enter
- Click on Environment Variables button
- Look for "Path" environment variable and double click on it
- Click New and set the path of the bin folder of downloaded scanner
    e.g. C:\SonarQube\sonar-scanner-4.5.0.2216-windows\bin
3. Set SonarQube user/password
Set the user/password you use to login SonarQube UI in sonar scanner properties file.
look for sonar-scanner.properties under conf folder e.g. C:\SonarQube\sonar-scanner-4.5.0.2216-windows\conf\sonar-scanner.properties
open this file with any text editor and add the below properties:
sonar.login=
e.g.
    sonar.login=admin
       sonar.password=admin
Note: If while installing SonarQube server you decided to use different port than the default, you will need to set the port in scanner properties file.
Modify prop sonar.host.url within sonar-scanner.properties to point to your sonarQube server:

   •   Local sonarQube server: -
    sonar.host.url= http://localhost:9000 (default)

   •   Remote sonarQube server: -
   sonar.host.url= http(s)://IP:Port


Installation
2.1 SonarLint Installation
To install this plugin in your IntelliJ IDE:
Go to File > Settings > Plugins.
Search for SonarLint
Launch the installation
2.2 SonarQube Installation
1. Download and install SonarQube-10.4 Community edition or higher version.
e.g., install under C:\sonarQube\sonarqube-<version>
2. Modify wrapper.conf (located under C:\sonarQube\sonarqube-\
wrapper.java.command=C:/Program Files/ojdkbuild/jdk-11.0.8/bin/java
Java path might be installed in different location, make sure to use the right path.
Note: You must download and config java 11 to execute SonarQube.
3. Download (right panel) java and xml plugins and copy to C:\sonarQube\sonarqube-\
4. Start SonarQube server:
- open C:\sonarQube\sonarqube-<version>\bin\windows-x86-64\ in File Explorer
- open cmd (windows) pointing to that path by typing cmd in the Address Bar in File explorer
- execute StartSonar.bat in cmd
- wait for server to be up and running, you supposed to see below message:
    jvm 1    | 2020.12.28 12:41:35 INFO  app[][o.s.a.SchedulerImpl] SonarQube is up
5. Open your browser and type http://localhost:9000/ (9000 is default)
log-in using default System Administrator credentials (login=admin, password=admin).
6. Create Quality Profiles.
Quality Profiles are sets of rules to be applied on project when scanned.
Create QP for each plugin, need to run the steps for each plugin (XML/Java)
   - Open SonarQube UI, Go to Home Page --> Quality Profiles --> Create
   - Choose "Extend an existing quality profile"
   - "Language" choose XML or Java
- "Parent" choose "Sonar way (Built-in)", or any default profile used for the project.
- "Name" give a uniqe QP name. (later on you will use this name when applying this QP to your project)
- Open your new QP, under "Rule breakdown" click on "Activate More"
 - On the left panel, open tags, search for k2view, mark "k2view" and "k2view-iidf", click on "Bulk Change" and choose "Activate In <QP name>" and Ok.
  - Apply this QP on your project under: <Project> -> Project Settings -> Quality Profiles and change Current Qualirt Profile to your newly created QP.
Note: For any configuration changes go to conf folder and sonar.properties file. Here you can configure database, LDAP, webserver, SSO authentication, logging, etc.
For port changes, under web-server section, you can add sonar.web.port=9001.
2.3 SonarScanner Installation
1. Download and Install sonarScanner
e.g., install under c:\sonarQube\sonar-scanner-<version>-windows
2. In the window, register sonar scanner executable under the "Path" environment variable.
- Type env in Windows Start Search and hit enter
- Click on Environment Variables button
- Look for "Path" environment variable and double click on it
- Click New and set the path of the bin folder of downloaded scanner
    e.g. C:\SonarQube\sonar-scanner-4.5.0.2216-windows\bin
3. Set SonarQube user/password
Set the user/password you use to login SonarQube UI in sonar scanner properties file.
look for sonar-scanner.properties under conf folder e.g. C:\SonarQube\sonar-scanner-4.5.0.2216-windows\conf\sonar-scanner.properties
open this file with any text editor and add the below properties:
sonar.login=
e.g.
    sonar.login=admin
       sonar.password=admin
Note: If while installing SonarQube server you decided to use different port than the default, you will need to set the port in scanner properties file.
Modify prop sonar.host.url within sonar-scanner.properties to point to your sonarQube server:

   •   Local sonarQube server: -
    sonar.host.url= http://localhost:9000 (default)

   •   Remote sonarQube server: -
   sonar.host.url= http(s)://IP:Port
