

Graphit Basic Editing
Once you've created a Graphit file, you can start editing it. To learn how to create a Graphit as web service - read here. Similarly, you can create Graphit under any other Logical Unit.
Graphit Terminology
- Node - an entry element, represented visually as a vertical strip, and which stands for an output document element and/or as a logical function.
- Node Type - defines how node content is generated and structured. For node types that have a representation in the output document, there may also be a definition relating to the node presentation. Some node types, such as SQL, Broadway and Get, provide additional helpers to ease the node content building.
- Node Property - an additional instruction that can be given to a node. For example, how to format a number, which database to query, or whether the node is active/disabled.
Basic Editing Concepts
- The Graphit editor is built from a main editing area, a top toolbar, and a right panel that opens when an action in the top toolbar is selected.
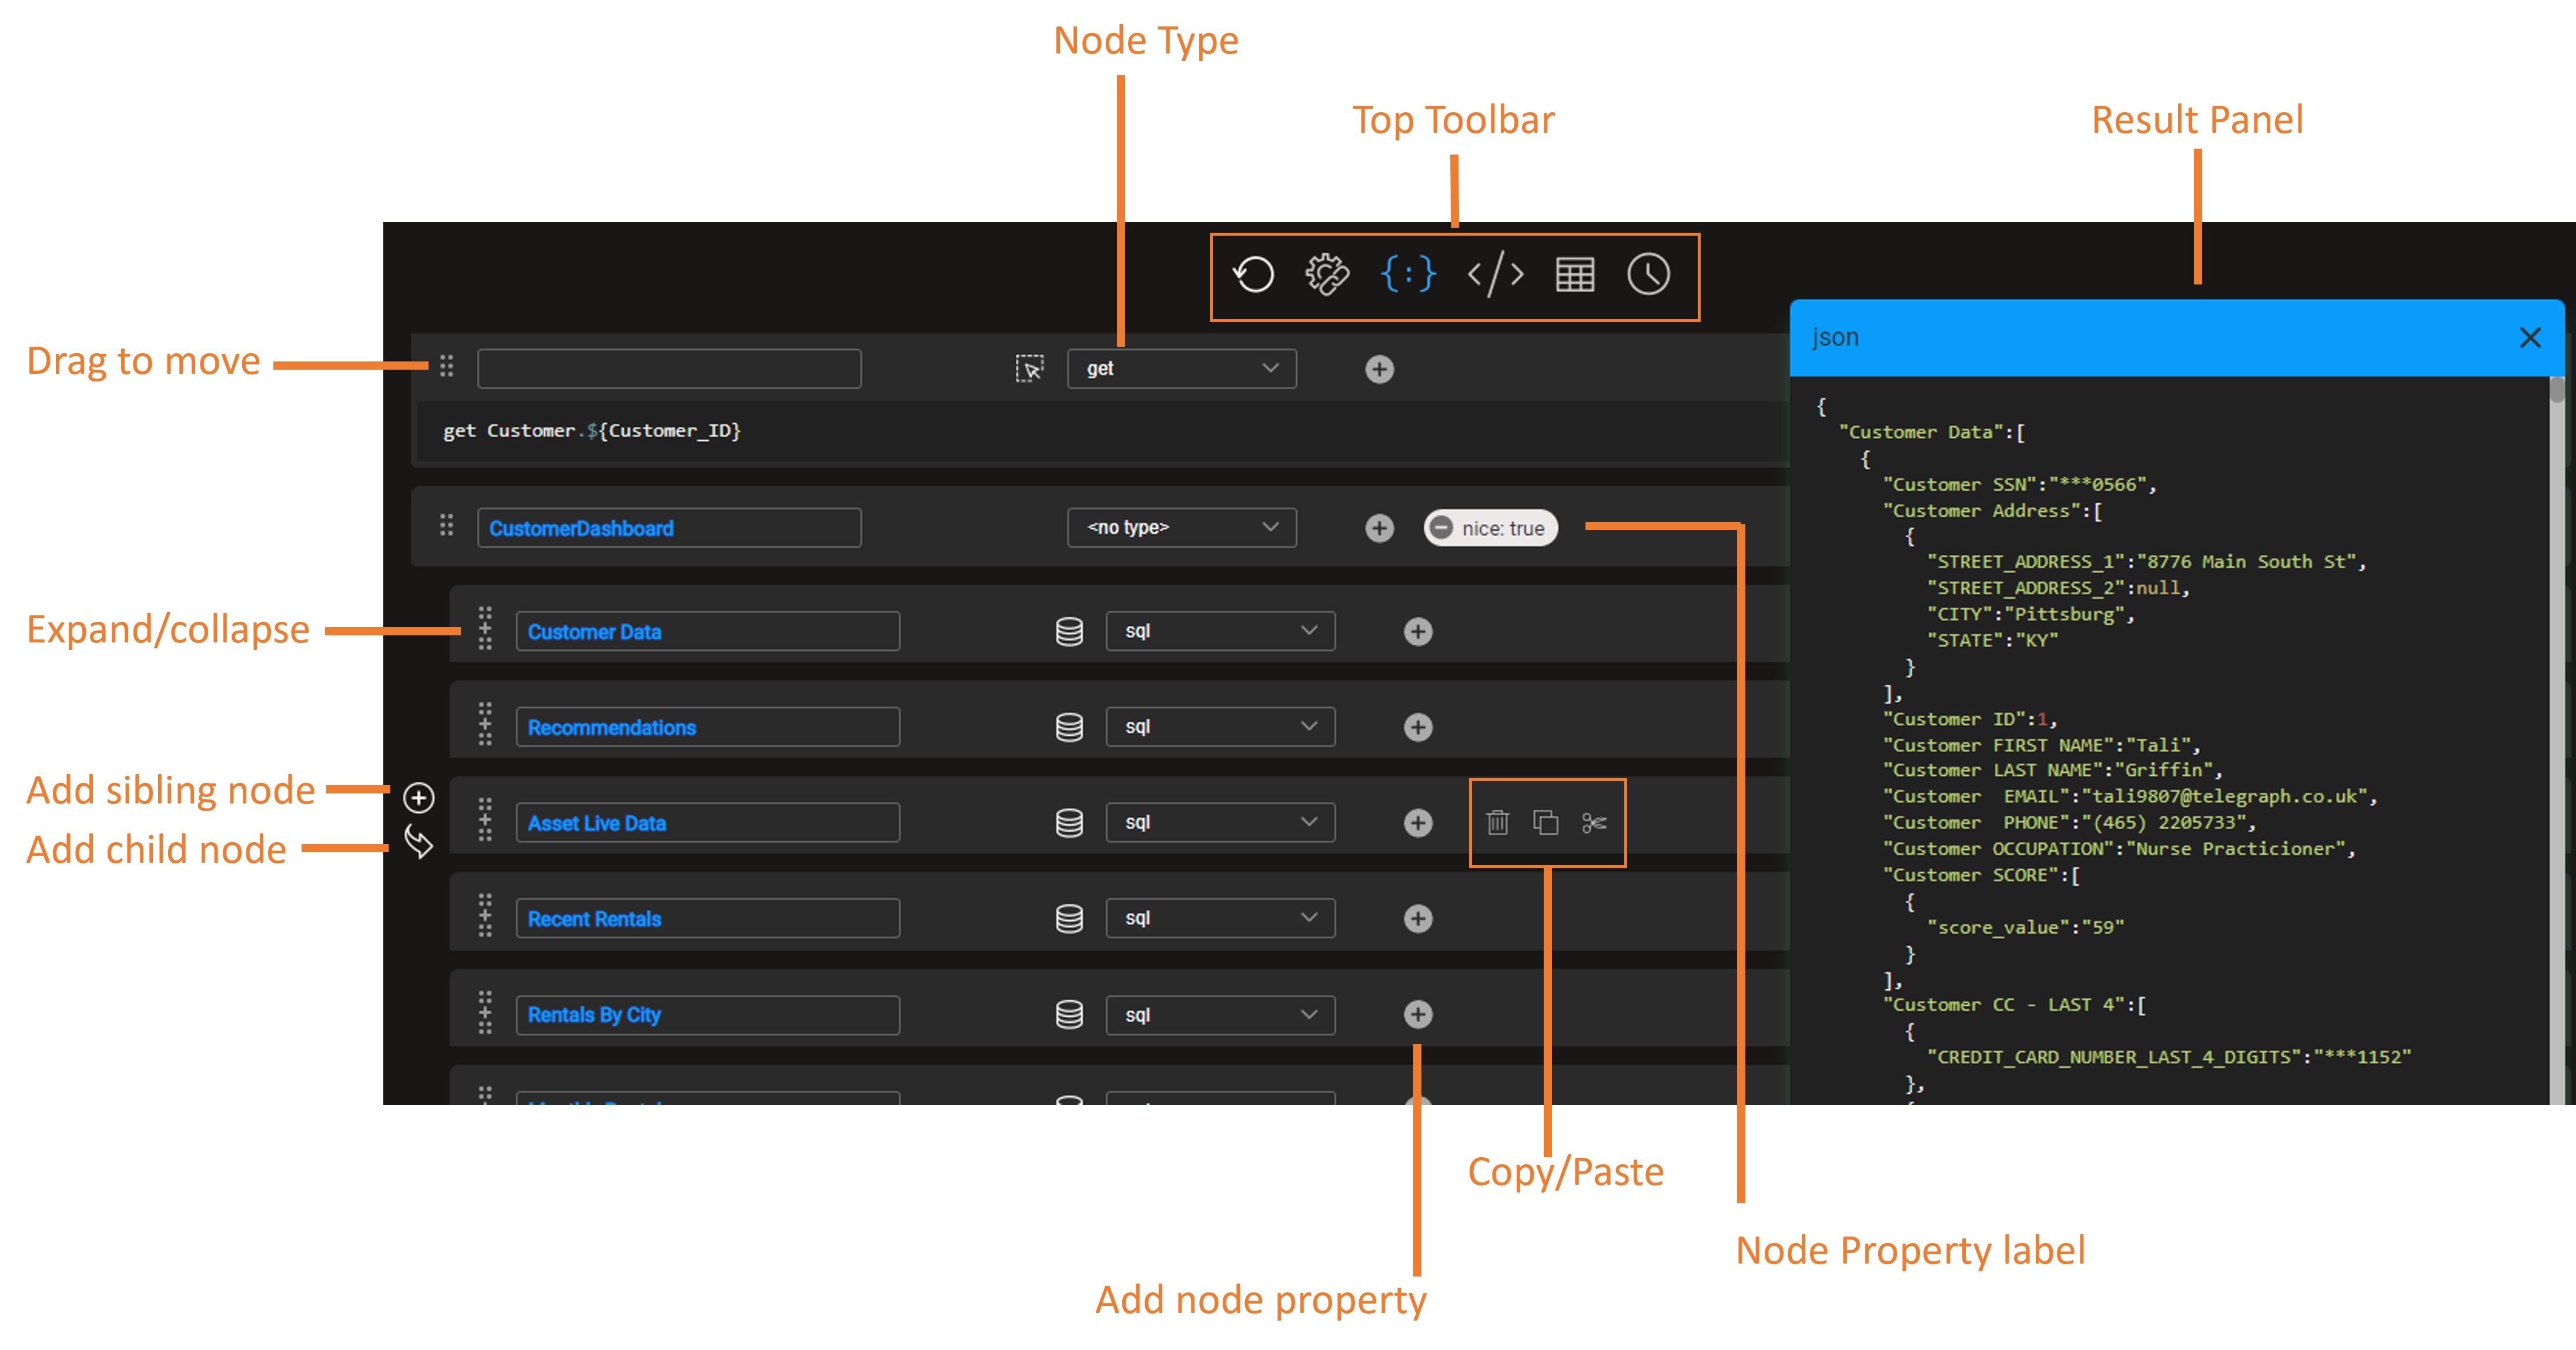
- The editor manages Graphit files that are built from nodes that can be added as either a sibling or a child of any other existing node, in the main editing area.
- Nodes can be moved or copied within a GraphIt file using Drag&Drop or Copy&Paste actions. A node can be copied and pasted between files.
- Upon a node creation, you shall first select its node type and accordingly accomplish its logic and/or output form. The node type can be changed later during editing. To learn more about node types - read here. Note:
- Not all nodes have an output representation, as they define a logical functionality.
- Any node that has an output representation shall be named.
- You may use node properties to define some of the logic or the output form of a node. To learn more about node properties - read here.
Top Toolbar Actions
 Refreshing the opened testing results panel. It is enabled only when the result panel is opened.
 Opening the URL Parameters and Properties panel. This panel shows different items by context.
 Opening the JSON result panel
  Opening the XML result panel
  Opening the CSV result panel
  Opening the Graphit Profile panel
Nodes Editing Actions
Use the following actions for managing nodes such as create, copy, paste, move, delete:
- Click
 on the left of a node, to create a new sibling node placed under the original node, on the same level. The icon appears when hovering over the node.
 - Click
 on the left of a node, to create a new child node under the parent node. The icon appears when hovering over the node.
 - Click
 to drag a node to another location in the hierarchy.
 - Click
 to expand a collapsed node.
 - Click
 to delete a node on the node level. The icon appears when hovering over the node.
 - Click
 to copy a node so that it can be pasted into another location in this Graphit or to another Graphit file. The icon appears when hovering over the node.
 - Click
 to copy a node so that it can be moved into another location in this Graphit or to another Graphit file. Moving nodes within a Graphit file can be also done via drag and drop. The icon appears when hovering over the node.
 - Click
 to paste a previously copied/cut node as a child node. The icon appears when hovering over the node.
 - Click
 to paste a previously copied/cut node as a sibling node. The icon appears when hovering over the node.
Use the following actions for node editing:
- Click
 to add a property to the node
 - Click
 to open Query builder for a sql node type
 - Click
 to open Helper for a get and Broadway node types.
Testing Graphit
You can easily execute and test your Graphit file by using the top tollbar actions, as explained here.


Graphit Basic Editing
Once you've created a Graphit file, you can start editing it. To learn how to create a Graphit as web service - read here. Similarly, you can create Graphit under any other Logical Unit.
Graphit Terminology
- Node - an entry element, represented visually as a vertical strip, and which stands for an output document element and/or as a logical function.
- Node Type - defines how node content is generated and structured. For node types that have a representation in the output document, there may also be a definition relating to the node presentation. Some node types, such as SQL, Broadway and Get, provide additional helpers to ease the node content building.
- Node Property - an additional instruction that can be given to a node. For example, how to format a number, which database to query, or whether the node is active/disabled.
Basic Editing Concepts
- The Graphit editor is built from a main editing area, a top toolbar, and a right panel that opens when an action in the top toolbar is selected.
- The editor manages Graphit files that are built from nodes that can be added as either a sibling or a child of any other existing node, in the main editing area.
- Nodes can be moved or copied within a GraphIt file using Drag&Drop or Copy&Paste actions. A node can be copied and pasted between files.
- Upon a node creation, you shall first select its node type and accordingly accomplish its logic and/or output form. The node type can be changed later during editing. To learn more about node types - read here. Note:
- Not all nodes have an output representation, as they define a logical functionality.
- Any node that has an output representation shall be named.
- You may use node properties to define some of the logic or the output form of a node. To learn more about node properties - read here.
Top Toolbar Actions
- Refreshing the opened testing results panel. It is enabled only when the result panel is opened.
- Opening the URL Parameters and Properties panel. This panel shows different items by context.
- Opening the JSON result panel
- Opening the XML result panel
- Opening the CSV result panel
- Opening the Graphit Profile panel
Nodes Editing Actions
Use the following actions for managing nodes such as create, copy, paste, move, delete:
- Click on the left of a node, to create a new sibling node placed under the original node, on the same level. The icon appears when hovering over the node.
- Click on the left of a node, to create a new child node under the parent node. The icon appears when hovering over the node.
- Click to drag a node to another location in the hierarchy.
- Click to expand a collapsed node.
- Click to delete a node on the node level. The icon appears when hovering over the node.
- Click to copy a node so that it can be pasted into another location in this Graphit or to another Graphit file. The icon appears when hovering over the node.
- Click to copy a node so that it can be moved into another location in this Graphit or to another Graphit file. Moving nodes within a Graphit file can be also done via drag and drop. The icon appears when hovering over the node.
- Click to paste a previously copied/cut node as a child node. The icon appears when hovering over the node.
- Click to paste a previously copied/cut node as a sibling node. The icon appears when hovering over the node.
Use the following actions for node editing:
- Click to add a property to the node
- Click to open Query builder for a sql node type
- Click to open Helper for a get and Broadway node types.
Testing Graphit
You can easily execute and test your Graphit file by using the top tollbar actions, as explained here.
