


Create Custom-Built Web Service with Graphit
As a powerful low-code utility, Graphit enables web service planning and generation in a visualized layout, as well as inline testing capabilities. To learn more about the Graphit utility - read here.
A Graphit file is structured as a hierarchical representation of nodes, where each node defines an entry element in either a JSON, an XML or a CSV formatted document.
To create a new Graphit Web Service, follow these steps:
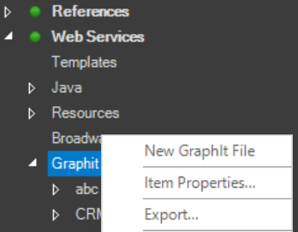
Go to Project Tree, click on Web Services > Graphit > right-click & choose New Graphit File.
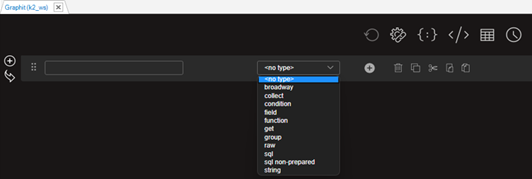
A Graphit file opens, containing a newly created Graphit node, which should be populated.
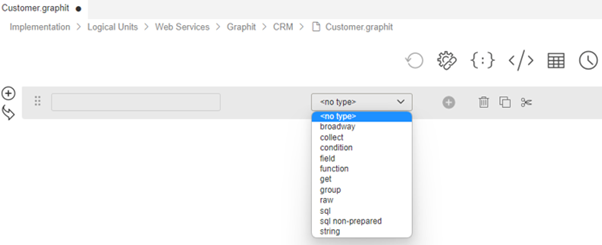
Start by choosing, from the drop-down list, any of the below commands/functions (node types):
Initiate the example by choosing a get command
It is useful to place the get command - a function that retrieves the LUI (Logical Unit Instance) - in the beginning of the Graphit layout although it can be implemented on any of the nodes.
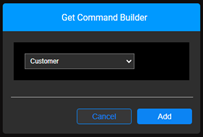
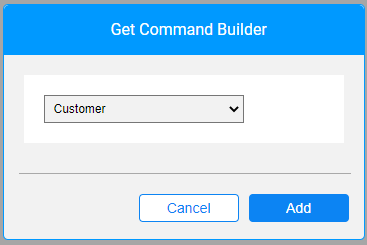
From the open pop-up window, select an LU from the drop-down list and then click Add.
 Once this 1st node is created, it will looks like this:
You can later change the get command, when needed, by clicking on the
 icon, triggering the Get Command Builder pop-up window again.
Hover over the node and click on the plus icon
 in order to add a sibling node to the example layout.
Name the newly created node by populating the left-hand-field. Note that only nodes with a tag name are displayed in the output document, when a Graphit web service is called.
Choose an sql command, as the node type, using the drop-down arrow.

Click on the query builder icon
 on the 2nd node, to generate a query in a Query Builder window.
Read here for more information about Query Builder.
on the 2nd node, to generate a query in a Query Builder window.
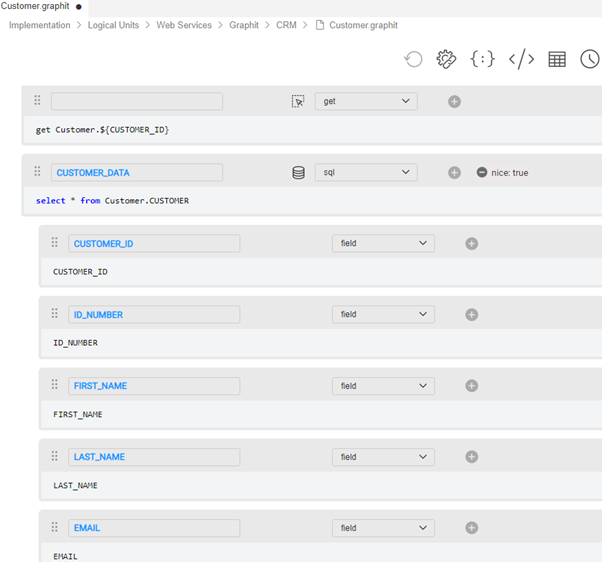
Read here for more information about Query Builder.Following the creation of the 2nd node and its population, a message pops up, asking whether you want to create table fields, i.e., laying out and exposing the SQL fields in the Graphit; choose YES.

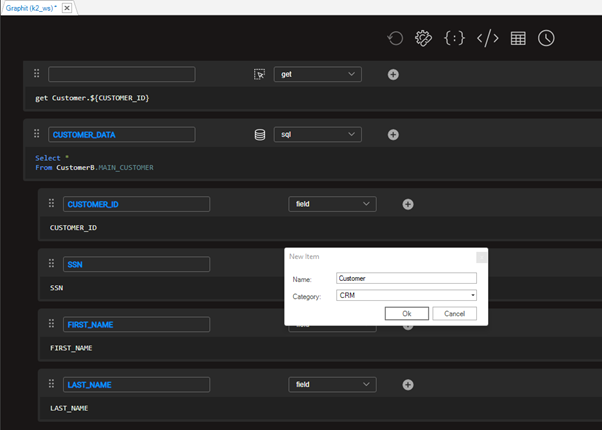
The below image shows the nested nodes layout result:
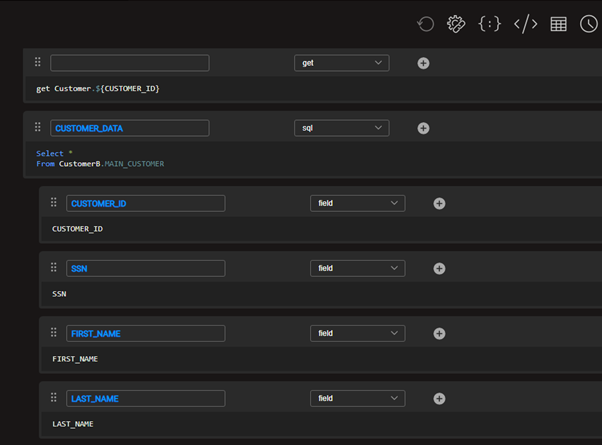
Note that exposing the SQL fields is optional and even if you choose NO, the fields will be displayed in the output document. Yet, exposing them allows you to manipulate them. It is sometimes preferred by implementors for a better visualized output document, to see a full layout of the structure.
Save the Graphit file. A pop-up message will appear, asking you to assign a Name and a Category for your Graphit file.
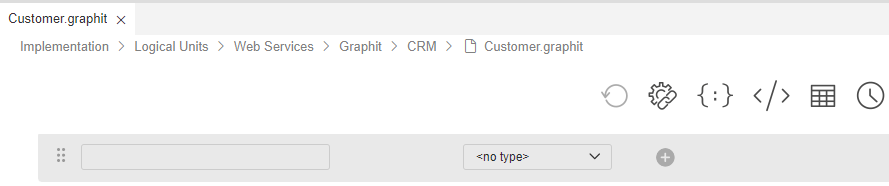
Once Ok'ed, the newly created Graphit file name appears in the Project Tree, under its category, and automatically receives a '.graphit' suffix:

You can create a new web service from either the Fabric menu at the top menu bar or the Project Tree.
When initiated from the Fabric menu:
- Open Fabric Menu, choose New Web Service
- Select New Graphit Web Service
When initiated from the Project Tree:
- Go to Project Tree, click on Implementation -> Logical Units / Data Products -> Web Services
- Expand Web Services -> right-click on Graphit and choose New Graphit

- Click on Choose Category to select an existing category name for the Graphit file:

or, click on New Category to enter a new category name, followed by Enter for saving it:

The next step is to enter a name for your new Graphit file, followed by Enter for saving it. Note that the name should contain only alpha-numeric characters.
Using the file name, you can control and set both the web-service version and its verb. For more information - read here. The pop-up window itself provides some tips about the recommended naming conventions.

The Graphit file is saved, its name appears at the top of its layout, it is open and it contains a newly created Graphit node, which should be populated:
- Start by choosing, from the drop-down list, any of the below commands/functions (node types):
Initiate the example by choosing a get command
It is useful to place the get command - a function that retrieves the LUI (Logical Unit Instance) - in the beginning of the Graphit layout although it can be implemented on any of the nodes.
- From the open pop-up window, select an LU from the drop-down list and then click Add.
Once this 1st node has been created, it will looks like this:

You can later change the get command, when needed, by clicking on the icon, triggering the Get Command Builder pop-up window again.
- Hover over the node and click on the plus icon in order to add a sibling node to the example layout.
- Name the newly created node by populating the left-hand field.
Note that only nodes with a tag name are displayed in the output document, when a Graphit web service is called.
- Choose an sql command, as the node type, using the drop-down arrow.

- Click on the query builder icon on the 2nd node, to generate a query in a Query Builder window.
Read here for more information about Query Builder.
Following the creation of the 2nd node and its population, a message pops up, asking whether you want to create table fields, i.e., laying out and exposing the SQL fields in the Graphit; choose YES.
The below image shows the nested nodes layout result:
Note that exposing the SQL fields is optional and even if you choose NO, the fields will be displayed in the output document. Yet, exposing them allows you to manipulate them. It is sometimes preferred by implementors for a better visualized output document, to see a full layout of the structure.
- Save the Graphit file.
It now appears in the Project Tree, under its category, and automatically receives a '.graphit' suffix:

To learn more about editing a Graphit file - using the Graphit Editor - read here.
NOTE: Prior to Fabric 7, Graphit files were located only under Java/resources folder. This option is still available, for a backward compatibility.


Create Custom-Built Web Service with Graphit
As a powerful low-code utility, Graphit enables web service planning and generation in a visualized layout, as well as inline testing capabilities. To learn more about the Graphit utility - read here.
A Graphit file is structured as a hierarchical representation of nodes, where each node defines an entry element in either a JSON, an XML or a CSV formatted document.
To create a new Graphit Web Service, follow these steps:
Go to Project Tree, click on Web Services > Graphit > right-click & choose New Graphit File.
A Graphit file opens, containing a newly created Graphit node, which should be populated.
Start by choosing, from the drop-down list, any of the below commands/functions (node types):
Initiate the example by choosing a get command
It is useful to place the get command - a function that retrieves the LUI (Logical Unit Instance) - in the beginning of the Graphit layout although it can be implemented on any of the nodes.
From the open pop-up window, select an LU from the drop-down list and then click Add.
Once this 1st node is created, it will looks like this:You can later change the get command, when needed, by clicking on the
icon, triggering the Get Command Builder pop-up window again.Hover over the node and click on the plus icon
in order to add a sibling node to the example layout.Name the newly created node by populating the left-hand-field. Note that only nodes with a tag name are displayed in the output document, when a Graphit web service is called.
Choose an sql command, as the node type, using the drop-down arrow.
Click on the query builder icon
on the 2nd node, to generate a query in a Query Builder window.
Read here for more information about Query Builder.Following the creation of the 2nd node and its population, a message pops up, asking whether you want to create table fields, i.e., laying out and exposing the SQL fields in the Graphit; choose YES.
The below image shows the nested nodes layout result:
Note that exposing the SQL fields is optional and even if you choose NO, the fields will be displayed in the output document. Yet, exposing them allows you to manipulate them. It is sometimes preferred by implementors for a better visualized output document, to see a full layout of the structure.
Save the Graphit file. A pop-up message will appear, asking you to assign a Name and a Category for your Graphit file.
Once Ok'ed, the newly created Graphit file name appears in the Project Tree, under its category, and automatically receives a '.graphit' suffix:
You can create a new web service from either the Fabric menu at the top menu bar or the Project Tree.
When initiated from the Fabric menu:
- Open Fabric Menu, choose New Web Service
- Select New Graphit Web Service
When initiated from the Project Tree:
- Go to Project Tree, click on Implementation -> Logical Units / Data Products -> Web Services
- Expand Web Services -> right-click on Graphit and choose New Graphit
- Click on Choose Category to select an existing category name for the Graphit file:
or, click on New Category to enter a new category name, followed by Enter for saving it:
The next step is to enter a name for your new Graphit file, followed by Enter for saving it. Note that the name should contain only alpha-numeric characters.
Using the file name, you can control and set both the web-service version and its verb. For more information - read here. The pop-up window itself provides some tips about the recommended naming conventions.
The Graphit file is saved, its name appears at the top of its layout, it is open and it contains a newly created Graphit node, which should be populated:
- Start by choosing, from the drop-down list, any of the below commands/functions (node types):
Initiate the example by choosing a get command
It is useful to place the get command - a function that retrieves the LUI (Logical Unit Instance) - in the beginning of the Graphit layout although it can be implemented on any of the nodes.
- From the open pop-up window, select an LU from the drop-down list and then click Add.
Once this 1st node has been created, it will looks like this:
You can later change the get command, when needed, by clicking on the icon, triggering the Get Command Builder pop-up window again.
- Hover over the node and click on the plus icon in order to add a sibling node to the example layout.
- Name the newly created node by populating the left-hand field.
Note that only nodes with a tag name are displayed in the output document, when a Graphit web service is called.
- Choose an sql command, as the node type, using the drop-down arrow.
- Click on the query builder icon on the 2nd node, to generate a query in a Query Builder window.
Read here for more information about Query Builder.
Following the creation of the 2nd node and its population, a message pops up, asking whether you want to create table fields, i.e., laying out and exposing the SQL fields in the Graphit; choose YES.
The below image shows the nested nodes layout result:
Note that exposing the SQL fields is optional and even if you choose NO, the fields will be displayed in the output document. Yet, exposing them allows you to manipulate them. It is sometimes preferred by implementors for a better visualized output document, to see a full layout of the structure.
- Save the Graphit file.
It now appears in the Project Tree, under its category, and automatically receives a '.graphit' suffix:
To learn more about editing a Graphit file - using the Graphit Editor - read here.
NOTE: Prior to Fabric 7, Graphit files were located only under Java/resources folder. This option is still available, for a backward compatibility.
