


Deploy from Fabric Studio
New or already existing Fabric project implementations must be deployed to the server in a way that recent code changes are compiled and ready to be used.
A deployment can be performed either from the Fabric Studio, as explained in this article, or by using an Offline Deploy.
Studio allows you to deploy to either the local development server or a remote server.
Before starting the deployment process on a project, check that the target Fabric server is configured. To do so, go to the User Preferences > Server Configuration window and configure the required Fabric server, or use the 'debug' server entry, that is already configured to localhost, that is, to the Fabric server that the Studio works by default with.
Note that in order to force the sync of the LU Instances after deployment, you should check the Force Upgrade Post Deploy checkbox in the Server Configuration window.
It is strongly recommended to avoid deploying directly from Studio to sensitive environments, such as staging or production servers. Instead, deployments to these environments should be managed through a CI/CD pipeline. This approach ensures that the deployment package is thoroughly verified before implementation.
Additionally, deployments may require coordination among multiple developers to integrate their work effectively. Using a structured pipeline not only minimizes risks but also facilitates collaboration and ensures a smooth deployment process.
Auto Deploy
The Fabric Studio Auto Deploy capability performs an automatic deployment of the code changes to the local Fabric server while debugging various components, such as the Data Viewer, LU Schema, Broadway, Broadway Population, Parser, and GraphIt.
This reduces friction during the debugging process and frees the user from performing a manual deployment upon each code change.
Fabric performs a local deployment according to the following logic:
- If the Schema was changed, a full deploy is performed.
- If Java was changed, only Java resources and Broadway are deployed.
- If Broadway was changed, only Broadway is deployed.
How Do I Deploy a Fabric Object from the Fabric Studio?
The following steps must be performed in the Fabric Studio for each deployed object, Logical Unit, Web Service, Broadway flow, Graphit or Reference table.
Right-click the object to be deployed and then select Deploy to Server to display the list of servers defined in the User Preferences window. Note that the Force Upgrade Post Deploy notification displays next to the server if the server is checked as Force Upgrade Post Deploy in the Server Configuration tab.
Do either:
- Click [Server Name], or
- Click Add/Edit to open the User Preferences window if the required server configuration is missing.
Deploying Fabric Objects to the Local Fabric Debug Server
To debug an LU, it must first be deployed to the local Fabric debug server. A deployed LU has a green circle next to its name.
To deploy the Fabric implementation to the Fabric debug server, do either:
- Right-click the selected Fabric object > Deploy To debug, or
- Click Deploy in the upper Fabric Debug panel.
Deploying a Fabric Project
You can activate a deployment and see the Deployment Status in several places within the Fabric Studio.
Deployment Status
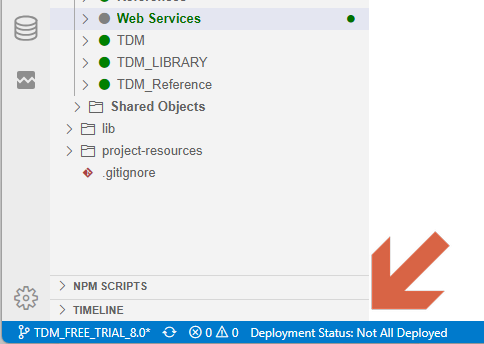
A deployed LU has a green circle next to its name in the Project Tree. Otherwise, for example while making changes in its content, the circle turns gray.
You can also check the 'Deployment Status' in the bottom status bar to verify whether all LUs have been deployed. Hovering the mouse over it will display a tooltip, implying that no LUs have been deployed.
The illustration below shows the Project Tree. All LUs except 'Web Services' appear with a green circle, indicating they are deployed. A similar indication exists in the bottom status bar.
Activate Deploy
Deployment can be done for all updated LUs, those that have not yet been deployed, or a specific LU.
To deploy all updated LUs, perform either one of the following actions:
- In the top menu bar, click Fabric and then 'Deploy All Updated Logical Units'.
- In the bottom status bar, hover your mouse over 'Deployment Status' to display a tooltip indicating which LUs are not deployed. Clicking on 'Deployment Status' will trigger the deployment of these LUs.
- Open the command pallet (you can use the CTRL+SHIST+P shortcut), look for 'Deploy All Updated Logical Units' and click on it.
Note: The 'Deploy All' action activates a Soft Deploy unless this is the first time an LU is deployed. This definition can be changed on the Preferences page, accessible via the bottom-left gear icon.
To deploy a specific LU, right-click on its name in the Project Tree. In the context menu, you can choose either Soft Deploy or Deploy. Read here for more information about deploy options.


Deploy from Fabric Studio
New or already existing Fabric project implementations must be deployed to the server in a way that recent code changes are compiled and ready to be used.
A deployment can be performed either from the Fabric Studio, as explained in this article, or by using an Offline Deploy.
Studio allows you to deploy to either the local development server or a remote server.
Before starting the deployment process on a project, check that the target Fabric server is configured. To do so, go to the User Preferences > Server Configuration window and configure the required Fabric server, or use the 'debug' server entry, that is already configured to localhost, that is, to the Fabric server that the Studio works by default with.
Note that in order to force the sync of the LU Instances after deployment, you should check the Force Upgrade Post Deploy checkbox in the Server Configuration window.
It is strongly recommended to avoid deploying directly from Studio to sensitive environments, such as staging or production servers. Instead, deployments to these environments should be managed through a CI/CD pipeline. This approach ensures that the deployment package is thoroughly verified before implementation.
Additionally, deployments may require coordination among multiple developers to integrate their work effectively. Using a structured pipeline not only minimizes risks but also facilitates collaboration and ensures a smooth deployment process.
Auto Deploy
The Fabric Studio Auto Deploy capability performs an automatic deployment of the code changes to the local Fabric server while debugging various components, such as the Data Viewer, LU Schema, Broadway, Broadway Population, Parser, and GraphIt.
This reduces friction during the debugging process and frees the user from performing a manual deployment upon each code change.
Fabric performs a local deployment according to the following logic:
- If the Schema was changed, a full deploy is performed.
- If Java was changed, only Java resources and Broadway are deployed.
- If Broadway was changed, only Broadway is deployed.
How Do I Deploy a Fabric Object from the Fabric Studio?
The following steps must be performed in the Fabric Studio for each deployed object, Logical Unit, Web Service, Broadway flow, Graphit or Reference table.
Right-click the object to be deployed and then select Deploy to Server to display the list of servers defined in the User Preferences window. Note that the Force Upgrade Post Deploy notification displays next to the server if the server is checked as Force Upgrade Post Deploy in the Server Configuration tab.
Do either:
- Click [Server Name], or
- Click Add/Edit to open the User Preferences window if the required server configuration is missing.
Deploying Fabric Objects to the Local Fabric Debug Server
To debug an LU, it must first be deployed to the local Fabric debug server. A deployed LU has a green circle next to its name.
To deploy the Fabric implementation to the Fabric debug server, do either:
- Right-click the selected Fabric object > Deploy To debug, or
- Click Deploy in the upper Fabric Debug panel.
Deploying a Fabric Project
You can activate a deployment and see the Deployment Status in several places within the Fabric Studio.
Deployment Status
A deployed LU has a green circle next to its name in the Project Tree. Otherwise, for example while making changes in its content, the circle turns gray.
You can also check the 'Deployment Status' in the bottom status bar to verify whether all LUs have been deployed. Hovering the mouse over it will display a tooltip, implying that no LUs have been deployed.
The illustration below shows the Project Tree. All LUs except 'Web Services' appear with a green circle, indicating they are deployed. A similar indication exists in the bottom status bar.
Activate Deploy
Deployment can be done for all updated LUs, those that have not yet been deployed, or a specific LU.
To deploy all updated LUs, perform either one of the following actions:
- In the top menu bar, click Fabric and then 'Deploy All Updated Logical Units'.
- In the bottom status bar, hover your mouse over 'Deployment Status' to display a tooltip indicating which LUs are not deployed. Clicking on 'Deployment Status' will trigger the deployment of these LUs.
- Open the command pallet (you can use the CTRL+SHIST+P shortcut), look for 'Deploy All Updated Logical Units' and click on it.
Note: The 'Deploy All' action activates a Soft Deploy unless this is the first time an LU is deployed. This definition can be changed on the Preferences page, accessible via the bottom-left gear icon.
To deploy a specific LU, right-click on its name in the Project Tree. In the context menu, you can choose either Soft Deploy or Deploy. Read here for more information about deploy options.
