


Reference Tables in Fabric Studio
A Reference table holds information that is common to either all LU instances or to multiple LUs. For optimization reasons, this information is stored in an external table and not in each LUI MicroDB.
How to Create a New Reference Table from an External Source
Go to Project Tree > References , right-click, then select Create References Based On DB Tables. This will display the DB Browser menu, Context menu and References popup window.
Click DB Connection (top of the window) and select a data source interface.
Click main to display the Tables directory in the source DB.
Select a table. To select multiple tables, press the Ctrl key.
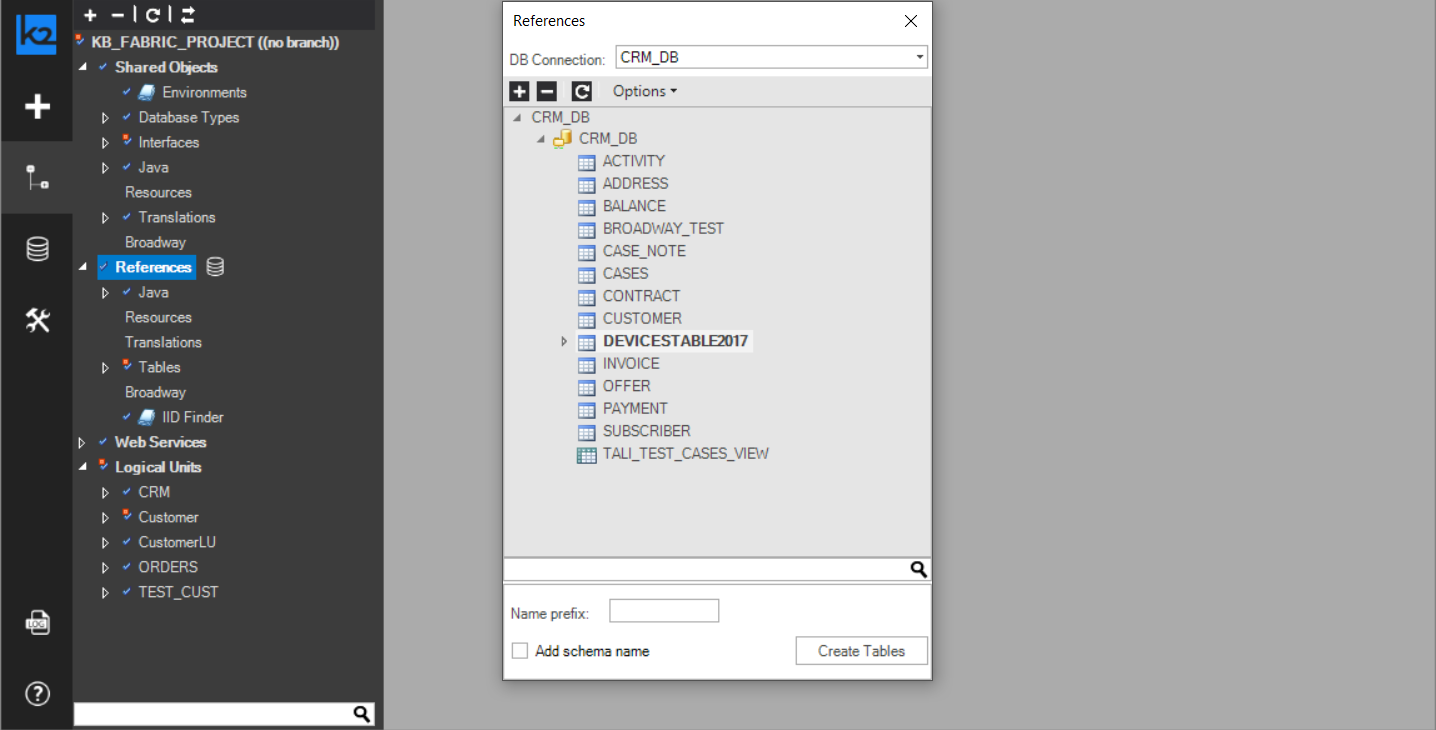
- Optional:
Add a prefix to the Reference table's name in the Name Prefix field (window's footer).
- If there are objects in the project with the same name, add a prefix to differentiate between Reference tables and LU tables with similar names.
- We recommend using a prefix that indicates the project name as a Reference table.
To populate the Reference Table using a Broadway flow, tick the Table population based Broadway flow box.
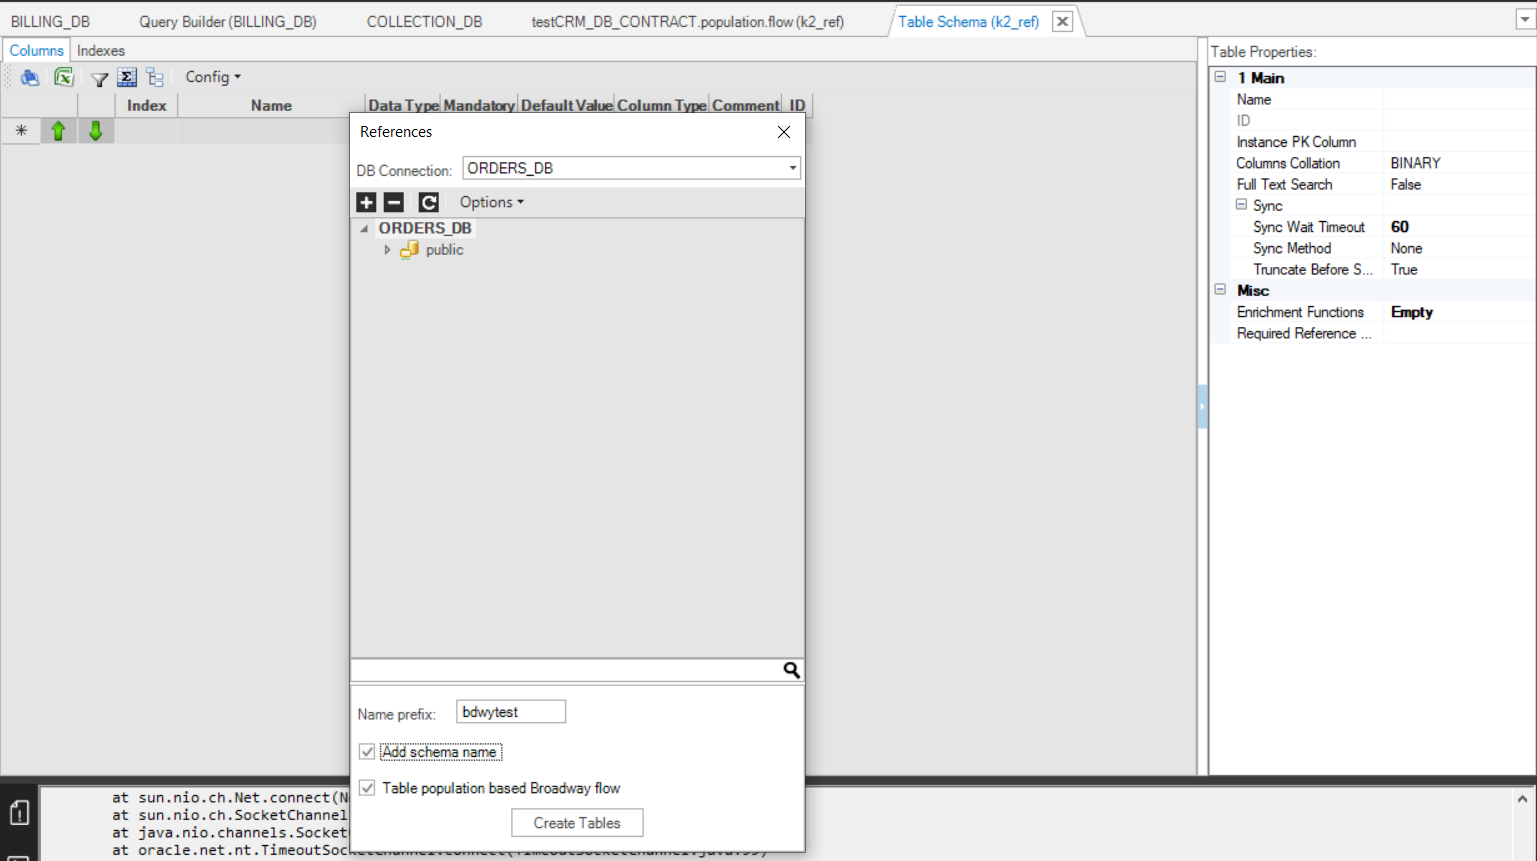
- Click Create Tables to add the new Reference table under References in the Project Tree.
If the table does not appear immediately, click
 Refresh on the top of the Project Tree.
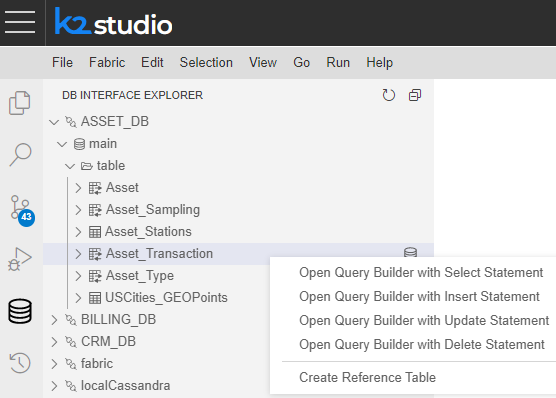
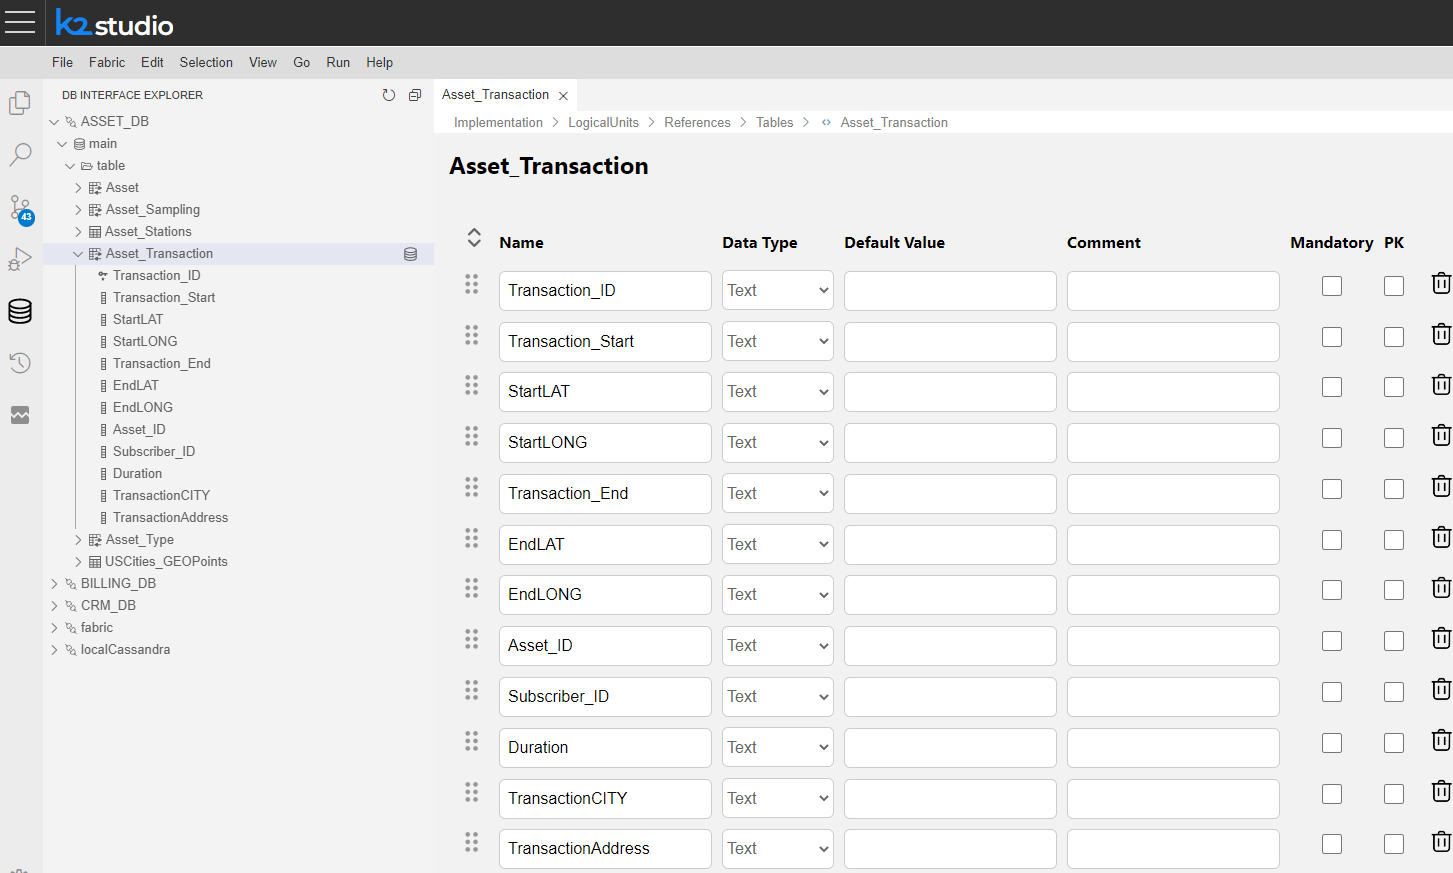
Switch to DB Interface Explorer View by clicking on its icon (
 ), located on the Activity Bar.
Choose the DB Interface and the required table
Right-click on the table. A popup window appears. Choose the Create Reference Table option as seen below
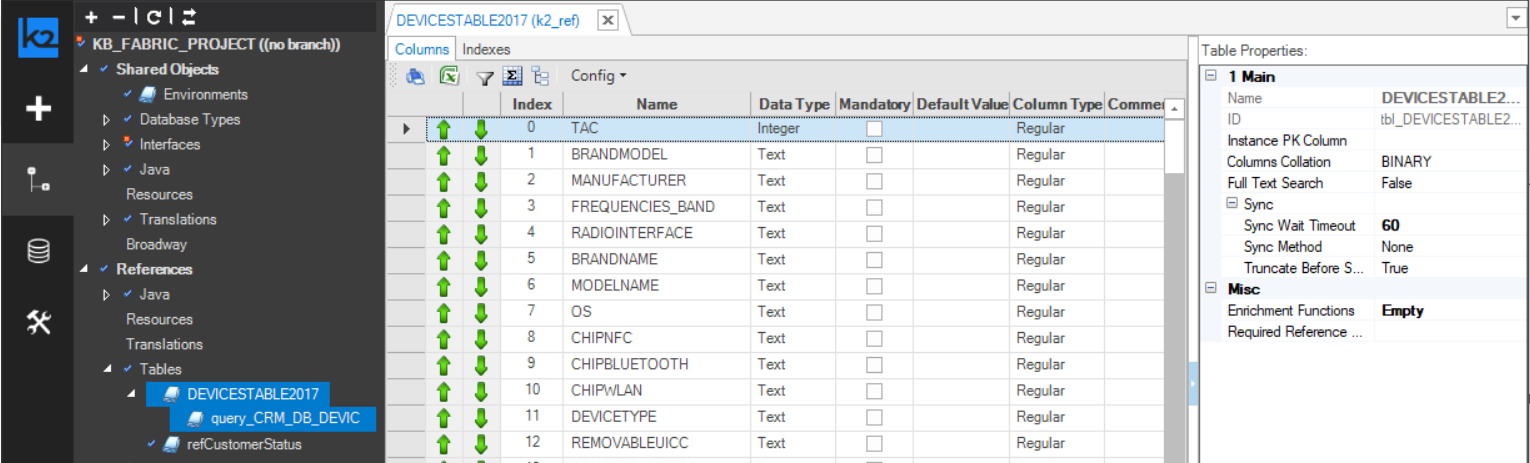
An automatically-generated new reference table has been created; as seen below, it is comprised of external data source table.
Note: Once the reference table is auto generated, a corresponding population flow is auto generated too.
Manual Creation of a New Reference Table
A new reference table can be created also manually.
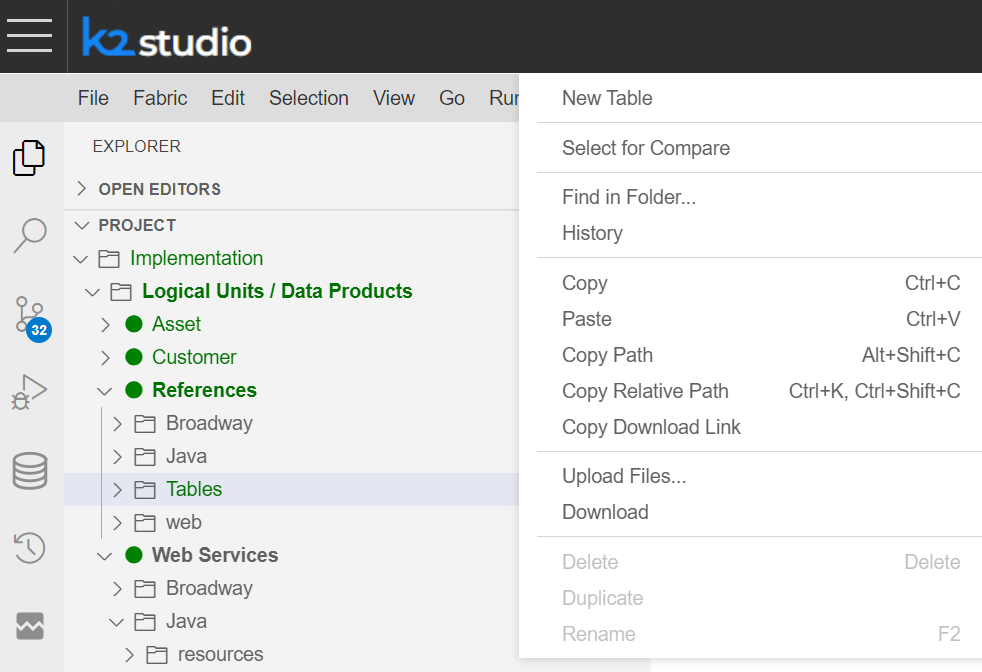
Go to Project Tree > Implementation > Logical Units / Data Products
Choose Logical Units / Data Products by clicking anywhere along the line
Choose/click on the References logical unit
Choose/highlight the Tables folder > right-click on it
Choose the New Table option from the opened context menu
Name the new Table. Press Enter to confirm or Escape to cancel.

Follow the instructions for creating a new table.

Save the file
Create a corresponding table population.
Editing and Viewing Reference Tables
Reference tables can be edited by either changing the default data mapping, adding transformations or adding or removing columns like in LU tables.
When the Broadway flow population option is selected as described above, the table population process can be edited using the Broadway flow described here.
How to View Reference Table Data
To access the Reference Viewer do the following:
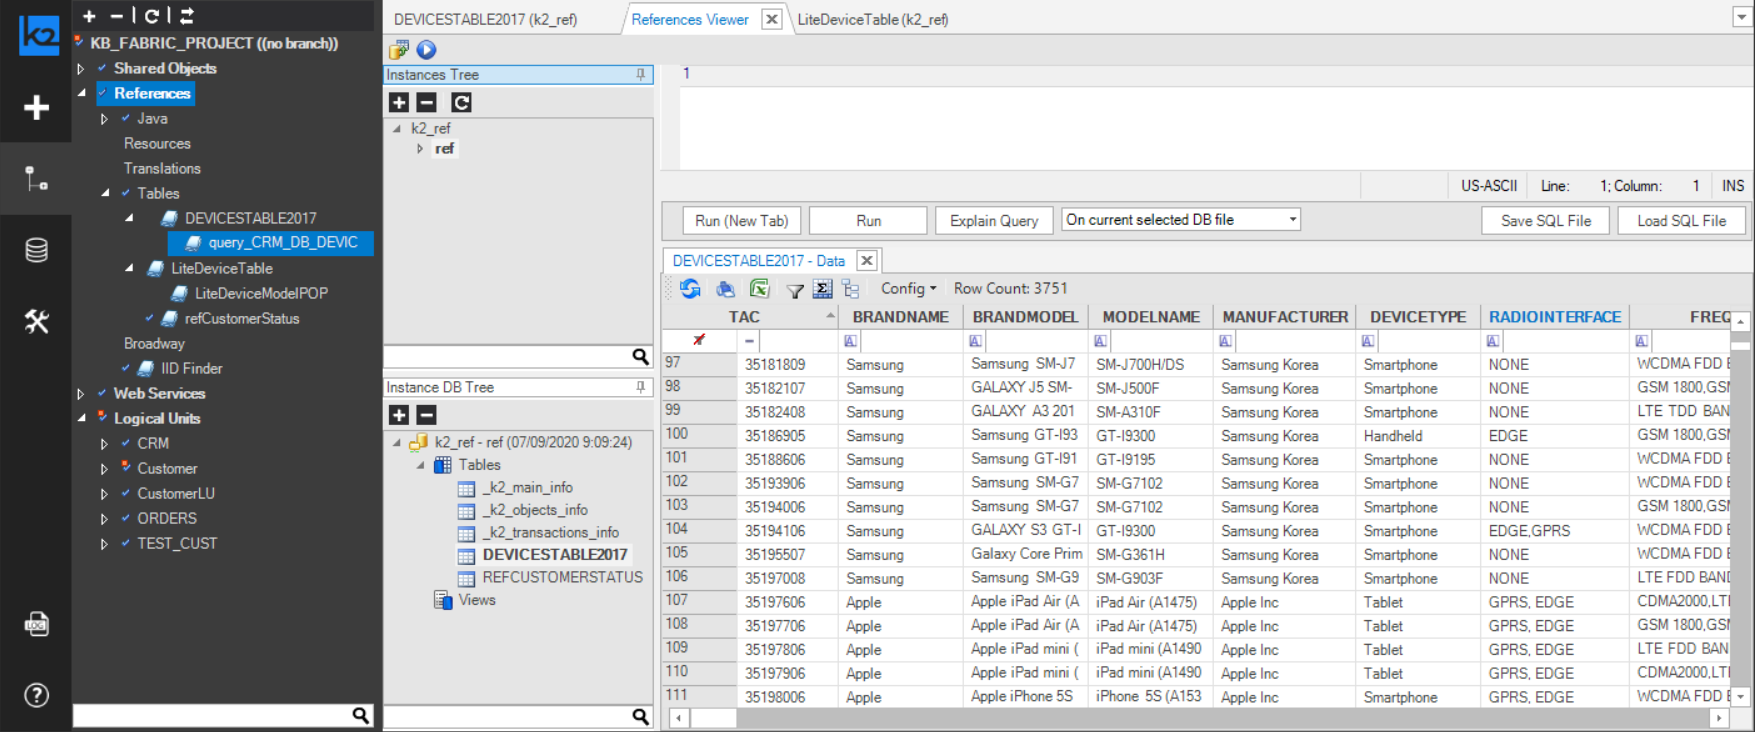
Go to Project Tree > References, right-click References Viewer, and then select the table. The Data Viewer window is displayed according to its hierarchy in the Instances Tree pane.
Click the data file to display the components hierarchy in the Instance DB Tree pane.
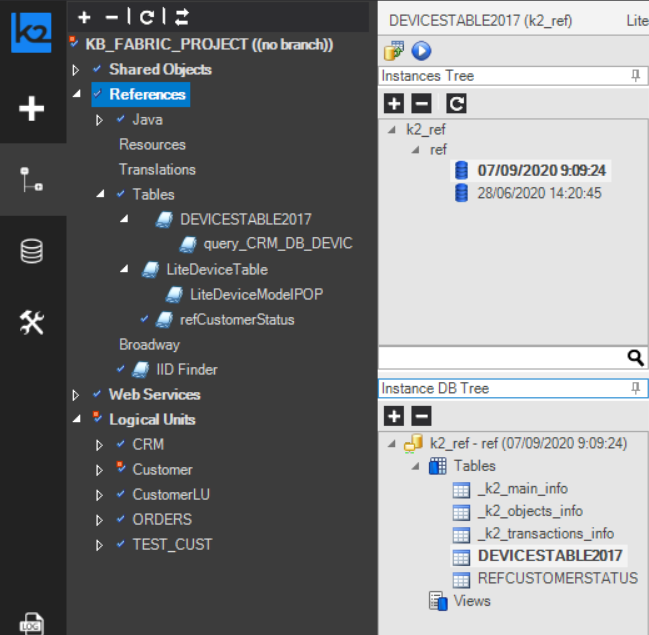
- Click the table name to display the table's data in the main Data Viewer window.
To view Reference tables content:
- Switch to DB Interface Explorer View by clicking on its icon ( ), located on the Activity Bar.
- Click to open the Query Builder on Fabric
- Choose "common"
- Choose the required reference table or some of its columns and right-click to add a select statement. Then click on the Execute button to view its content in the results panel.
Reference Tables Properties
Properties can be defined in the Table Properties panel in the right pane of the selected Table tab.
Main Properties
- Name, can be defined or modified.
- Schema, the name of the common DB in which this table will be stored. If left empty, the table will be added to the generic CommonDB schema.
- Full Text Search
- Column collation type:
- BINARY, compares string data regardless of text encoding.
- NOCASE, folds upper case characters to their lower case equivalents.
- RTRIM, ignores trailing space characters.
Sync Method
By default, reference tables are synched in the background of each table according to the defined Sync policy. The following Sync options can be selected in the Table Properties panel:
None, default value, synchronization is according to the Sync policy defined.
Time Interval, set in
days.hrs:min:secformat.Decision function, syncs the table according to the Decision function defined under the References > Java folder.
Miscellaneous
The following functions or other tables can be attached to the Reference table:
- Enrichment Functions - performs data manipulations on the table's content.
- Other Reference Tables, on which the current Reference table depends (e.g. it needs data from these tables).
- Index Post Sync - determines if an index should be created on a Reference table after data is synced. This capability is relevant for huge reference databases (more than 200M records) and can accelerate the overall data sync time. Added in release 6.5.1.
Query Statements Settings
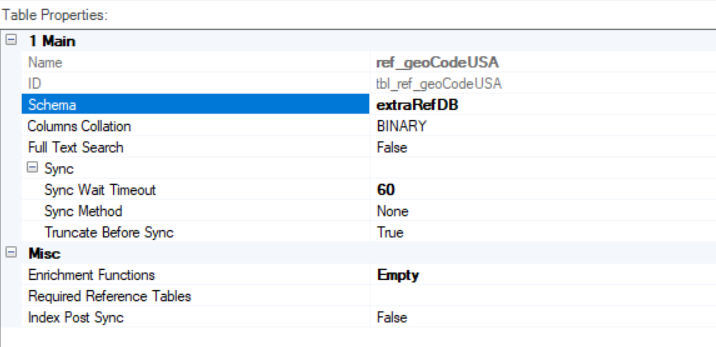
- Schema, the name of the common DB in which this table will be stored. If left empty, the table will be added to the generic commonDB schema. In the illustration below the reference table ref_geoCodeUSA is attached to the extraRefDB schema.
- Column collation type:
- BINARY, compares string data regardless of text encoding.
- NOCASE, folds upper case characters to their lower case equivalents.
- RTRIM, ignores trailing space characters.
- Full Text Search: When set to True, enables the use of the MATCH SQLite command as part of the WHERE clause of a Select statement that reads data from a Fabric table. Default = False.
Sync
Sync Wait Timeout: The timeout in seconds for syncing the. This is similar to schema sync wait timeout
Sync Method: By default, reference tables are synched in the background of each table according to the defined Sync policy. The following Sync options can be selected in the Table Properties panel:
None, default value, synchronization is according to the Sync policy defined.
Time Interval, set in
days.hrs:min:secformat.Decision function, syncs the table according to the Decision function defined under the References > Java folder.
Truncate Before Sync: When Truncate Before Sync = True (checkbox is checked), the entire LU table is truncated before the populations are executed
Miscellaneous
- Required Reference Tables, on which the current Reference table depends (e.g. it needs data from these tables).
- Index Post Sync - determines if an index should be created on a Reference table after data is synced. This capability is relevant for huge reference databases (more than 200M records) and can accelerate the overall data sync time.
Attach the Reference Table to a Logical Unit Schema
Before accessing the Reference Table from a specific LU, or before it can be used as a lookup object, it must be attached to the LU.
Configure LU to Use a Reference Table
Open the Schema Window
In the right panel, select the References tab.
Check the relevant Reference table(s) option.
Open the Schema Window
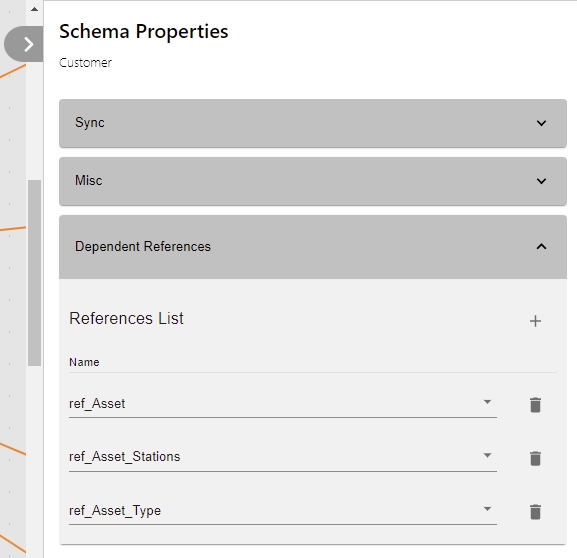
In the right panel, expand the Dependent References section
Add the required Reference tables to the Reference List: Use the plus (+) button to add another table and then select a table from the list
- Click Save to save the association created between the LU and the Reference Table(s).
Note: Reference tables can also be accessed via Lookup tables, Web Services, functions, jobs and Broadway Actors.
Deploy the Reference Tables
Reference Tables must be deployed before being used. As a result of the deployment, a synchronization job process is triggered in the background to ensure that all CommonDB copies are kept in-sync across the Fabric Cluster.
To deploy the Reference Tables, go to the Project Tree, right click References, select Deploy to Server and then the Server to deploy to the Reference table.
Note that if a reference table has been attached to an LU Schema as described above, the LU must be re-deployed.


Reference Tables in Fabric Studio
A Reference table holds information that is common to either all LU instances or to multiple LUs. For optimization reasons, this information is stored in an external table and not in each LUI MicroDB.
How to Create a New Reference Table from an External Source
Go to Project Tree > References , right-click, then select Create References Based On DB Tables. This will display the DB Browser menu, Context menu and References popup window.
Click DB Connection (top of the window) and select a data source interface.
Click main to display the Tables directory in the source DB.
Select a table. To select multiple tables, press the Ctrl key.
- Optional:
Add a prefix to the Reference table's name in the Name Prefix field (window's footer).
- If there are objects in the project with the same name, add a prefix to differentiate between Reference tables and LU tables with similar names.
- We recommend using a prefix that indicates the project name as a Reference table.
To populate the Reference Table using a Broadway flow, tick the Table population based Broadway flow box.
- Click Create Tables to add the new Reference table under References in the Project Tree.
If the table does not appear immediately, click Refresh on the top of the Project Tree.
Switch to DB Interface Explorer View by clicking on its icon (
), located on the Activity Bar.Choose the DB Interface and the required table
Right-click on the table. A popup window appears. Choose the Create Reference Table option as seen below
An automatically-generated new reference table has been created; as seen below, it is comprised of external data source table.
Note: Once the reference table is auto generated, a corresponding population flow is auto generated too.
Manual Creation of a New Reference Table
A new reference table can be created also manually.
Go to Project Tree > Implementation > Logical Units / Data Products
Choose Logical Units / Data Products by clicking anywhere along the line
Choose/click on the References logical unit
Choose/highlight the Tables folder > right-click on it
Choose the New Table option from the opened context menu
Name the new Table. Press Enter to confirm or Escape to cancel.
Follow the instructions for creating a new table.
Save the file
Create a corresponding table population.
Editing and Viewing Reference Tables
Reference tables can be edited by either changing the default data mapping, adding transformations or adding or removing columns like in LU tables.
When the Broadway flow population option is selected as described above, the table population process can be edited using the Broadway flow described here.
How to View Reference Table Data
To access the Reference Viewer do the following:
Go to Project Tree > References, right-click References Viewer, and then select the table. The Data Viewer window is displayed according to its hierarchy in the Instances Tree pane.
Click the data file to display the components hierarchy in the Instance DB Tree pane.
- Click the table name to display the table's data in the main Data Viewer window.
To view Reference tables content:
- Switch to DB Interface Explorer View by clicking on its icon ( ), located on the Activity Bar.
- Click to open the Query Builder on Fabric
- Choose "common"
- Choose the required reference table or some of its columns and right-click to add a select statement. Then click on the Execute button to view its content in the results panel.
Reference Tables Properties
Properties can be defined in the Table Properties panel in the right pane of the selected Table tab.
Main Properties
- Name, can be defined or modified.
- Schema, the name of the common DB in which this table will be stored. If left empty, the table will be added to the generic CommonDB schema.
- Full Text Search
- Column collation type:
- BINARY, compares string data regardless of text encoding.
- NOCASE, folds upper case characters to their lower case equivalents.
- RTRIM, ignores trailing space characters.
Sync Method
By default, reference tables are synched in the background of each table according to the defined Sync policy. The following Sync options can be selected in the Table Properties panel:
None, default value, synchronization is according to the Sync policy defined.
Time Interval, set in
days.hrs:min:secformat.Decision function, syncs the table according to the Decision function defined under the References > Java folder.
Miscellaneous
The following functions or other tables can be attached to the Reference table:
- Enrichment Functions - performs data manipulations on the table's content.
- Other Reference Tables, on which the current Reference table depends (e.g. it needs data from these tables).
- Index Post Sync - determines if an index should be created on a Reference table after data is synced. This capability is relevant for huge reference databases (more than 200M records) and can accelerate the overall data sync time. Added in release 6.5.1.
Query Statements Settings
- Schema, the name of the common DB in which this table will be stored. If left empty, the table will be added to the generic commonDB schema. In the illustration below the reference table ref_geoCodeUSA is attached to the extraRefDB schema.
- Column collation type:
- BINARY, compares string data regardless of text encoding.
- NOCASE, folds upper case characters to their lower case equivalents.
- RTRIM, ignores trailing space characters.
- Full Text Search: When set to True, enables the use of the MATCH SQLite command as part of the WHERE clause of a Select statement that reads data from a Fabric table. Default = False.
Sync
Sync Wait Timeout: The timeout in seconds for syncing the. This is similar to schema sync wait timeout
Sync Method: By default, reference tables are synched in the background of each table according to the defined Sync policy. The following Sync options can be selected in the Table Properties panel:
None, default value, synchronization is according to the Sync policy defined.
Time Interval, set in
days.hrs:min:secformat.Decision function, syncs the table according to the Decision function defined under the References > Java folder.
Truncate Before Sync: When Truncate Before Sync = True (checkbox is checked), the entire LU table is truncated before the populations are executed
Miscellaneous
- Required Reference Tables, on which the current Reference table depends (e.g. it needs data from these tables).
- Index Post Sync - determines if an index should be created on a Reference table after data is synced. This capability is relevant for huge reference databases (more than 200M records) and can accelerate the overall data sync time.
Attach the Reference Table to a Logical Unit Schema
Before accessing the Reference Table from a specific LU, or before it can be used as a lookup object, it must be attached to the LU.
Configure LU to Use a Reference Table
Open the Schema Window
In the right panel, select the References tab.
Check the relevant Reference table(s) option.
Open the Schema Window
In the right panel, expand the Dependent References section
Add the required Reference tables to the Reference List: Use the plus (+) button to add another table and then select a table from the list
- Click Save to save the association created between the LU and the Reference Table(s).
Note: Reference tables can also be accessed via Lookup tables, Web Services, functions, jobs and Broadway Actors.
Deploy the Reference Tables
Reference Tables must be deployed before being used. As a result of the deployment, a synchronization job process is triggered in the background to ensure that all CommonDB copies are kept in-sync across the Fabric Cluster.
To deploy the Reference Tables, go to the Project Tree, right click References, select Deploy to Server and then the Server to deploy to the Reference table.
Note that if a reference table has been attached to an LU Schema as described above, the LU must be re-deployed.
