

Build and Write Data Catalog
A Data Catalog implementation must be deployed to the server side so that all changes are compiled and ready for use. To do so, use one of the following options in the Fabric Studio:
Build Catalog, builds the catalog files of all project entities (each LU, WS, Common).
- The files are created in JSON format in the Resources folder of the project entities - one file for each project entity.
- All files are named auto.catalog, except for the file created under Shared Objects that is named shared.catalog.
- The catalog supports overriding automatic files to include the additional elements if the automatic process cannot find them or if they are not part of the project.
Note that you can perform an offline Build Catalog, by running the build-catalog.sh script on the server side.
Write Catalog, deploys the catalog to the server. This includes building the catalog files of all the project entities (each LU, WS, Common) and uploading them to the OrientDB.
- Once Write Catalog is completed, login to the K2View Web Framework and navigate it.
- Write Catalog can also be performed by running the CATALOG WRITE command in the Fabric Server. In this scenario, the automatic files must be created before running the command using Build Catalog in the Fabric Studio.
- Note that catalog deployment is performed in a Soft Deploy mode.
How Do I Build the Catalog Using the Fabric Studio?
In the Fabric Studio, right click the Project and select Data Catalog > Build Catalog.
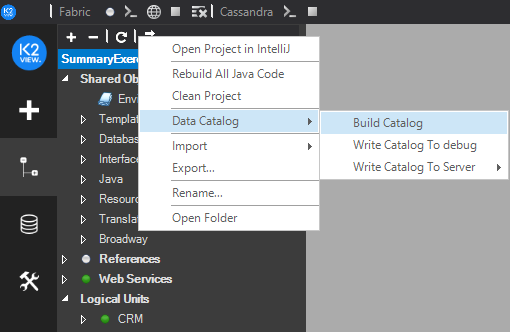
The build is executed and the results are displayed in the popup screen indicating the status of each project entity (LU, WS, Common). If there are problems, an error is displayed in the popup screen.
Open the created catalog files. For example, to open the catalog file of the WS:
- Go to Web Services > Resources and double click auto.catalog.
How Do I Do an Offline Build Catalog?
Run the build-catalog.sh script located under $K2_HOME/fabric/scripts in the Fabric Server. The script includes the following steps:
- Build and deploy the artifact files of the project.
- Build the catalog.
- Deploy the project.
Usage:
./build-catalog.sh [-h --help] -pd [PATH_TO_PROJECT] -u [USER] -p [PASSWORD]
Options:
-h/--help displays the usage of the script.
-pd [PROJ_NAME] - mandatory parameter. Sets the path to the project.
-u [USER] - optional parameter. Default is admin.
-p [PASSWORD] - optional parameter. Default is admin.
Example:
./build-catalog.sh -pd "/home/k2view/AutoTests/Data/StudioProject/DataCatalog/DataCatPrj1/Test1"
How Do I Write the Catalog?
Do either:
- In the Fabric Studio, right click the Project and select Data Catalog > Write Catalog To debug or Write Catalog To Server.
- Run the CATALOG WRITE command in the Fabric Server.
The Catalog Write command is executed and the results are displayed in the popup screen indicating the status of each project entity (LU, WS, Common). If there are problems, an error is displayed in the popup screen.
Note that you must perform Write Catalog to apply the changes in the catalog to the server.
Example of the Catalog Creation Process
Create a new project or use an existing one, for example the testCatalogDB project with the Customer LU, WS and Reference tables.
Create a Data Catalog interface named catalogdb. This is a one-time activity.
Install OrientDB and start it. This is a one-time activity.
Right click the Project and select Data Catalog > Write Catalog To debug.
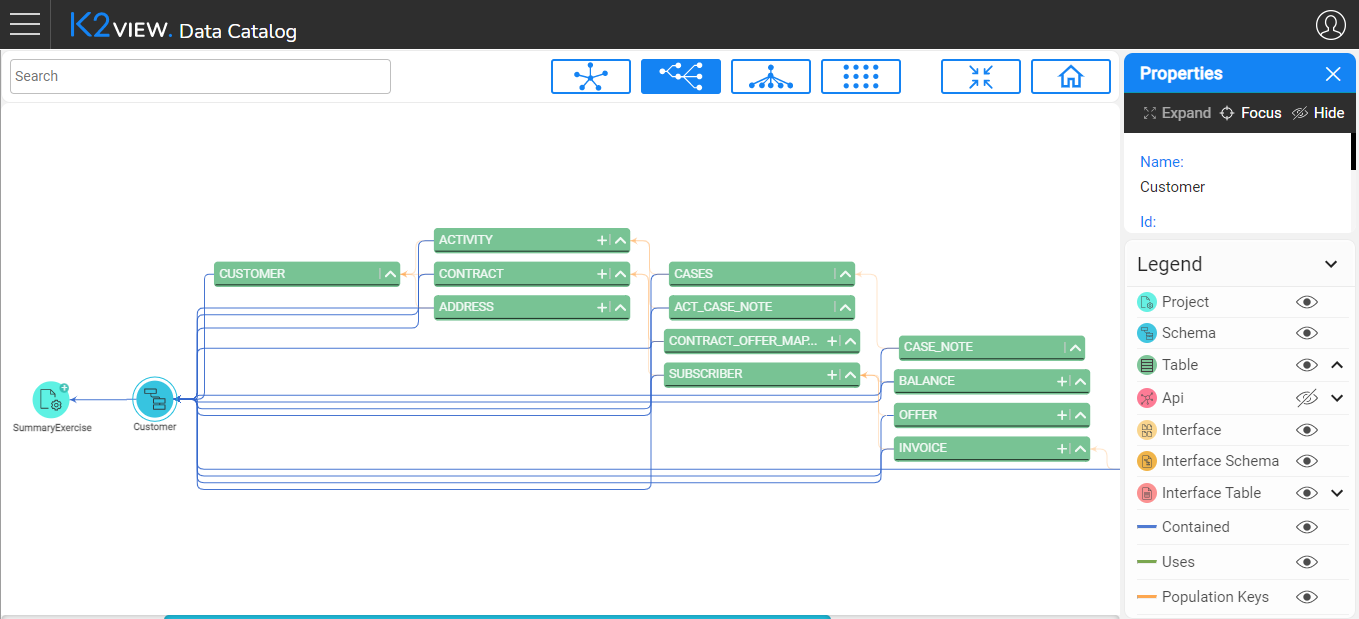
Login to the Data Catalog using the K2View Web Framework to navigate the catalog:


Build and Write Data Catalog
A Data Catalog implementation must be deployed to the server side so that all changes are compiled and ready for use. To do so, use one of the following options in the Fabric Studio:
Build Catalog, builds the catalog files of all project entities (each LU, WS, Common).
- The files are created in JSON format in the Resources folder of the project entities - one file for each project entity.
- All files are named auto.catalog, except for the file created under Shared Objects that is named shared.catalog.
- The catalog supports overriding automatic files to include the additional elements if the automatic process cannot find them or if they are not part of the project.
Note that you can perform an offline Build Catalog, by running the build-catalog.sh script on the server side.
Write Catalog, deploys the catalog to the server. This includes building the catalog files of all the project entities (each LU, WS, Common) and uploading them to the OrientDB.
- Once Write Catalog is completed, login to the K2View Web Framework and navigate it.
- Write Catalog can also be performed by running the CATALOG WRITE command in the Fabric Server. In this scenario, the automatic files must be created before running the command using Build Catalog in the Fabric Studio.
- Note that catalog deployment is performed in a Soft Deploy mode.
How Do I Build the Catalog Using the Fabric Studio?
In the Fabric Studio, right click the Project and select Data Catalog > Build Catalog.
The build is executed and the results are displayed in the popup screen indicating the status of each project entity (LU, WS, Common). If there are problems, an error is displayed in the popup screen.
Open the created catalog files. For example, to open the catalog file of the WS:
- Go to Web Services > Resources and double click auto.catalog.
How Do I Do an Offline Build Catalog?
Run the build-catalog.sh script located under $K2_HOME/fabric/scripts in the Fabric Server. The script includes the following steps:
- Build and deploy the artifact files of the project.
- Build the catalog.
- Deploy the project.
Usage:
./build-catalog.sh [-h --help] -pd [PATH_TO_PROJECT] -u [USER] -p [PASSWORD]
Options:
-h/--help displays the usage of the script.
-pd [PROJ_NAME] - mandatory parameter. Sets the path to the project.
-u [USER] - optional parameter. Default is admin.
-p [PASSWORD] - optional parameter. Default is admin.
Example:
./build-catalog.sh -pd "/home/k2view/AutoTests/Data/StudioProject/DataCatalog/DataCatPrj1/Test1"
How Do I Write the Catalog?
Do either:
- In the Fabric Studio, right click the Project and select Data Catalog > Write Catalog To debug or Write Catalog To Server.
- Run the CATALOG WRITE command in the Fabric Server.
The Catalog Write command is executed and the results are displayed in the popup screen indicating the status of each project entity (LU, WS, Common). If there are problems, an error is displayed in the popup screen.
Note that you must perform Write Catalog to apply the changes in the catalog to the server.
Example of the Catalog Creation Process
Create a new project or use an existing one, for example the testCatalogDB project with the Customer LU, WS and Reference tables.
Create a Data Catalog interface named catalogdb. This is a one-time activity.
Install OrientDB and start it. This is a one-time activity.
Right click the Project and select Data Catalog > Write Catalog To debug.
Login to the Data Catalog using the K2View Web Framework to navigate the catalog:
