

Setup for PGSQL 13.3
When using TDM, you need to have a Postres SQL database engine. This document explains how to install such an engine.
TDM 7.xx is certified to be used with PGSQL 9.6 & 13.
- You can provide access to a Postgres SQL database engine if you have one. If you do not, one is provided with the TDM application.
- TDM requires a username & password with full create, delete and update privileges.
- You also have the option install a Postgres SQL database engine from the K2View predefined tarball file.
- The tarball provided by K2View is PGSQL 13.3 with the TLS mode enabled.
- The user and password are postgres, port is the default port (5432).
Locations of important files are as follows:
- Certification files: /opt/apps/pgsql/bin/.crt
- Configuration files: /opt/apps/pgsql/data
Hardware and OS Requirements
- RedHat/CentOs 8, AWS Linux 2
- 2 vCPU
- 8GB RAM
- 100GB of free disk space, make sure it is assigned to
/opt/apps/pgsql
Preliminary Steps
Add the following users:
mkdir -p /opt/apps
chmod 755 /opt/apps
useradd -m -d /opt/apps/pgsql pgsql

#### add the following packges for RHEL/CentOs 8
dnf install -y compat-openssl10 readline* glibc-locale-source glibc-langpack-en
ln -s /usr/lib64/libreadline.so /usr/lib64/libreadline.so.6
Setup
Connect as the pgsql user on the console of the server.
Download or copy the tarball file from this link: pg13.3_tls_enabled.tar.gz.
Download the cert file from this link: pg13.3_tls_cert.zip
Copy the files to the Fabric instance that runs TDM, and place them here: $K2_HOME/.pg_cert/ (you will need to create this directory)
Untar the
pg13.3_tls_enabled.tar.gzas follows:
tar -zxvf pg13.3_tls_enabled.tar.gz && bash -l
- Start the pgsql using the following commands:
  cd bin/
  ./pg_ctl -D /opt/apps/pgsql/data -l logfile start
- You can stop the pgsql using the following commands:
./bin/pg_ctl -D /opt/apps/pgsql/data -l logfile stop
- Run the following commands from the server console to create the TDM database and the tdm user:
  createuser tdm --login --superuser
  createdb -O tdm TDMDB
  echo "ALTER USER tdm WITH PASSWORD 'tdm';"| psql
  echo "ALTER USER postgres WITH PASSWORD 'postgres';"| psql
  echo "ALTER USER postgres WITH SUPERUSER;"| psql
Connect via a pgadmin, then log in as the tdm user and run the contents of
TDMGUI/createTDMDB/k2vtdm2.sqlandTDMGUI/createTDMDB/k2vtdm3.sqlAlternatively, you can copy the files to the pgsql console and run them with the psql command. The files are located at ~/ k2vtdm2.sql ~/ k2vtdm3.sql
Example:
  cd ~/
  psql -d TDMDB -a -f ~/k2vtdm2.sql
  psql -d TDMDB -a -f ~/k2vtdm3.sql
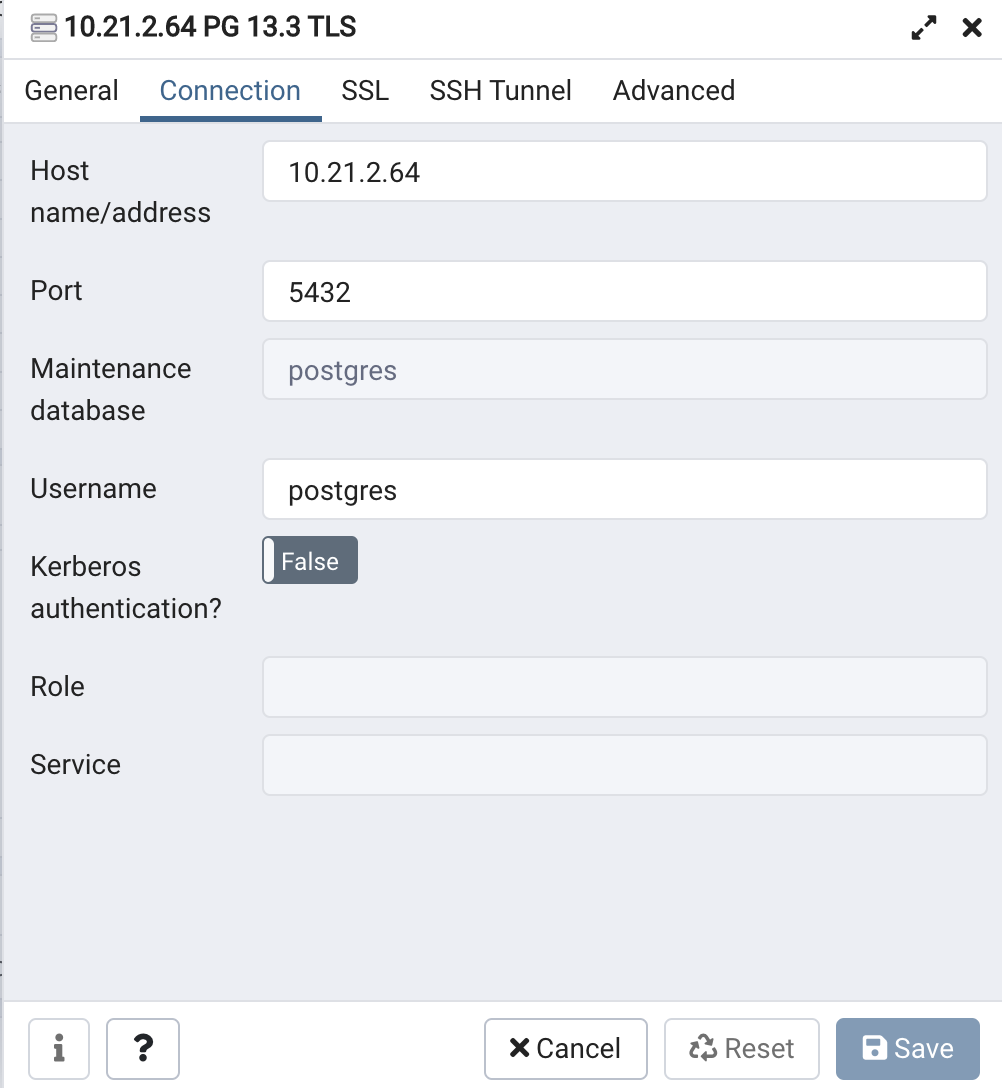
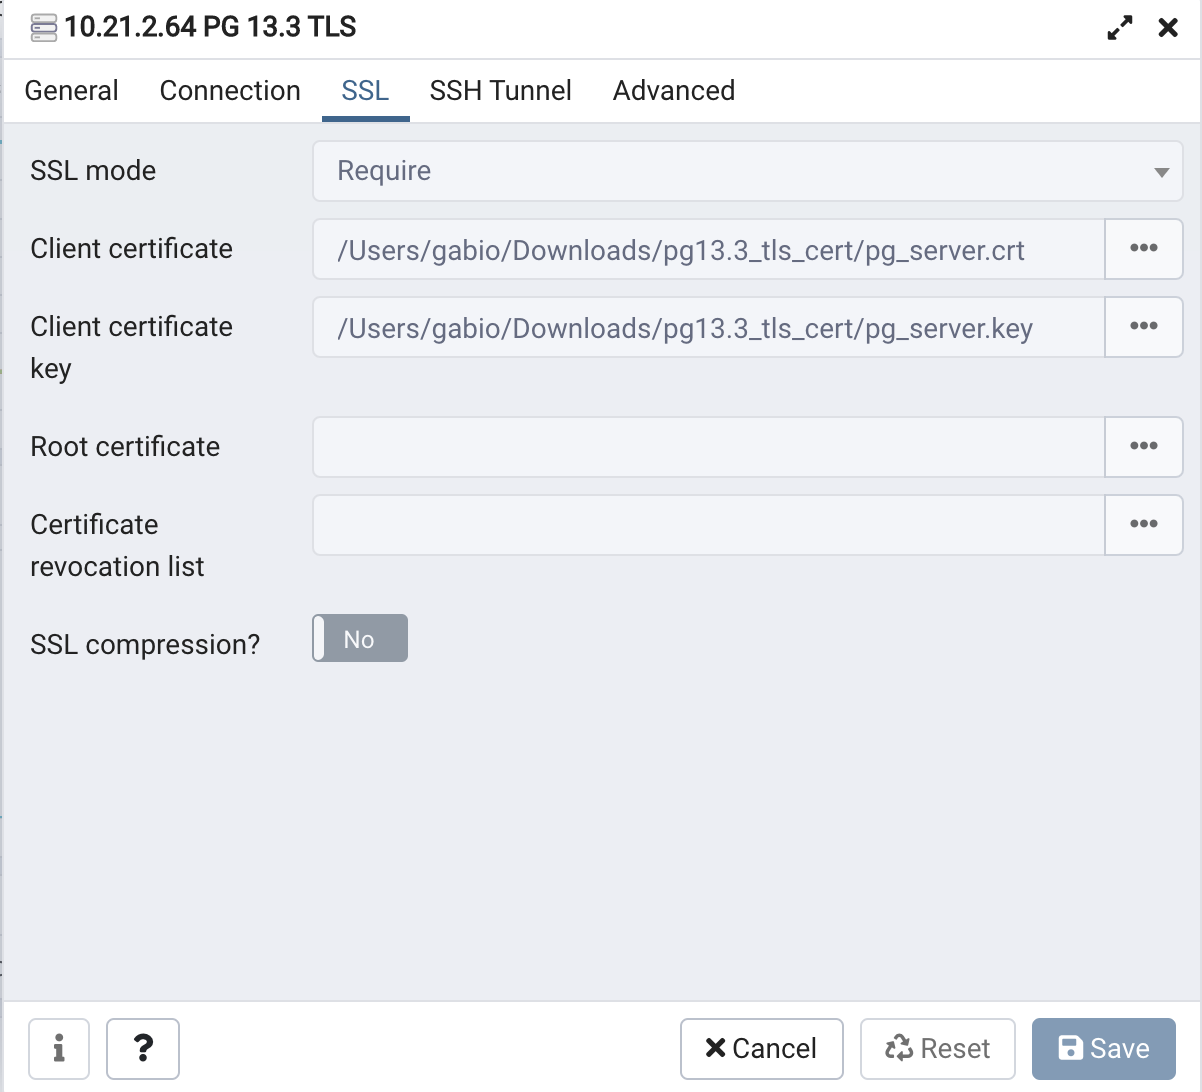
How to Connect From pgadmib4 in TLS Mode
Connect via a pgadmin and set this up as shown in the example below:
Check That the Connection is Secure
- On the server end, run the following command from the console:
echo "SELECT datname,usename, ssl, client_addr FROM pg_stat_ssl JOIN pg_stat_activity ON pg_stat_ssl.pid = pg_stat_activity.pid;" | psql
- The output should look like the following:
datname  | usename  | ssl |  client_addr
----------+----------+-----+---------------
 postgres | postgres | t   | 10.212.134.59
 postgres | postgres | t   | 10.212.134.59
 postgres | postgres | t   | 10.212.134.59
 postgres | postgres | t   | 10.212.134.59
 pgsql    | pgsql    | f   |
(5 rows)
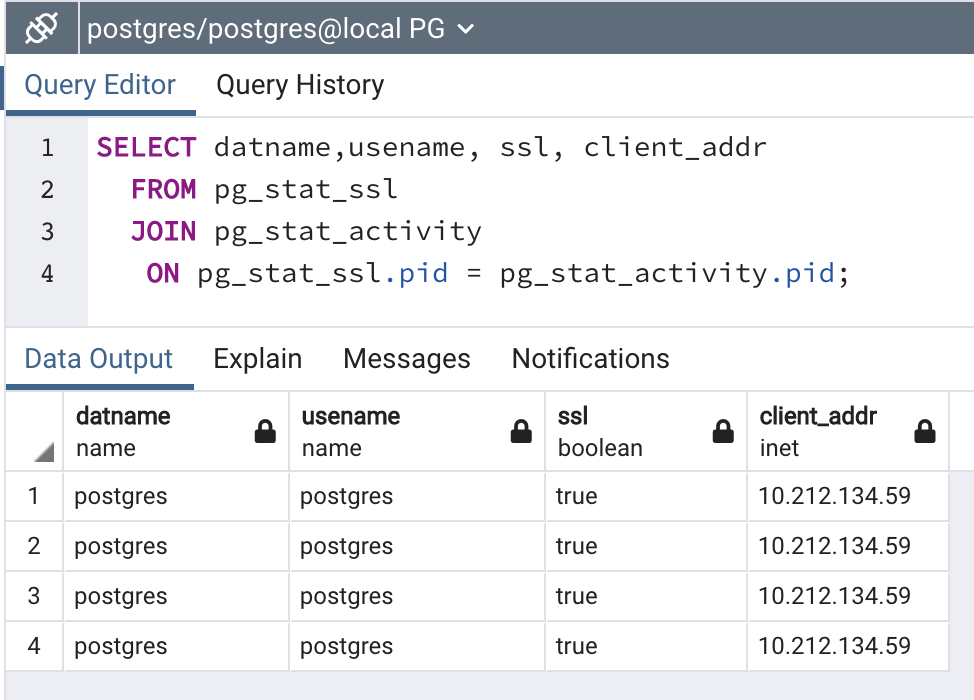
- As a pgadmin, run the following script:
  SELECT datname,usename, ssl, client_addr
  FROM pg_stat_ssl
  JOIN pg_stat_activity
  ON pg_stat_ssl.pid = pg_stat_activity.pid;
Fabric Implementation Guidelines
Edit the TDM Interface
Set the Custom Connection String setting to true and add &ssl=true to the connection string.
Example:
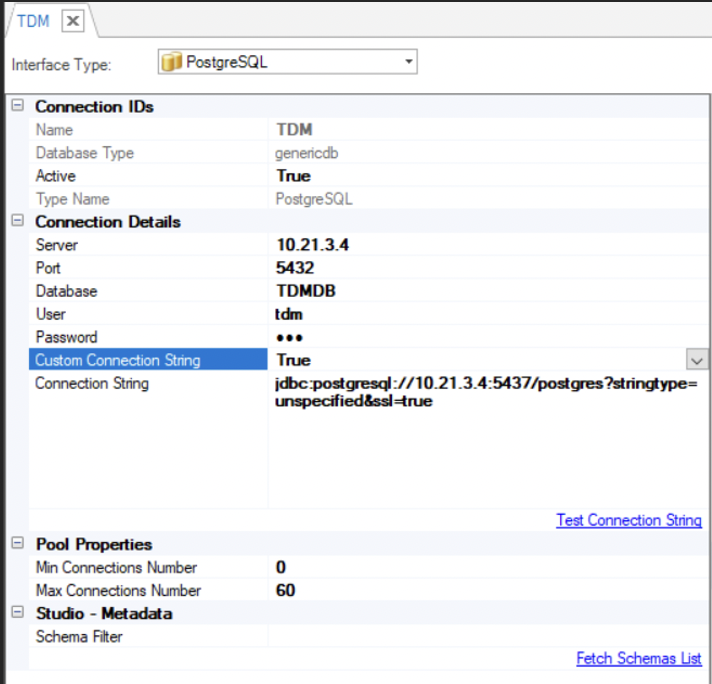
Verify that the TDM interface is defined using the Generic DB format (Database Type is genericdb).
Redeploy the project to Fabric.
Edit the Environments
- Open and edit all Environments: check the Custom Connection String checkbox of the TDM interface and add &ssl=true to the TDM’s connection string.
- Redeploy the Environments to Fabric.


Setup for PGSQL 13.3
When using TDM, you need to have a Postres SQL database engine. This document explains how to install such an engine.
TDM 7.xx is certified to be used with PGSQL 9.6 & 13.
- You can provide access to a Postgres SQL database engine if you have one. If you do not, one is provided with the TDM application.
- TDM requires a username & password with full create, delete and update privileges.
- You also have the option install a Postgres SQL database engine from the K2View predefined tarball file.
- The tarball provided by K2View is PGSQL 13.3 with the TLS mode enabled.
- The user and password are postgres, port is the default port (5432).
Locations of important files are as follows:
- Certification files: /opt/apps/pgsql/bin/.crt
- Configuration files: /opt/apps/pgsql/data
Hardware and OS Requirements
- RedHat/CentOs 8, AWS Linux 2
- 2 vCPU
- 8GB RAM
- 100GB of free disk space, make sure it is assigned to
/opt/apps/pgsql
Preliminary Steps
Add the following users:
mkdir -p /opt/apps
chmod 755 /opt/apps
useradd -m -d /opt/apps/pgsql pgsql

#### add the following packges for RHEL/CentOs 8
dnf install -y compat-openssl10 readline* glibc-locale-source glibc-langpack-en
ln -s /usr/lib64/libreadline.so /usr/lib64/libreadline.so.6
Setup
Connect as the pgsql user on the console of the server.
Download or copy the tarball file from this link: pg13.3_tls_enabled.tar.gz.
Download the cert file from this link: pg13.3_tls_cert.zip
Copy the files to the Fabric instance that runs TDM, and place them here: $K2_HOME/.pg_cert/ (you will need to create this directory)
Untar the
pg13.3_tls_enabled.tar.gzas follows:
tar -zxvf pg13.3_tls_enabled.tar.gz && bash -l
- Start the pgsql using the following commands:
  cd bin/
  ./pg_ctl -D /opt/apps/pgsql/data -l logfile start
- You can stop the pgsql using the following commands:
./bin/pg_ctl -D /opt/apps/pgsql/data -l logfile stop
- Run the following commands from the server console to create the TDM database and the tdm user:
  createuser tdm --login --superuser
  createdb -O tdm TDMDB
  echo "ALTER USER tdm WITH PASSWORD 'tdm';"| psql
  echo "ALTER USER postgres WITH PASSWORD 'postgres';"| psql
  echo "ALTER USER postgres WITH SUPERUSER;"| psql
Connect via a pgadmin, then log in as the tdm user and run the contents of
TDMGUI/createTDMDB/k2vtdm2.sqlandTDMGUI/createTDMDB/k2vtdm3.sqlAlternatively, you can copy the files to the pgsql console and run them with the psql command. The files are located at ~/ k2vtdm2.sql ~/ k2vtdm3.sql
Example:
  cd ~/
  psql -d TDMDB -a -f ~/k2vtdm2.sql
  psql -d TDMDB -a -f ~/k2vtdm3.sql
How to Connect From pgadmib4 in TLS Mode
Connect via a pgadmin and set this up as shown in the example below:
Check That the Connection is Secure
- On the server end, run the following command from the console:
echo "SELECT datname,usename, ssl, client_addr FROM pg_stat_ssl JOIN pg_stat_activity ON pg_stat_ssl.pid = pg_stat_activity.pid;" | psql
- The output should look like the following:
datname  | usename  | ssl |  client_addr
----------+----------+-----+---------------
 postgres | postgres | t   | 10.212.134.59
 postgres | postgres | t   | 10.212.134.59
 postgres | postgres | t   | 10.212.134.59
 postgres | postgres | t   | 10.212.134.59
 pgsql    | pgsql    | f   |
(5 rows)
- As a pgadmin, run the following script:
  SELECT datname,usename, ssl, client_addr
  FROM pg_stat_ssl
  JOIN pg_stat_activity
  ON pg_stat_ssl.pid = pg_stat_activity.pid;
Fabric Implementation Guidelines
Edit the TDM Interface
Set the Custom Connection String setting to true and add &ssl=true to the connection string.
Example:
Verify that the TDM interface is defined using the Generic DB format (Database Type is genericdb).
Redeploy the project to Fabric.
Edit the Environments
- Open and edit all Environments: check the Custom Connection String checkbox of the TDM interface and add &ssl=true to the TDM’s connection string.
- Redeploy the Environments to Fabric.
