Building and Running an SQL Query
- Go to Query Builder > DB Connection > DB Interface. The List of DB objects (Tables, Views and Synonyms) of the DB connection is displayed in the DB Tree.
- Create and edit the SQL query. You can either create the SQL query manually or edit an SQL query using the Query Builder window.
- To execute the SQL statement, click on Execute Query.
- Open the Results tab to view the SQL results.
Note: The Insert, Update and Delete statements (performed by the DB query) may cause an auto-commit to the DB (based on the DB driver’s definition).
Query Tab - Viewing the List of DB Objects
- Click the + or – icons to expand or collapse the list in the DB objects.
- Click Refresh to refresh the DB objects list.
- Click Options and check/uncheck the Include Synonyms option to include or exclude the DB Synonyms from the DB objects list.
Viewing the List of DB Objects
Expand or collapse the DB objects tree. When opened via the DB Interface Explorer, the DB objects tree looks as shown in the below image. A similar tree appears inside the Query Builder pop-up window, when the Query Builder is opened via Schema Editor, Graphit and Broadway.
Main Window - Editing an SQL Query
1. Adding a DB Object to the Main Window
Select the DB object (Table, View or Synonym) from the DB Tree and do either:
- Double-click the DB object.
- Select the DB objects and drag them to the Main window.
- Select the DB objects and click on Add Selected. The selected DB objects are added onto the Main window, when the related SQL statement is displayed in the Query window.
2. Removing a DB Object from the Main Window
Either click the DB object and press Delete on your keyboard or right-click the DB object > Remove. Note: The removal of a DB object automatically updates the SQL query in the Query Builder window.
3. Selecting the Columns in a DB Object
To select columns from a DB object, do either:
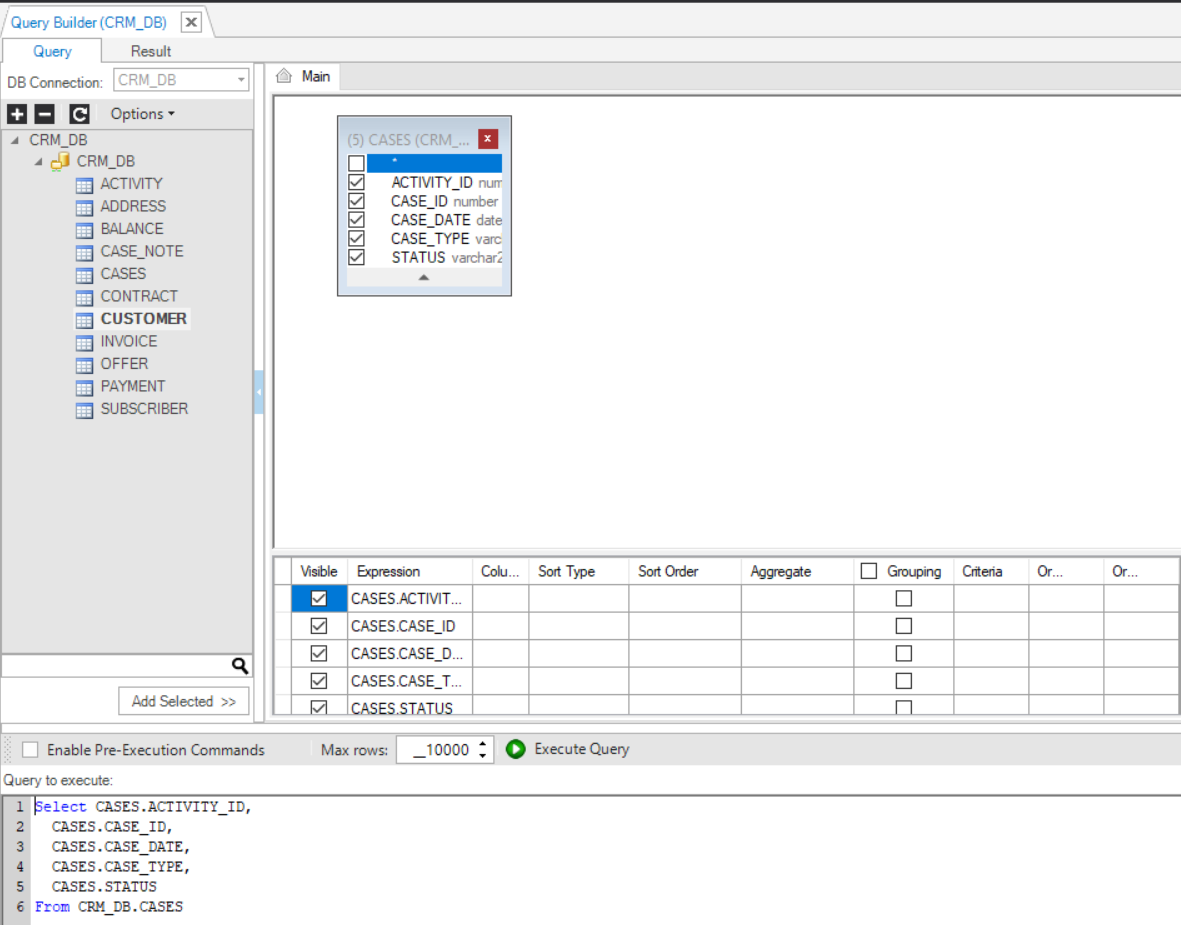
- Check specific columns in the DB object to include them in the SELECT statement.
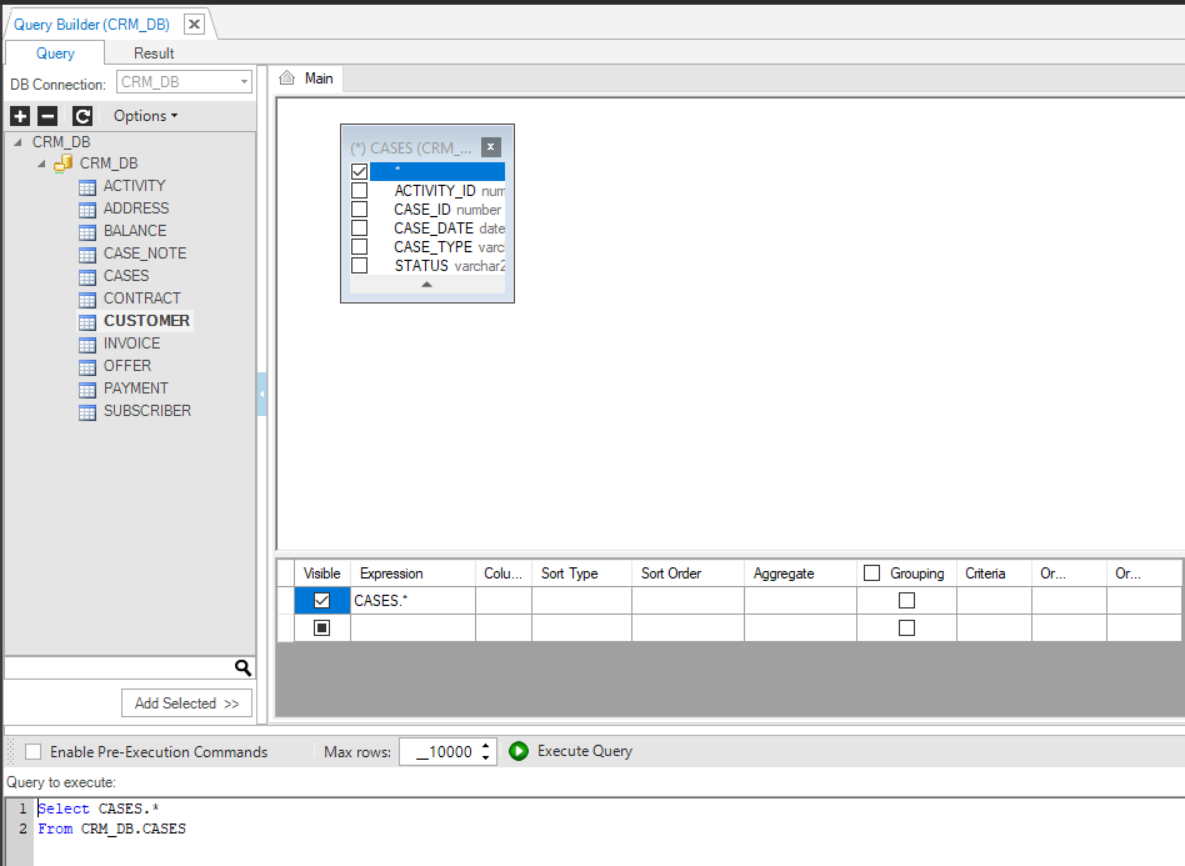
- Click the asterisk in the DB object to generate the following SQL syntax:
Select * from [Table Name];
- Right-click on the DB object > Check All to check all the columns in the table and add them to the SQL query.
4. Removing the Selected Columns in a DB Object
To remove columns from a DB object, do either:
- Uncheck the selected columns.
- Right-click on the DB object > Uncheck All to remove all the table’s columns from the SELECT statement. Note that when this option is selected for all DB objects in the Main window, the Query Builder generates the following SQL syntax: select * from …
Main Window - Advanced SQL Setting
5. Joining the Selected Tables
To add a JOIN to the SQL query, do the following:
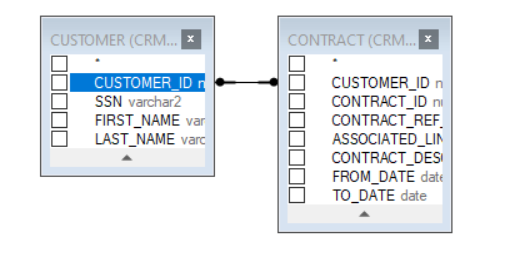
- Click on the DB object column (in the below example, it is the CUSTOMER_ID, in the CUSTOMER table) and drag a line to link it to a column in another DB object (CUSTOMER_ID, in the CONTRACT table). This would add an INNER JOIN to the SQL query.
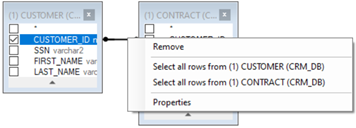
- Right-click the link’s line and select one or both Select all rows from … option/s to edit the link and update the JOIN to LEFT OUTER JOIN, RIGHT OUTER JOIN or FULL OUTER JOIN.
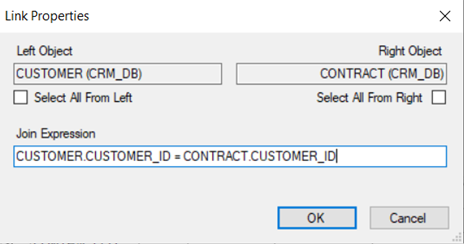
- Right-click on the link’s line > Properties to edit the JOIN's properties.
6. Union SQL Queries
- Do either:
- Right-click in the Main window > Union > New Union Sub-query/Copy Union Sub-Query.
- Click the + next to the Q of the query to add a UNION operator, which combines the result-set of 2 or more SELECT statements.
Each SQL statement that is combined by the UNION operator has a Q icon in the Main Window. Clicking the Q icon of each SQL statement opens its Main window, where you can add DB objects and link them to each other in order to edit the SQL statement in the Union query.
- To modify the Union query do either:
- Right-click Link -
 - between the queries to edit the Union type.

- Right-click the Q icon to change the order of the SQL statements in the Union SQL query.
- To remove the Union SQL query do either:\ a. Right-click the Q icon of the removed query and select Remove.\ b. Right-click the Main window, select Union > Remove.
Table of Selected Columns - Edit the SQL Query
This table is displayed at the bottom-right of the Main window and it enables editing the SQL query. Its selected columns hold the same information as the graphic map in a tabular format.
Adding an SQL Function to a DB object Column
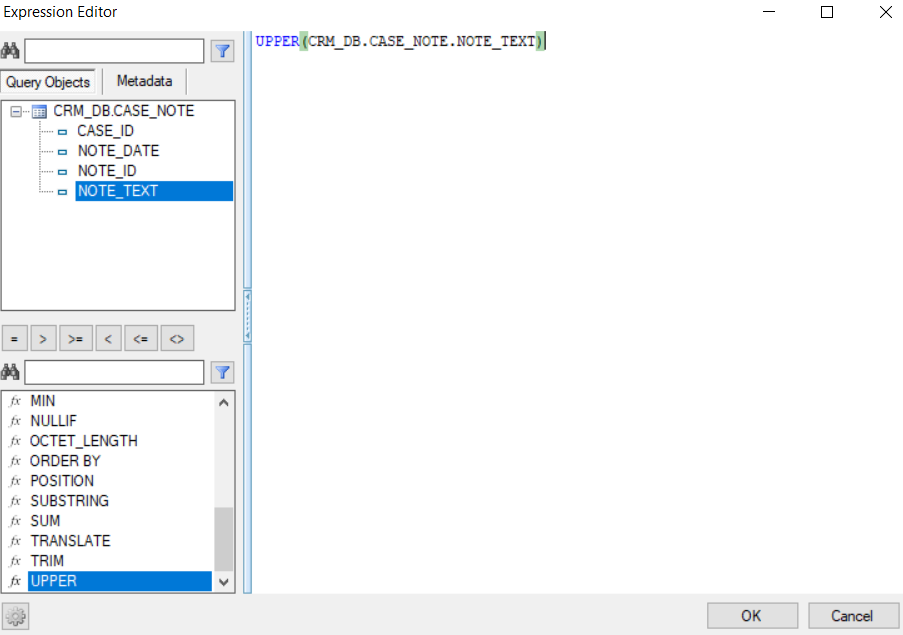
- Click on the 3 dots in the Expression column for opening the Expression Editor window.

- Select the Function and the DB object column in order to add them to the SQL query.
- Populate the Column Name column to add an alias to the selected DB object column.
- Populate the Sort Type and Sort Order columns to add an Order by to the SQL query.
- Populate the Aggregate column to add an aggregation function like Min, Max, Avg to the selected DB object column. This act updates the Grouping column and is reflected as a 'Group by' statement in the SQL query.
- Populate the Criteria and Or columns in order to add the DB object column to the WHERE statement of the SQL query.
Query Settings Toolbar
The Enable Pre-Execution Commands checkbox enables running commands on the selected DB before running the SQL query. When this checkbox is checked, the Pre-Execution Commands window opens. Note that when running the Query Builder on a Fabric interface, you should run the [Get Instance] command in the Pre-Execution Commands window as the SQL query must run on an LU Instance level.
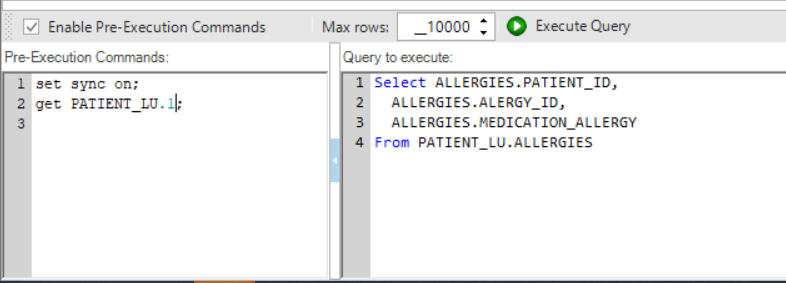
The Max rows setting is used for setting the maximum number of rows returned by the SQL query. The default value is 10,000 rows. It is possible to set a different number of rows to be returned by the SQL query.
To use the Query Builder:
- Edit the SQL commands in the top Query Editor window.
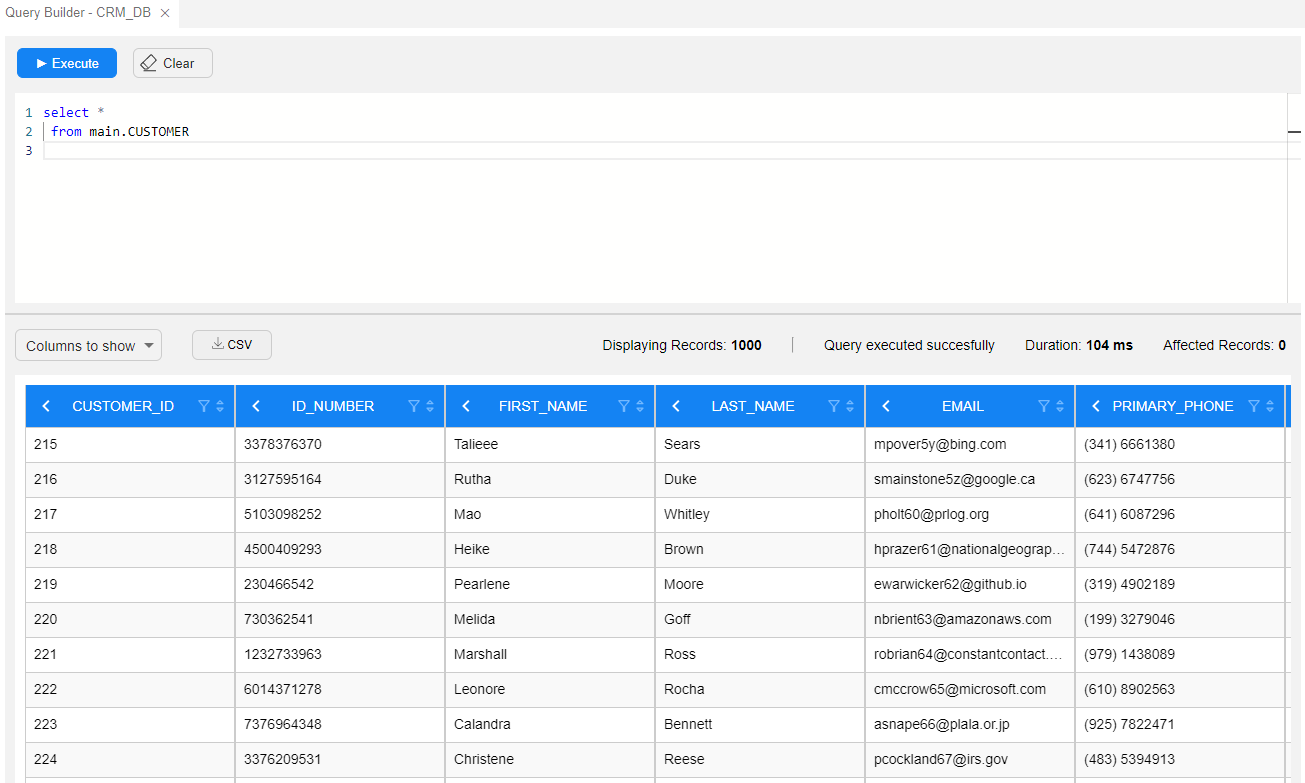
- Execute the query. The results are presented in a table view in the Results window (bottom part).
Query Editor Window
- You can clear the whole Query Editor window by clicking on the Clear button.
- The Query Editor window can hold and execute several queries. When clicking on the Execute button, all queries will be executed, one by one, where the Results window will show the results of the last query.
- If the Query Editor window contains several queries and you wish to run some of them, there is no need to delete the others. To execute specific commands, select them and then click on Execute.
- You can add Fabric commands to the Query Editor and they will also be executed.
- When Fabric is the selected data source interface, set the top bar fields before executing the query.
Results Window
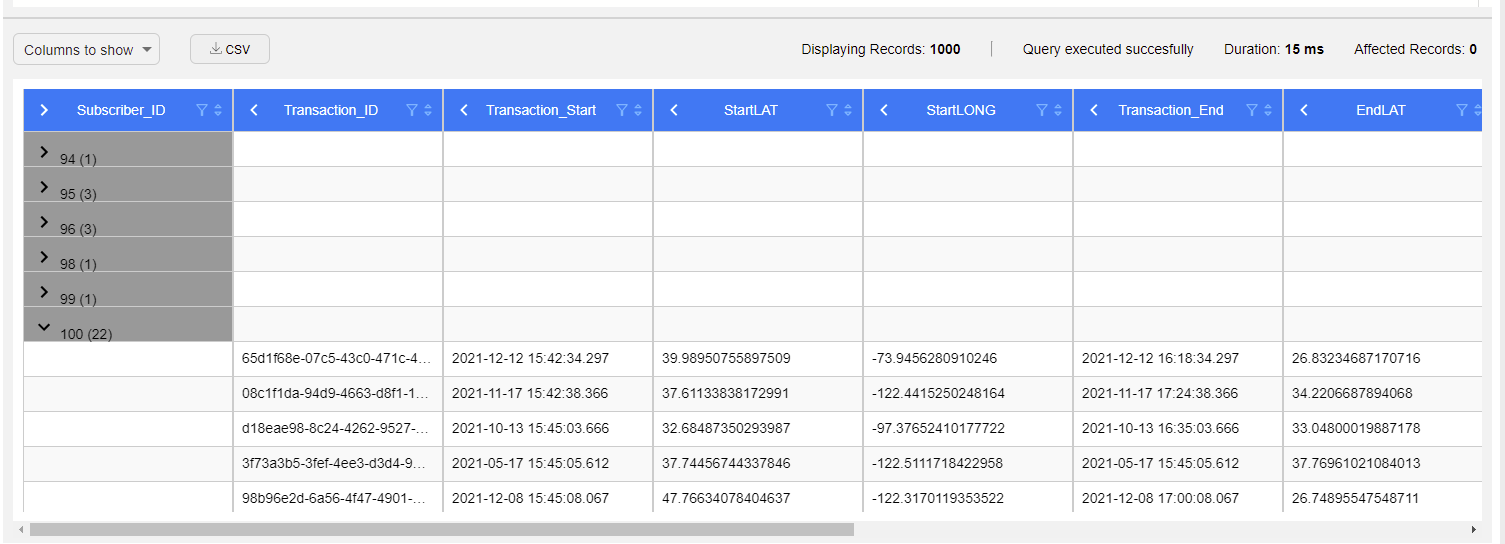
The Results window shows up to 1000 entries.
The Results window's top bar is divided into 2 parts: information (on the right side) and actions (on the left side):
- Information part contains:
- Number of displayed rows (as previously explained, up to 1000 rows).
- Query status - success/failure. In case of a failure, a failure reason will be shown in the results area, instead of the results table.
- Duration taken to execute the query. Note that the duration is not the time until the results table is rendered and displayed as a table in the results window.
- How many rows were affected during the query execution. In case of a select statement, no rows are affected, so it would show zero.
- Actions part contains:
- Columns to show - allows to adjust the Results table display. When clicked, a pop-up opens where you can set up the Result tables columns that will be shown.
- CSV - allows to download the results.
The Results table enables some manipulations that let you adjust the display according to your needs, in addition to the Columns to show option:
Sort Order - click on the column's header sort icon
 to reorder the table (Ascending/Descending).
Filter - click on the column's header filter icon
 to filter table's display accordingly.
Group - click on the column's header left arrow to group the table rows by this column.
Grouping by a column will show it as the left most column, change its color to gray and flip the arrow direction.
Click on a table row arrow to expand and collapse its grouped rows.
You can group by several columns.
To ungroup, click again on the column header arrow.
Building and Running an SQL Query
- Go to Query Builder > DB Connection > DB Interface. The List of DB objects (Tables, Views and Synonyms) of the DB connection is displayed in the DB Tree.
- Create and edit the SQL query. You can either create the SQL query manually or edit an SQL query using the Query Builder window.
- To execute the SQL statement, click on Execute Query.
- Open the Results tab to view the SQL results.
Note: The Insert, Update and Delete statements (performed by the DB query) may cause an auto-commit to the DB (based on the DB driver’s definition).
Query Tab - Viewing the List of DB Objects
- Click the + or – icons to expand or collapse the list in the DB objects.
- Click Refresh to refresh the DB objects list.
- Click Options and check/uncheck the Include Synonyms option to include or exclude the DB Synonyms from the DB objects list.
Viewing the List of DB Objects
Expand or collapse the DB objects tree. When opened via the DB Interface Explorer, the DB objects tree looks as shown in the below image. A similar tree appears inside the Query Builder pop-up window, when the Query Builder is opened via Schema Editor, Graphit and Broadway.
Main Window - Editing an SQL Query
1. Adding a DB Object to the Main Window
Select the DB object (Table, View or Synonym) from the DB Tree and do either:
- Double-click the DB object.
- Select the DB objects and drag them to the Main window.
- Select the DB objects and click on Add Selected. The selected DB objects are added onto the Main window, when the related SQL statement is displayed in the Query window.
2. Removing a DB Object from the Main Window
Either click the DB object and press Delete on your keyboard or right-click the DB object > Remove. Note: The removal of a DB object automatically updates the SQL query in the Query Builder window.
3. Selecting the Columns in a DB Object
To select columns from a DB object, do either:
- Check specific columns in the DB object to include them in the SELECT statement.
- Click the asterisk in the DB object to generate the following SQL syntax:
Select * from [Table Name];

- Right-click on the DB object > Check All to check all the columns in the table and add them to the SQL query.

4. Removing the Selected Columns in a DB Object
To remove columns from a DB object, do either:
- Uncheck the selected columns.
- Right-click on the DB object > Uncheck All to remove all the table’s columns from the SELECT statement. Note that when this option is selected for all DB objects in the Main window, the Query Builder generates the following SQL syntax: select * from …
Main Window - Advanced SQL Setting
5. Joining the Selected Tables
To add a JOIN to the SQL query, do the following:
- Click on the DB object column (in the below example, it is the CUSTOMER_ID, in the CUSTOMER table) and drag a line to link it to a column in another DB object (CUSTOMER_ID, in the CONTRACT table). This would add an INNER JOIN to the SQL query.

- Right-click the link’s line and select one or both Select all rows from … option/s to edit the link and update the JOIN to LEFT OUTER JOIN, RIGHT OUTER JOIN or FULL OUTER JOIN.

- Right-click on the link’s line > Properties to edit the JOIN's properties.

6. Union SQL Queries
- Do either:
- Right-click in the Main window > Union > New Union Sub-query/Copy Union Sub-Query.
- Click the + next to the Q of the query to add a UNION operator, which combines the result-set of 2 or more SELECT statements.
Each SQL statement that is combined by the UNION operator has a Q icon in the Main Window. Clicking the Q icon of each SQL statement opens its Main window, where you can add DB objects and link them to each other in order to edit the SQL statement in the Union query.
- To modify the Union query do either:
- Right-click Link -
 - between the queries to edit the Union type.

- Right-click the Q icon to change the order of the SQL statements in the Union SQL query.
- To remove the Union SQL query do either:\ a. Right-click the Q icon of the removed query and select Remove.\ b. Right-click the Main window, select Union > Remove.
Table of Selected Columns - Edit the SQL Query
This table is displayed at the bottom-right of the Main window and it enables editing the SQL query. Its selected columns hold the same information as the graphic map in a tabular format.
Adding an SQL Function to a DB object Column
- Click on the 3 dots in the Expression column for opening the Expression Editor window.

- Select the Function and the DB object column in order to add them to the SQL query.

- Populate the Column Name column to add an alias to the selected DB object column.
- Populate the Sort Type and Sort Order columns to add an Order by to the SQL query.
- Populate the Aggregate column to add an aggregation function like Min, Max, Avg to the selected DB object column. This act updates the Grouping column and is reflected as a 'Group by' statement in the SQL query.
- Populate the Criteria and Or columns in order to add the DB object column to the WHERE statement of the SQL query.
Query Settings Toolbar
The Enable Pre-Execution Commands checkbox enables running commands on the selected DB before running the SQL query. When this checkbox is checked, the Pre-Execution Commands window opens. Note that when running the Query Builder on a Fabric interface, you should run the [Get Instance] command in the Pre-Execution Commands window as the SQL query must run on an LU Instance level.

The Max rows setting is used for setting the maximum number of rows returned by the SQL query. The default value is 10,000 rows. It is possible to set a different number of rows to be returned by the SQL query.
To use the Query Builder:
- Edit the SQL commands in the top Query Editor window.
- Execute the query. The results are presented in a table view in the Results window (bottom part).

Query Editor Window
- You can clear the whole Query Editor window by clicking on the Clear button.
- The Query Editor window can hold and execute several queries. When clicking on the Execute button, all queries will be executed, one by one, where the Results window will show the results of the last query.
- If the Query Editor window contains several queries and you wish to run some of them, there is no need to delete the others. To execute specific commands, select them and then click on Execute.
- You can add Fabric commands to the Query Editor and they will also be executed.
- When Fabric is the selected data source interface, set the top bar fields before executing the query.
Results Window
The Results window shows up to 1000 entries.
The Results window's top bar is divided into 2 parts: information (on the right side) and actions (on the left side):
- Information part contains:
- Number of displayed rows (as previously explained, up to 1000 rows).
- Query status - success/failure. In case of a failure, a failure reason will be shown in the results area, instead of the results table.
- Duration taken to execute the query. Note that the duration is not the time until the results table is rendered and displayed as a table in the results window.
- How many rows were affected during the query execution. In case of a select statement, no rows are affected, so it would show zero.
- Actions part contains:
- Columns to show - allows to adjust the Results table display. When clicked, a pop-up opens where you can set up the Result tables columns that will be shown.
- CSV - allows to download the results.
The Results table enables some manipulations that let you adjust the display according to your needs, in addition to the Columns to show option:
Sort Order - click on the column's header sort icon
 to reorder the table (Ascending/Descending).
Filter - click on the column's header filter icon
 to filter table's display accordingly.
Group - click on the column's header left arrow to group the table rows by this column.
Grouping by a column will show it as the left most column, change its color to gray and flip the arrow direction.
Click on a table row arrow to expand and collapse its grouped rows.
You can group by several columns.
To ungroup, click again on the column header arrow.


