

Creating a New Project
What Is a Fabric Project?
A Fabric project is a consolidation of rules that transform data from one or more data sources into the K2View Fabric MicroDB structure using Logical Unit modeling. To do so, the project must be defined in the Fabric Studio and can then be added to either GIT or SVN version control.
Click for more information about Fabric Studio UI Components and Menus.
Click for more information about the Fabric Project Structure.
Click for more information about Adding Fabric Projects to Version Controls.
How Do I Create a New Project?
- Go to the Start Page or click the File icon
 and then click New Project to display the New Project dialog box.
 - Enter the name of the project in the Project Name field.
- Verify that the default directory displayed in the Location field is correct, if not, Browse and select the correct one. This directory will be used to store the project’s files and definitions.
- Optional: check the Add Project to Version Control checkbox to add the new project to SVN or Git. It is recommended to save and commit the new project as a baseline. Note that to avoid errors, the SVN/Git repositories must be created in advance.
- Verify the default URL in the Repository URL field is correct, if not, Browse and select the correct one. The PROJECT_NAME is automatically added to the Repository URL once added to the configuration control.
- Click OK. The project’s Main Window opens and the Project Tree is displayed in the left pane.
Notes
- Only one project can be deployed to a specific Fabric server / cluster. Therefore, when defining the project’s physical saved name(.K2proj), make sure that it is meaningful, for example, the project’s business purpose. The project’s logical name can be edited in the Fabric Studio.
- To find the deployed project’s name, execute the Fabric set; command from the Fabric console.
Click for more information about User Preferences.
Click for more information about Adding Fabric Projects to Version Controls.
Click for more information about Best Practices for Using SVN and GIT.
How Do I Access a Fabric Project?
- Either:\ a. Go to the K2view Fabric Studio Start Page and click Open Project.\ b. Click File in the top left corner and then click Open Project to open the default Fabric Project Directory.
- Go to the Project Folder (it has the name of the project) and double click the .k2proj file.
- Do the following to check out a project:\ a. Go to the Start Page or click File and then click Checkout Project to display the Checkout Project dialog box.\ b. The Repository Type is based on the central version control defined for the project and is one of the following:
GIT
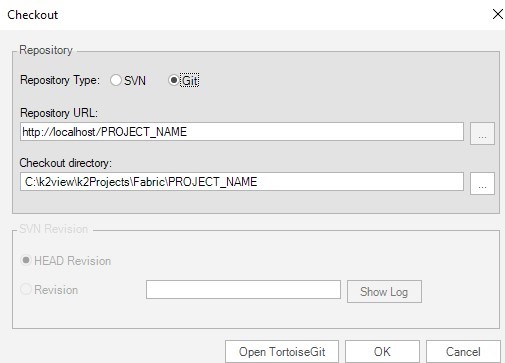
SVN

- Once checked out, the project is created locally.


Creating a New Project
What Is a Fabric Project?
A Fabric project is a consolidation of rules that transform data from one or more data sources into the K2View Fabric MicroDB structure using Logical Unit modeling. To do so, the project must be defined in the Fabric Studio and can then be added to either GIT or SVN version control.
Click for more information about Fabric Studio UI Components and Menus.
Click for more information about the Fabric Project Structure.
Click for more information about Adding Fabric Projects to Version Controls.
How Do I Create a New Project?
- Go to the Start Page or click the File icon and then click New Project to display the New Project dialog box.
- Enter the name of the project in the Project Name field.
- Verify that the default directory displayed in the Location field is correct, if not, Browse and select the correct one. This directory will be used to store the project’s files and definitions.
- Optional: check the Add Project to Version Control checkbox to add the new project to SVN or Git. It is recommended to save and commit the new project as a baseline. Note that to avoid errors, the SVN/Git repositories must be created in advance.
- Verify the default URL in the Repository URL field is correct, if not, Browse and select the correct one. The PROJECT_NAME is automatically added to the Repository URL once added to the configuration control.
- Click OK. The project’s Main Window opens and the Project Tree is displayed in the left pane.
Notes
- Only one project can be deployed to a specific Fabric server / cluster. Therefore, when defining the project’s physical saved name(.K2proj), make sure that it is meaningful, for example, the project’s business purpose. The project’s logical name can be edited in the Fabric Studio.
- To find the deployed project’s name, execute the Fabric set; command from the Fabric console.
Click for more information about User Preferences.
Click for more information about Adding Fabric Projects to Version Controls.
Click for more information about Best Practices for Using SVN and GIT.
How Do I Access a Fabric Project?
- Either:\ a. Go to the K2view Fabric Studio Start Page and click Open Project.\ b. Click File in the top left corner and then click Open Project to open the default Fabric Project Directory.
- Go to the Project Folder (it has the name of the project) and double click the .k2proj file.
- Do the following to check out a project:\ a. Go to the Start Page or click File and then click Checkout Project to display the Checkout Project dialog box.\ b. The Repository Type is based on the central version control defined for the project and is one of the following:
GIT
SVN
- Once checked out, the project is created locally.