

Using the Query Builder Window - Building and Running an SQL Query
- Go to Query Builder > DB Connection > DB Interface. The List of DB objects (Tables, Views and Synonyms) of the DB connection is displayed in the DB Tree.
- Create and edit the SQL query. You can either create the SQL query manually or edit an SQL query using the Query Builder window.
- To execute the SQL statement, click Execute Query.
- Open the Results tab to view the SQL results.
Note that the Insert, Update and Delete statements performed by the DB query, might cause an auto-commit to the DB (based on the DB driver’s definition).
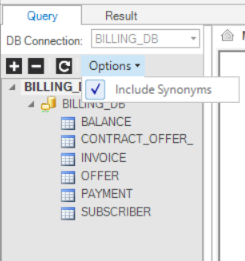
Query Tab - Viewing the List of DB Objects
- Click the + or – icons to expand or collapse the list in the DB objects.
- Click Refresh to refresh the DB objects list.
- Click Options and check / uncheck the Include Synonyms options to include or exclude the DB Synonyms from the DB objects list.
Main Window - Editing an SQL Query
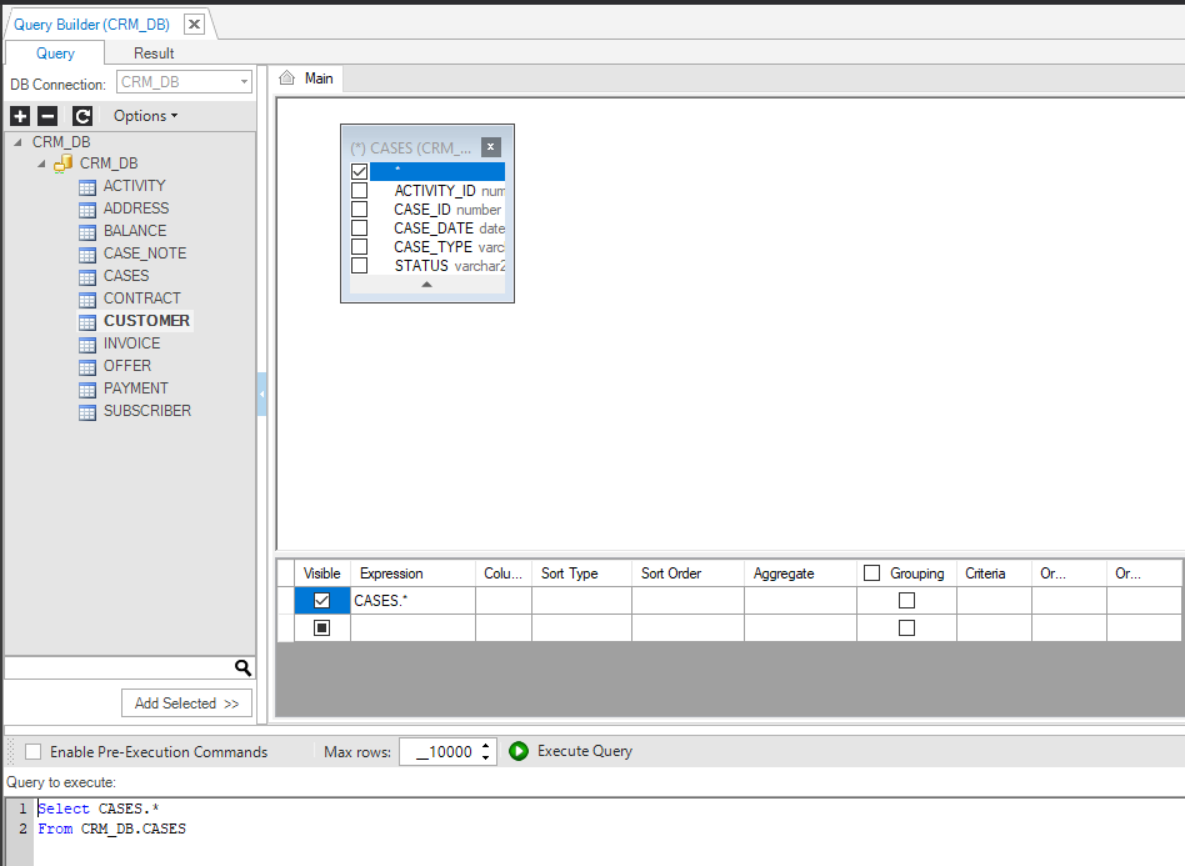
1. Adding a DB Object to the Main Window
Select the DB object (Table, View, or Synonym) from the DB Tree and do either:
- Double click the DB object.
- Select the DB objects and drag them to the Main window.
- Select the DB objects and click Add Selected. The selected DB objects are added to the Main window and their SQL statement is displayed in the Query window.
2. Removing a DB object from the Main Window
Either click the DB object and press Delete on your keyboard or right click the DB object > Remove. Note that the removal of a DB object automatically updates the SQL query in the Query Builder window.
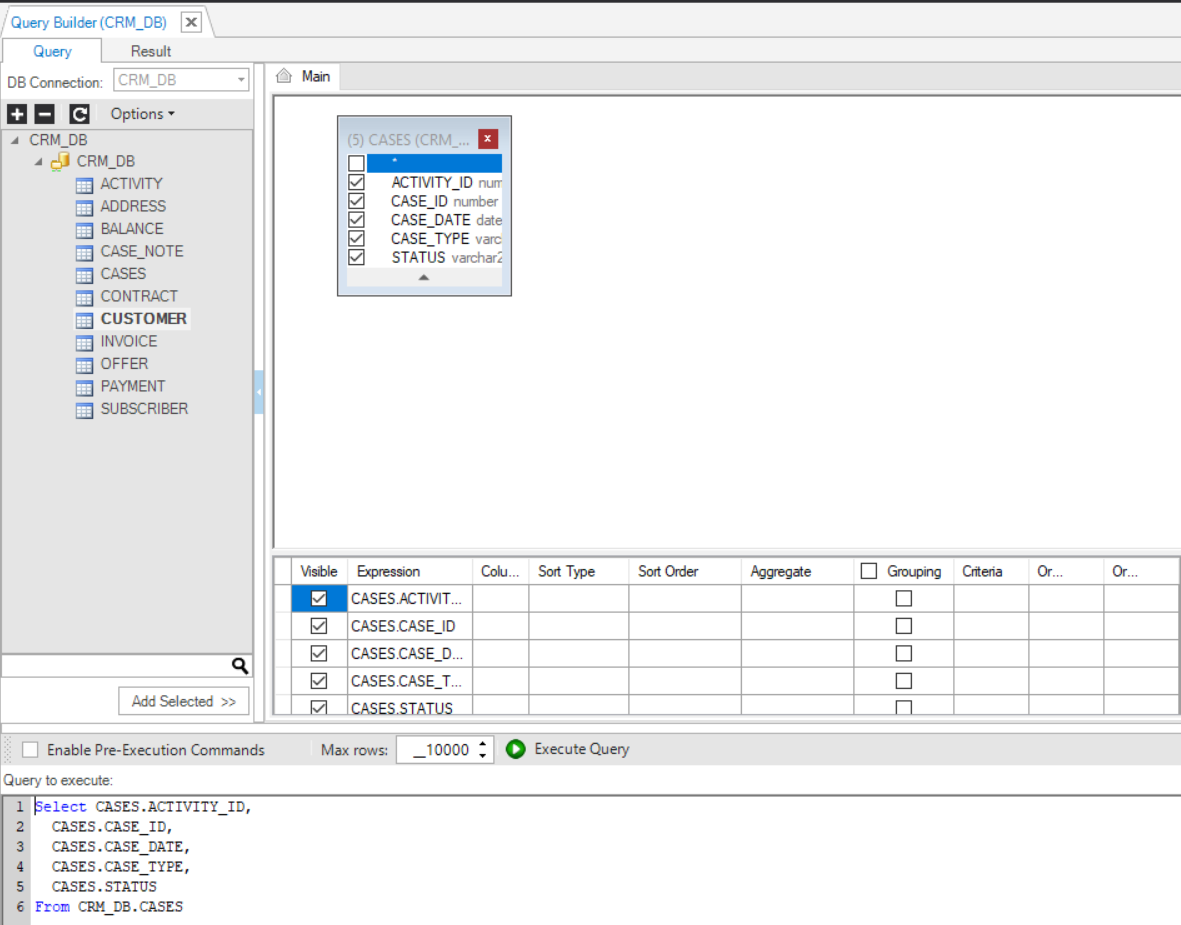
3. Selecting the Columns in a DB Object
To select columns from a DB object, do either:
- Check specific columns in the DB object to include them in the SELECT statement.
- Click the asterisk in the DB object to generate the following SQL syntax:
Select * from [Table Name];
- Right click the DB object > Check All to check all the columns in the table and add them to the SQL query.
4. Removing the Selected Columns in a DB Object
To remove columns from a DB object, do either:
- Uncheck the selected columns.
- Right click the DB object > Uncheck All to remove all the table’s columns from the SELECT statement. Note that when this option is selected for all DB objects in the Main window, the Query Builder generates the following SQL syntax: select * from …
Main Window - Advanced SQL Setting
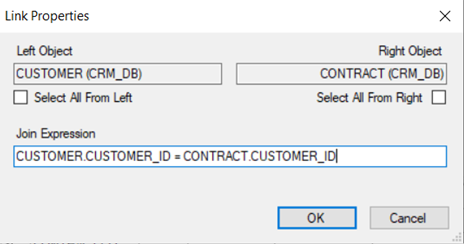
5. Joining the Selected Tables
To add a JOIN to the SQL query, do the following:
- Click the DB object column and drag it to the linked DB object and column to add an INNER JOIN to the SQL query.
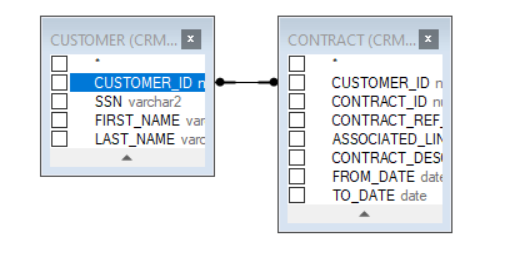
- Right click the link’s line and select one or both Select all rows from … options to edit the link and update the JOIN to LEFT OUTER JOIN, RIGHT OUTER JOIN, or FULL OUTER JOIN.
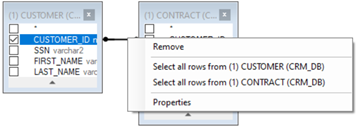
- Right click the link’s line > Properties to edit the Join properties.
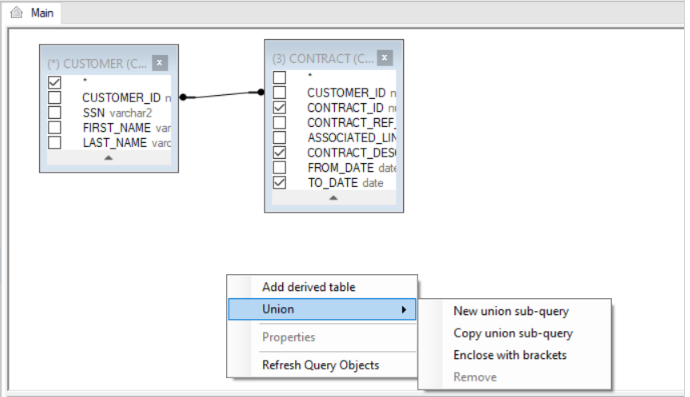
6. Union SQL Queries
- Do either:
- Right click in the Main window > Union > New Union Sub-query / Copy Union Sub-Query.
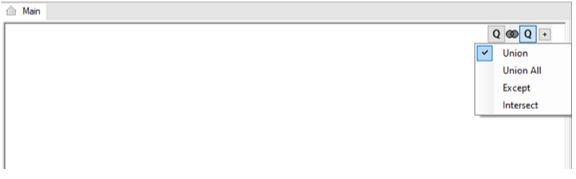
- Click the + next to the Q of the query to add a UNION operator which combines the result-set of two or more SELECT statements.
Each SQL statement that is combined by the UNION operator has a Q icon in the Main Window. Clicking the Q icon of each SQL statement opens its Main window where you can add DB objects and link them to each other to edit the SQL statement in the Union query.
- To modify the Union query do either:
- Right click Link -
 - between the queries to edit the Union type.
- Right click the Q icon to change the order of the SQL statements in the Union SQL query.
- Right click the Q icon to change the order of the SQL statements in the Union SQL query.
- To remove the Union SQL query do either:\ a. Right click the Q icon of the removed query and select Remove.\ b. Right click the Main window, select Union > Remove.
Table of Selected Columns - Edit the SQL Query
This table is displayed on the bottom right of the main window and enables editing the SQL query. Its selected columns hold the same information as in the graphic map in a tabular format.
Adding an SQL Function to a DB object Column
- Click the 3 dots in the Expression column to open the Expression Editor window.
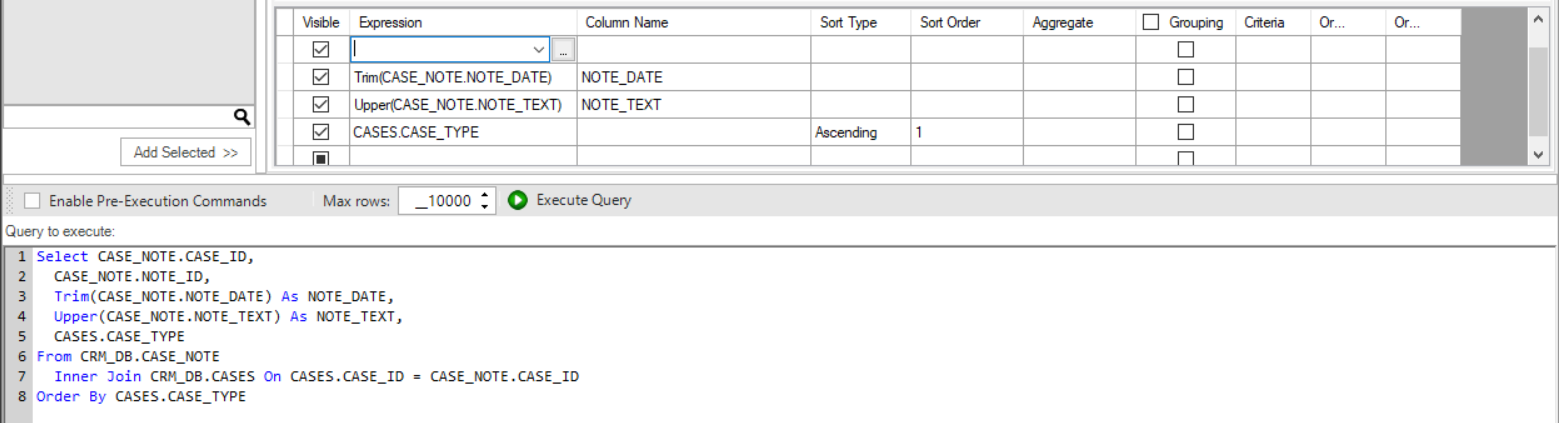
- Select the Function and the DB object column to add to the SQL query.
- Populate the Column Name column to add an alias to the selected DB object column.
- Populate the Sort Type and Sort Order columns to add an Order by to the SQL query.
- Populate the Aggregate column to add an aggregation function like Min, Max, Avg to the selected DB object column. This also updates the Grouping column to add a Group by to the SQL query.
- Populate the Criteria and Or columns to add the DB object column to the WHERE statement of the SQL query.
Query Settings Toolbar
The Enable Pre-Execution Commands checkbox enables running commands on the selected DB before running the SQL query. When this checkbox is checked, the Pre-Execution Commands window is opened. Note that when running the Query Builder on a Fabric interface, you must run the [Get Instance] command in the Pre-Execution Commands window since the SQL query must run on an LU Instance level.
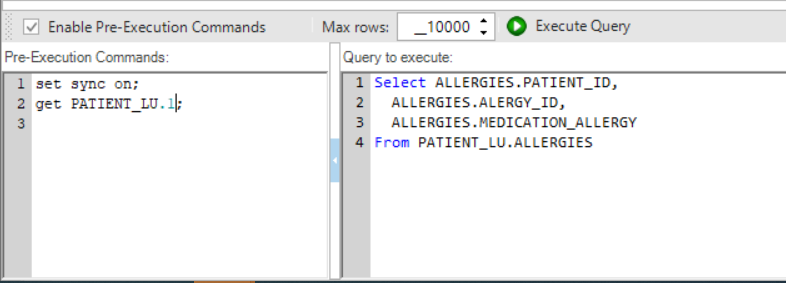
The Max rows setting is used to set the maximum number of rows returned by the SQL query. The default value is 10,000 rows. You can set a different number of rows to be returned by the SQL query

Using the Query Builder Window - Building and Running an SQL Query
- Go to Query Builder > DB Connection > DB Interface. The List of DB objects (Tables, Views and Synonyms) of the DB connection is displayed in the DB Tree.
- Create and edit the SQL query. You can either create the SQL query manually or edit an SQL query using the Query Builder window.
- To execute the SQL statement, click Execute Query.
- Open the Results tab to view the SQL results.
Note that the Insert, Update and Delete statements performed by the DB query, might cause an auto-commit to the DB (based on the DB driver’s definition).
Query Tab - Viewing the List of DB Objects
- Click the + or – icons to expand or collapse the list in the DB objects.
- Click Refresh to refresh the DB objects list.
- Click Options and check / uncheck the Include Synonyms options to include or exclude the DB Synonyms from the DB objects list.
Main Window - Editing an SQL Query
1. Adding a DB Object to the Main Window
Select the DB object (Table, View, or Synonym) from the DB Tree and do either:
- Double click the DB object.
- Select the DB objects and drag them to the Main window.
- Select the DB objects and click Add Selected. The selected DB objects are added to the Main window and their SQL statement is displayed in the Query window.
2. Removing a DB object from the Main Window
Either click the DB object and press Delete on your keyboard or right click the DB object > Remove. Note that the removal of a DB object automatically updates the SQL query in the Query Builder window.
3. Selecting the Columns in a DB Object
To select columns from a DB object, do either:
- Check specific columns in the DB object to include them in the SELECT statement.
- Click the asterisk in the DB object to generate the following SQL syntax:
Select * from [Table Name];
- Right click the DB object > Check All to check all the columns in the table and add them to the SQL query.
4. Removing the Selected Columns in a DB Object
To remove columns from a DB object, do either:
- Uncheck the selected columns.
- Right click the DB object > Uncheck All to remove all the table’s columns from the SELECT statement. Note that when this option is selected for all DB objects in the Main window, the Query Builder generates the following SQL syntax: select * from …
Main Window - Advanced SQL Setting
5. Joining the Selected Tables
To add a JOIN to the SQL query, do the following:
- Click the DB object column and drag it to the linked DB object and column to add an INNER JOIN to the SQL query.
- Right click the link’s line and select one or both Select all rows from … options to edit the link and update the JOIN to LEFT OUTER JOIN, RIGHT OUTER JOIN, or FULL OUTER JOIN.
- Right click the link’s line > Properties to edit the Join properties.
6. Union SQL Queries
- Do either:
- Right click in the Main window > Union > New Union Sub-query / Copy Union Sub-Query.
- Click the + next to the Q of the query to add a UNION operator which combines the result-set of two or more SELECT statements.
Each SQL statement that is combined by the UNION operator has a Q icon in the Main Window. Clicking the Q icon of each SQL statement opens its Main window where you can add DB objects and link them to each other to edit the SQL statement in the Union query.
- To modify the Union query do either:
- Right click Link - - between the queries to edit the Union type.
- Right click the Q icon to change the order of the SQL statements in the Union SQL query.
- Right click the Q icon to change the order of the SQL statements in the Union SQL query.
- To remove the Union SQL query do either:\ a. Right click the Q icon of the removed query and select Remove.\ b. Right click the Main window, select Union > Remove.
Table of Selected Columns - Edit the SQL Query
This table is displayed on the bottom right of the main window and enables editing the SQL query. Its selected columns hold the same information as in the graphic map in a tabular format.
Adding an SQL Function to a DB object Column
- Click the 3 dots in the Expression column to open the Expression Editor window.
- Select the Function and the DB object column to add to the SQL query.
- Populate the Column Name column to add an alias to the selected DB object column.
- Populate the Sort Type and Sort Order columns to add an Order by to the SQL query.
- Populate the Aggregate column to add an aggregation function like Min, Max, Avg to the selected DB object column. This also updates the Grouping column to add a Group by to the SQL query.
- Populate the Criteria and Or columns to add the DB object column to the WHERE statement of the SQL query.
Query Settings Toolbar
The Enable Pre-Execution Commands checkbox enables running commands on the selected DB before running the SQL query. When this checkbox is checked, the Pre-Execution Commands window is opened. Note that when running the Query Builder on a Fabric interface, you must run the [Get Instance] command in the Pre-Execution Commands window since the SQL query must run on an LU Instance level.
The Max rows setting is used to set the maximum number of rows returned by the SQL query. The default value is 10,000 rows. You can set a different number of rows to be returned by the SQL query