


Building an SQL Query
Use the Query Builder to create SQL queries as shown below:
- Open the Query Builder window, as described here (remember to choose the interface you wish to query).
- Edit the SQL commands in the Query Editor (top pane).
- Click to execute the query. You can also use the Keyboard shortcut
CTRL+Enter(windows) orCMD+Enter(Mac) - The results are presented in a table view in the Results window.
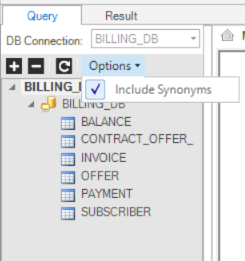
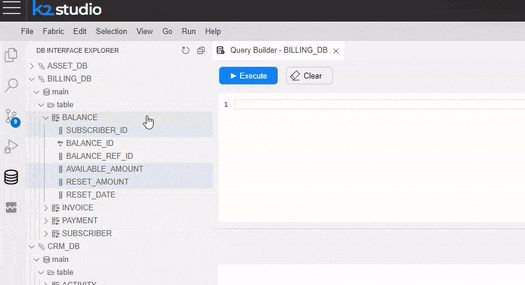
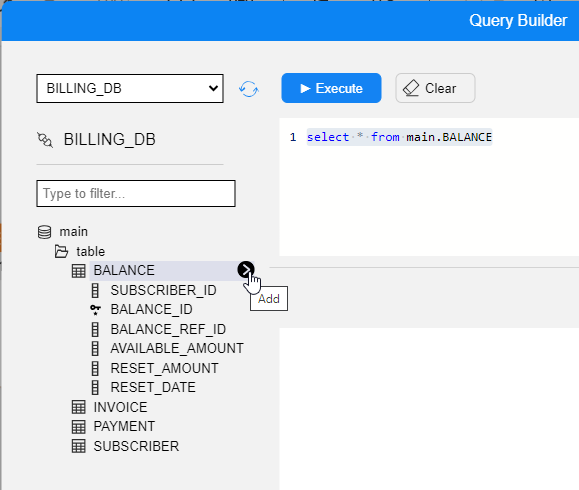
- Go to Query Builder > DB Connection > select a DB Interface. The list of DB objects (Tables, Views and Synonyms) of the DB connection is displayed in the DB Tree (as seen in the image below).
- Create and edit the SQL query. You can either create the SQL query manually or edit an SQL query using the Query Builder window.
- To execute the SQL statement, click on Execute Query (in the Query Settings toolbar).
- Open the Results tab to view the SQL results.
Note: The Insert, Update and Delete statements (performed by the DB query) may cause an auto-commit to the DB (based on the DB driver’s definition).
Viewing the List of DB Objects
- Click the + or – icons to either expand or collapse the list in the DB objects.
- Click the Refresh icon to refresh the DB objects list.
- Click Options and check/uncheck the Include Synonyms option to include or exclude the DB Synonyms from the DB objects list.
Editing an SQL Statement
1. Adding a DB Object to the Main Window
Select the DB object (Table, View or Synonym) from the DB Tree and proceed with one of the following actions:
- Double-click the DB object.
- Select the DB objects and drag them to the Main window.
- Select the DB objects and click on Add Selected (at the bottom of the DB Tree pane). The selected DB objects are then added onto the Main window, and the related SQL statement displays in the Query Display pane.
2. Removing a DB Object from the Main Window
To remove a DB object from the Main window, you can either click the DB object and press Delete on your keyboard, right-click the DB object > Remove, or click the x located at the top-right corner of the DB object.
Note: Such removal automatically updates the SQL statement in the Query Display pane.
3. Selecting Columns in a DB Object
The following default SQL syntax appears in the Query Display pane -
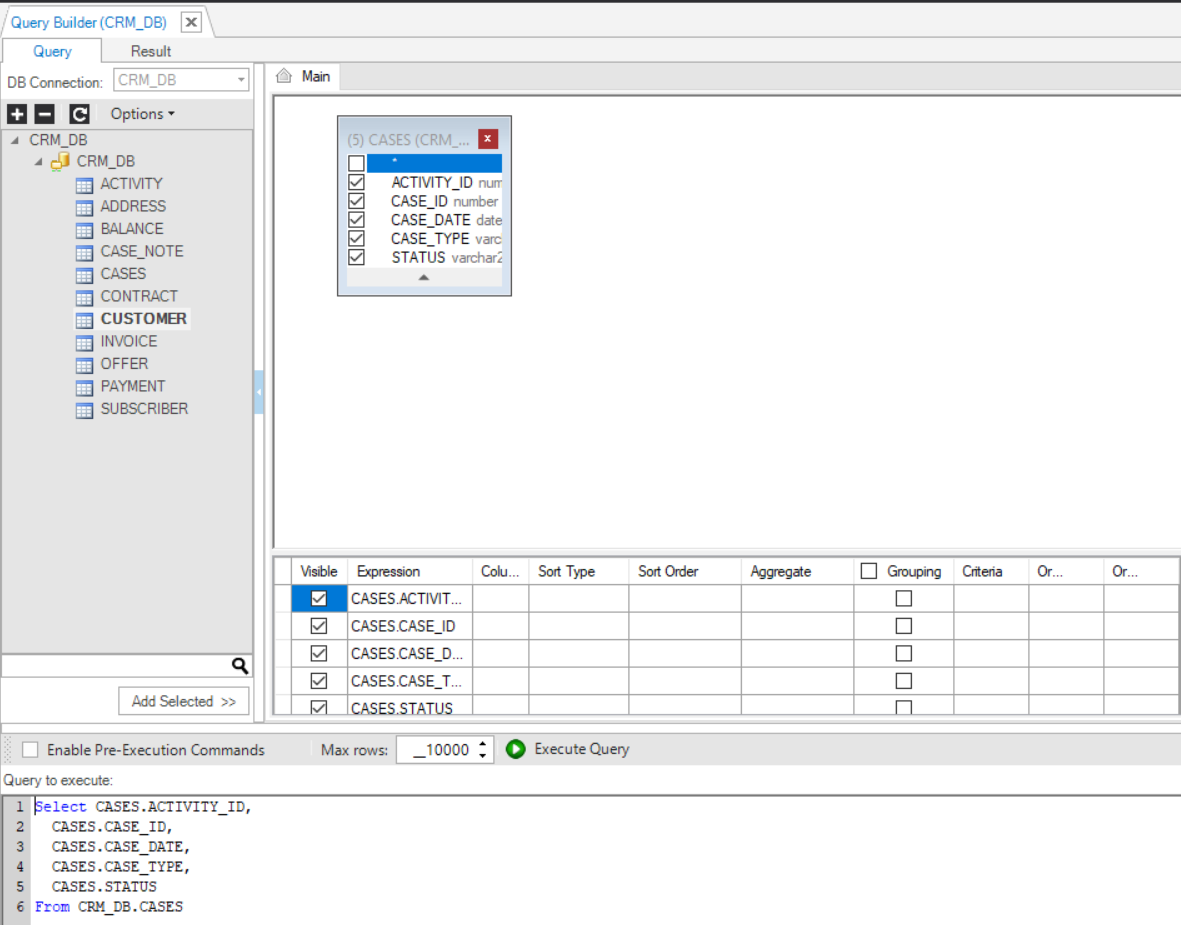
Select * from [Table Name]; - Check the checkboxes of specific columns in the DB object to include them only in the SELECT statement.
- Check the checkbox next to the asterisk in the DB object to generate the following SQL syntax:
Select [Table Name.] * from [Table Name];
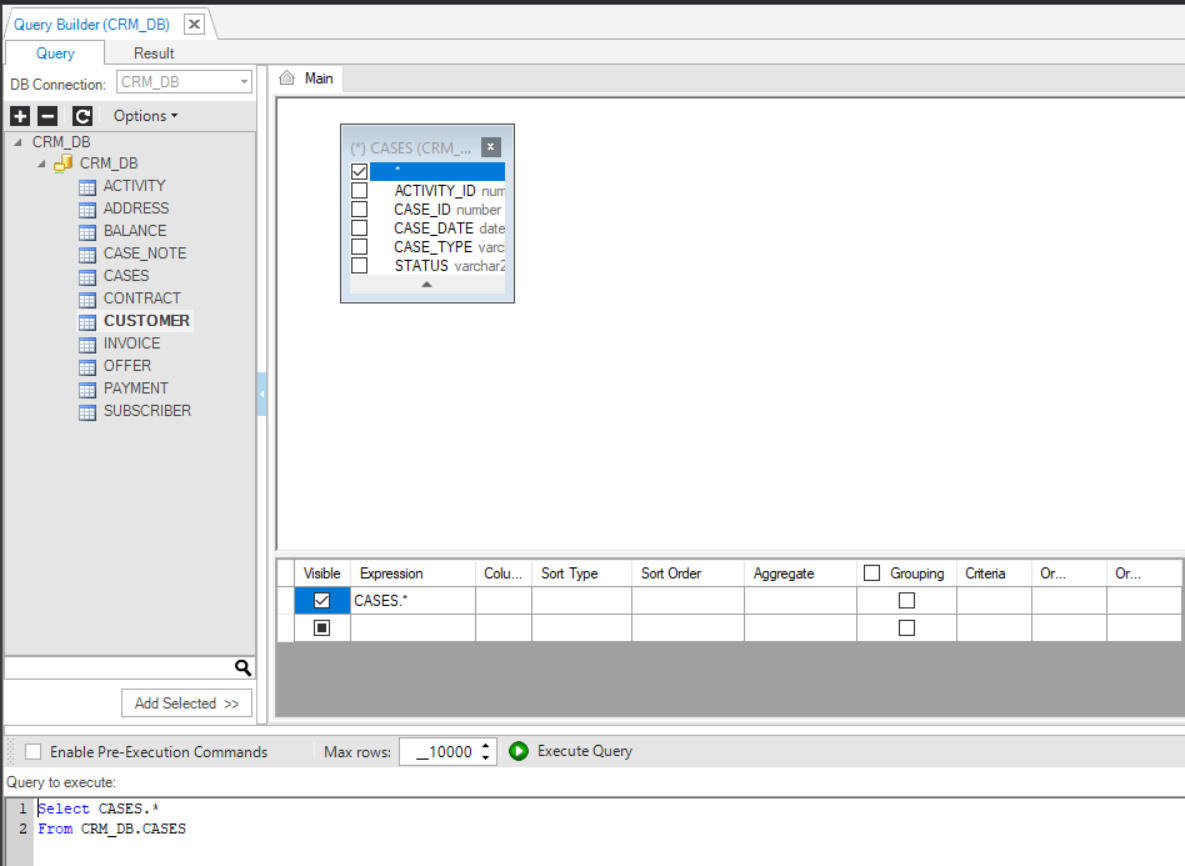
Note: As you can see in the above image, the [Table Name.] before * is explicitly specified, which can be useful in JOIN statements to avoid ambiguity. However, it is not required in most cases unless dealing with multiple tables with overlapping column names.
- Right-click on the DB object > Check All to check all checkboxes of all columns in the table and add them to the SELECT statement.
4. Removing Selected Columns from a DB Object
To remove columns from a DB object, perform either one of the following actions:
- Uncheck the checkboxes of the selected columns in the DB object.
- Right-click on the DB object > Uncheck All to remove all columns of the table from the SELECT statement. Note that when this option is selected for all DB objects in the Main window, the Query Builder generates the following SQL syntax: select * from …
Advanced SQL Setting
5. Joining the Selected Tables
To add a JOIN operator to the SQL query, perform the following:
- Click on the DB object column (in the below example, it is the CUSTOMER_ID, in the CUSTOMER table) and drag a line to link it to a column in another DB object (CUSTOMER_ID, in the CONTRACT table). This action would add an INNER JOIN to the SQL query.
- Right-click the link’s line and select one or both Select all rows from … option(s) to edit the link and update the JOIN operator to LEFT OUTER JOIN, RIGHT OUTER JOIN or FULL OUTER JOIN.
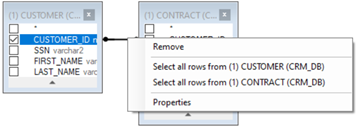
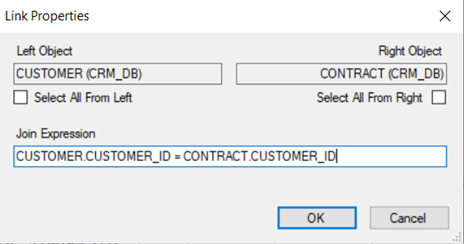
- Right-click on the link’s line > Properties to edit the JOIN's properties.
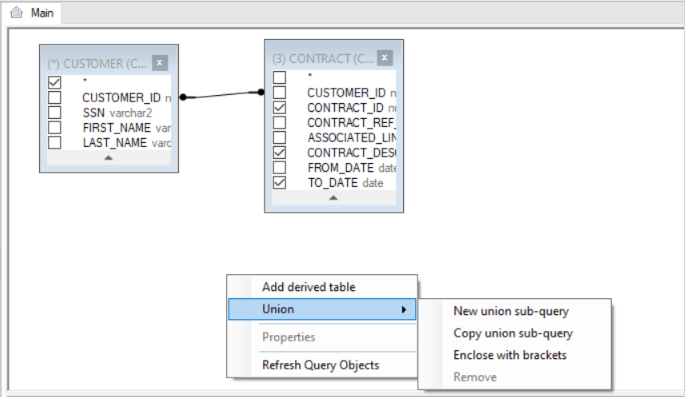
6. Union SQL Queries
- Perform either one of the following actions:
- Right-click in the Main window > Union > New union sub-query/Copy union sub-query.
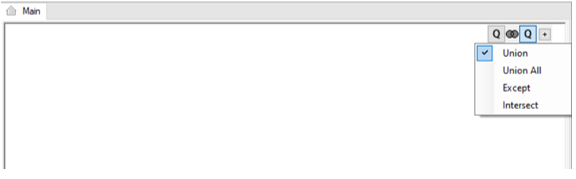
- Click the + next to the Q of the query (top-right corner of the Main window) to add a UNION operator, which combines the result-set of 2 or more SELECT statements.
Each SQL statement, which is combined by the UNION operator, has a Q icon in the Main window. Clicking the Q icon of each SQL statement opens it in the Main window, where you can add DB objects and link them to each other in order to edit the SQL statement in the SQL query.
- To modify the Union query, perform either one of the following actions:
- Right-click Link -
 - between the queries, to edit the Union type.
- Right-click the Q icon to change the order of the SQL statements in the SQL query.
- To remove the Union SQL query, perform either one of the following actions:\ a. Right-click the Q icon of the removed query and select Remove.\ b. Right-click the Main window, select Union > Remove.
Table of Selected Columns - Edit the SQL Statement
This table is located underneath the Query Builder's Main window, and it enables editing the SQL query. Its selected columns hold the same information as the graphical map, yet in a tabular format.
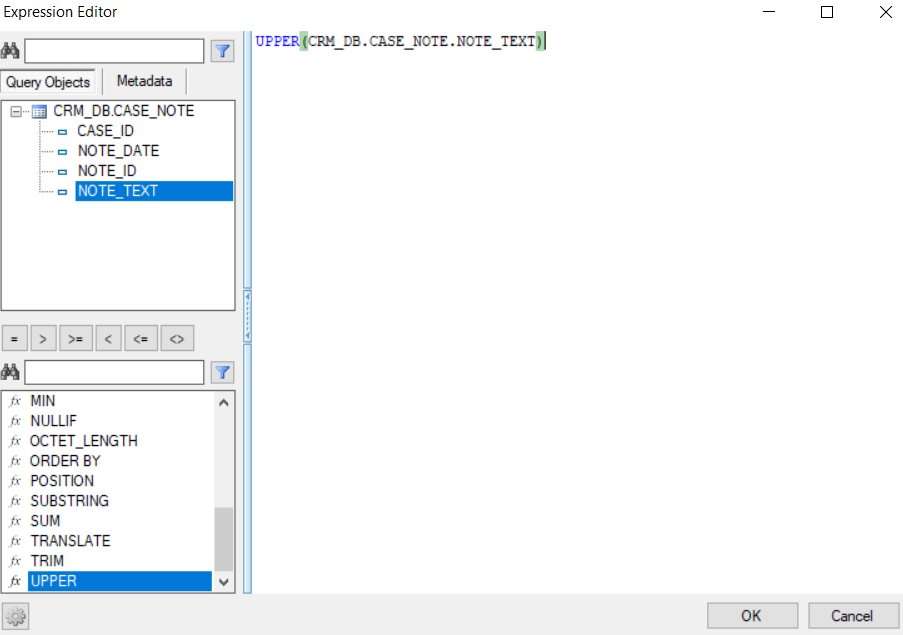
Adding an SQL Function to a DB Object Column
- Click on the 3 dots in the Expression column for opening the Expression Editor window.
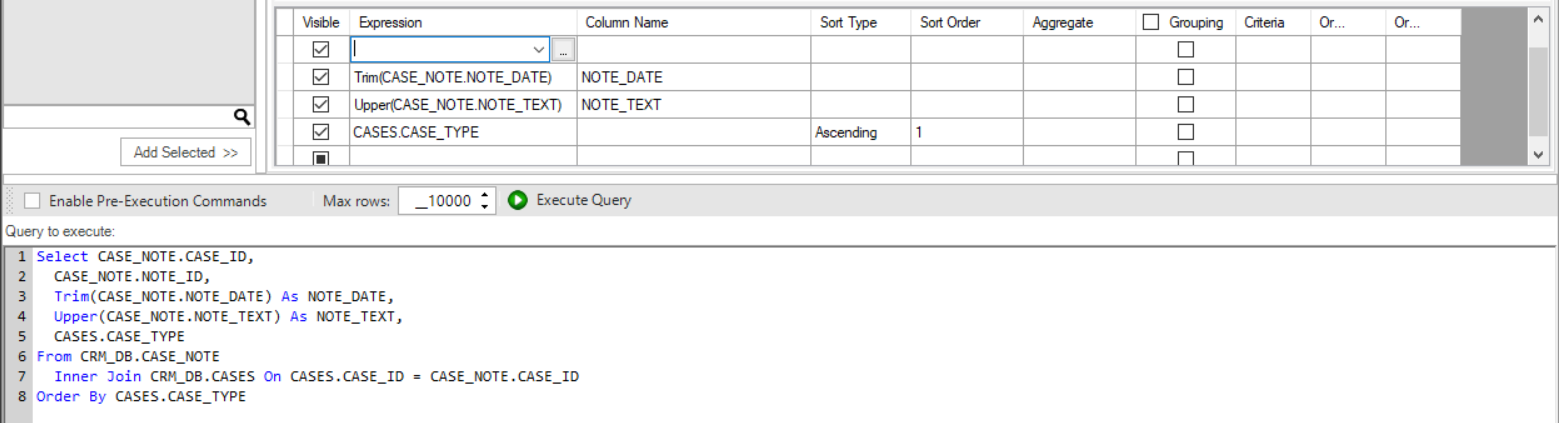
- Select the Function and the DB object column in order to add them to the SQL query.
- Populate the Column Name column to add an alias to the selected DB object column.
- Populate the Sort Type and Sort Order columns to add an Order by to the SQL query.
- Populate the Aggregate column to add an aggregation function such as Min, Max, Avg to the selected DB object column. This act updates the Grouping column and is reflected as a 'Group by' statement in the SQL query.
- Populate the Criteria and Or columns in order to add the DB object column to the WHERE statement of the SQL query.
Query Settings Toolbar
The Enable Pre-Execution Commands checkbox (located in the Query Settings toolbar) enables running commands on the selected DB before running the SQL query. When this checkbox is checked, the Pre-Execution Commands window opens. Note that when running the Query Builder on a Fabric interface, you should run the [Get Instance] command in the Pre-Execution Commands window, as the SQL query must run on an LU Instance level.
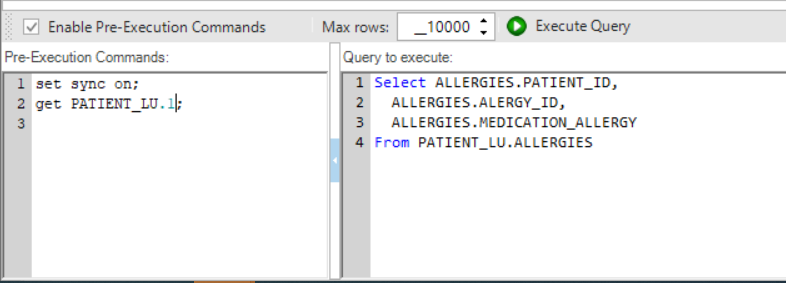
The Max rows setting determines the maximum number of rows that the SQL query can return, with a default of 10,000, which can be modified as required.
You can create and edit an SQL statement by either selecting the desired action from the Interface Explorer menu tree, typing it manually, or seeking guidance from the built-in AI Assistant. The latter two options are used for more complex queries.
Adding a Query using the Interface Explorer Tree
In the Query Builder, adding an SQL statement to the Query Editor (top pane) can be done either manually or using the Interface Explorer Tree (left pane).
To add an SQL statement through the Interface Explorer Tree, right-click the relevant table or specific table fields ensuring that only the chosen fields are included. The available statements include SELECT, INSERT, UPDATE and DELETE.
Note: The Query Builder tool can be opened through the Interface Explorer view (as explained above and as can be watched below) as well as a pop-up window in the LU Schema, Graphit and Broadway.
In the Query Builder pop-up window, you can hover over a table in the tree and click on the arrow that appears on its right. Once clicked, a SELECT statement from that table is added to the Query Editor.
Writing an SQL statement
While writing your SQL statement in the Query Editor (top pane), you can be guided by 2 assistants - AI Assistant and Code Completion Assistant.
AI Assistant
You can use the built-in AI Assistant to create SQL statements by entering your desired statement in natural language for the AI Assistant. To activate the AI Assistant, install from the Exchange one of the AI extensions (such as OpenAI, Anthropic, Gemini) and create an AI Interface based on it. To use the AI Assistant:
Click on the AI icon (
 ) in the upper-right corner of the Query Editor.
This pane is then split into two side-by-side editors: On the left - the SQL Editor, whereas on the right - the natural language statements Editor.
Write your desired statement in the right-side editor.
Choose the relevant schemas that you would like the AI Assistant to look at, via the Schema Filter select list. This action aims to avoid an overburdening process. In case there is only a single schema DB, it is selected automatically.

In order to see the selected schema(s), you can simply hover over Selected Schemas without reopening the Schema Filter select list.

Click on the
SQL ← Textbutton.The query will then be generated and will appear in the SQL Editor (on the left).

The AI Assistant's explanations of how the SQL statement was created can be viewed by clicking the question mark icon that then appears above the SQL Editor.
You can also activate the AI Assistant in the opposite direction, which would explain an existing SQL query in natural language. To do that, click on the SQL → Text button.
When the AI Assistant is activated within a DB select function, such as in Broadway DB Query actors or Graphit nodes, the natural language statement is saved as a comment alongside the SQL statement.
Query Editor's Code Completion Assistant
While manually editing SQL statements, you can be assisted by the Code Completion Assistant, which provides code completion suggestions. These completion suggestions are intended for schemas, tables, column names of the current interface, as well as sets of basic SQL clauses.
To use it, press CTRL+SPACE, similar to code programming.
A select list then opens, allowing you to choose the relevant statement.

An icon appears to the left of each item in the select list, where:
 stands for a DB schema.
 stands for a DB table.
 stands for a table.
The Code Completion Assistant can also help you when looking for the standard SQL commands, such as Select, AND, WHERE. The icon that represents them is:  .
.
Notes and Tips
- Clearing the whole Query Editor can be done by clicking on the Clear button.
- The Query Editor can hold and execute several queries. When clicking on the Execute button, all queries will be executed, one by one, where the Results pane will show the results of the last query.
- If the Query Editor contains several queries and you wish to run some of them, there is no need to delete the others. To execute specific commands, select them and then click on Execute.
- You can add Fabric commands to the Query Editor, and they will also be executed.
- When fabric is the selected data source interface, set the top bar fields prior to executing the query.

Building an SQL Query
Use the Query Builder to create SQL queries as shown below:
- Open the Query Builder window, as described here (remember to choose the interface you wish to query).
- Edit the SQL commands in the Query Editor (top pane).
- Click to execute the query. You can also use the Keyboard shortcut
CTRL+Enter(windows) orCMD+Enter(Mac) - The results are presented in a table view in the Results window.
- Go to Query Builder > DB Connection > select a DB Interface. The list of DB objects (Tables, Views and Synonyms) of the DB connection is displayed in the DB Tree (as seen in the image below).
- Create and edit the SQL query. You can either create the SQL query manually or edit an SQL query using the Query Builder window.
- To execute the SQL statement, click on Execute Query (in the Query Settings toolbar).
- Open the Results tab to view the SQL results.
Note: The Insert, Update and Delete statements (performed by the DB query) may cause an auto-commit to the DB (based on the DB driver’s definition).
Viewing the List of DB Objects
- Click the + or – icons to either expand or collapse the list in the DB objects.
- Click the Refresh icon to refresh the DB objects list.
- Click Options and check/uncheck the Include Synonyms option to include or exclude the DB Synonyms from the DB objects list.
Editing an SQL Statement
1. Adding a DB Object to the Main Window
Select the DB object (Table, View or Synonym) from the DB Tree and proceed with one of the following actions:
- Double-click the DB object.
- Select the DB objects and drag them to the Main window.
- Select the DB objects and click on Add Selected (at the bottom of the DB Tree pane). The selected DB objects are then added onto the Main window, and the related SQL statement displays in the Query Display pane.
2. Removing a DB Object from the Main Window
To remove a DB object from the Main window, you can either click the DB object and press Delete on your keyboard, right-click the DB object > Remove, or click the x located at the top-right corner of the DB object.
Note: Such removal automatically updates the SQL statement in the Query Display pane.
3. Selecting Columns in a DB Object
The following default SQL syntax appears in the Query Display pane -
Select * from [Table Name]; - Check the checkboxes of specific columns in the DB object to include them only in the SELECT statement.
- Check the checkbox next to the asterisk in the DB object to generate the following SQL syntax:
Select [Table Name.] * from [Table Name];
Note: As you can see in the above image, the [Table Name.] before * is explicitly specified, which can be useful in JOIN statements to avoid ambiguity. However, it is not required in most cases unless dealing with multiple tables with overlapping column names.
- Right-click on the DB object > Check All to check all checkboxes of all columns in the table and add them to the SELECT statement.
4. Removing Selected Columns from a DB Object
To remove columns from a DB object, perform either one of the following actions:
- Uncheck the checkboxes of the selected columns in the DB object.
- Right-click on the DB object > Uncheck All to remove all columns of the table from the SELECT statement. Note that when this option is selected for all DB objects in the Main window, the Query Builder generates the following SQL syntax: select * from …
Advanced SQL Setting
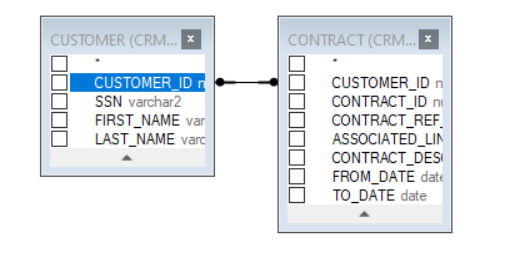
5. Joining the Selected Tables
To add a JOIN operator to the SQL query, perform the following:
- Click on the DB object column (in the below example, it is the CUSTOMER_ID, in the CUSTOMER table) and drag a line to link it to a column in another DB object (CUSTOMER_ID, in the CONTRACT table). This action would add an INNER JOIN to the SQL query.
- Right-click the link’s line and select one or both Select all rows from … option(s) to edit the link and update the JOIN operator to LEFT OUTER JOIN, RIGHT OUTER JOIN or FULL OUTER JOIN.
- Right-click on the link’s line > Properties to edit the JOIN's properties.
6. Union SQL Queries
- Perform either one of the following actions:
- Right-click in the Main window > Union > New union sub-query/Copy union sub-query.
- Click the + next to the Q of the query (top-right corner of the Main window) to add a UNION operator, which combines the result-set of 2 or more SELECT statements.
Each SQL statement, which is combined by the UNION operator, has a Q icon in the Main window. Clicking the Q icon of each SQL statement opens it in the Main window, where you can add DB objects and link them to each other in order to edit the SQL statement in the SQL query.
- To modify the Union query, perform either one of the following actions:
- Right-click Link - - between the queries, to edit the Union type.
- Right-click the Q icon to change the order of the SQL statements in the SQL query.
- To remove the Union SQL query, perform either one of the following actions:\ a. Right-click the Q icon of the removed query and select Remove.\ b. Right-click the Main window, select Union > Remove.
Table of Selected Columns - Edit the SQL Statement
This table is located underneath the Query Builder's Main window, and it enables editing the SQL query. Its selected columns hold the same information as the graphical map, yet in a tabular format.
Adding an SQL Function to a DB Object Column
- Click on the 3 dots in the Expression column for opening the Expression Editor window.
- Select the Function and the DB object column in order to add them to the SQL query.
- Populate the Column Name column to add an alias to the selected DB object column.
- Populate the Sort Type and Sort Order columns to add an Order by to the SQL query.
- Populate the Aggregate column to add an aggregation function such as Min, Max, Avg to the selected DB object column. This act updates the Grouping column and is reflected as a 'Group by' statement in the SQL query.
- Populate the Criteria and Or columns in order to add the DB object column to the WHERE statement of the SQL query.
Query Settings Toolbar
The Enable Pre-Execution Commands checkbox (located in the Query Settings toolbar) enables running commands on the selected DB before running the SQL query. When this checkbox is checked, the Pre-Execution Commands window opens. Note that when running the Query Builder on a Fabric interface, you should run the [Get Instance] command in the Pre-Execution Commands window, as the SQL query must run on an LU Instance level.
The Max rows setting determines the maximum number of rows that the SQL query can return, with a default of 10,000, which can be modified as required.
You can create and edit an SQL statement by either selecting the desired action from the Interface Explorer menu tree, typing it manually, or seeking guidance from the built-in AI Assistant. The latter two options are used for more complex queries.
Adding a Query using the Interface Explorer Tree
In the Query Builder, adding an SQL statement to the Query Editor (top pane) can be done either manually or using the Interface Explorer Tree (left pane).
To add an SQL statement through the Interface Explorer Tree, right-click the relevant table or specific table fields ensuring that only the chosen fields are included. The available statements include SELECT, INSERT, UPDATE and DELETE.
Note: The Query Builder tool can be opened through the Interface Explorer view (as explained above and as can be watched below) as well as a pop-up window in the LU Schema, Graphit and Broadway.
In the Query Builder pop-up window, you can hover over a table in the tree and click on the arrow that appears on its right. Once clicked, a SELECT statement from that table is added to the Query Editor.
Writing an SQL statement
While writing your SQL statement in the Query Editor (top pane), you can be guided by 2 assistants - AI Assistant and Code Completion Assistant.
AI Assistant
You can use the built-in AI Assistant to create SQL statements by entering your desired statement in natural language for the AI Assistant. To activate the AI Assistant, install from the Exchange one of the AI extensions (such as OpenAI, Anthropic, Gemini) and create an AI Interface based on it. To use the AI Assistant:
Click on the AI icon (
) in the upper-right corner of the Query Editor.This pane is then split into two side-by-side editors: On the left - the SQL Editor, whereas on the right - the natural language statements Editor.
Write your desired statement in the right-side editor.
Choose the relevant schemas that you would like the AI Assistant to look at, via the Schema Filter select list. This action aims to avoid an overburdening process. In case there is only a single schema DB, it is selected automatically.
In order to see the selected schema(s), you can simply hover over Selected Schemas without reopening the Schema Filter select list.
Click on the
SQL ← Textbutton.The query will then be generated and will appear in the SQL Editor (on the left).
The AI Assistant's explanations of how the SQL statement was created can be viewed by clicking the question mark icon that then appears above the SQL Editor.
You can also activate the AI Assistant in the opposite direction, which would explain an existing SQL query in natural language. To do that, click on the SQL → Text button.
When the AI Assistant is activated within a DB select function, such as in Broadway DB Query actors or Graphit nodes, the natural language statement is saved as a comment alongside the SQL statement.
Query Editor's Code Completion Assistant
While manually editing SQL statements, you can be assisted by the Code Completion Assistant, which provides code completion suggestions. These completion suggestions are intended for schemas, tables, column names of the current interface, as well as sets of basic SQL clauses.
To use it, press CTRL+SPACE, similar to code programming.
A select list then opens, allowing you to choose the relevant statement.
An icon appears to the left of each item in the select list, where:
- stands for a DB schema.
- stands for a DB table.
- stands for a table.
The Code Completion Assistant can also help you when looking for the standard SQL commands, such as Select, AND, WHERE. The icon that represents them is: .
Notes and Tips
- Clearing the whole Query Editor can be done by clicking on the Clear button.
- The Query Editor can hold and execute several queries. When clicking on the Execute button, all queries will be executed, one by one, where the Results pane will show the results of the last query.
- If the Query Editor contains several queries and you wish to run some of them, there is no need to delete the others. To execute specific commands, select them and then click on Execute.
- You can add Fabric commands to the Query Editor, and they will also be executed.
- When fabric is the selected data source interface, set the top bar fields prior to executing the query.
