

Data Viewer
The Data Viewer enables you to view a Logical Unit database (LUDB), add debugging capabilities and improve testing and defect resolution times.
Since an LUDB is in-memory, it can be viewed by dumping it into an SQLite file which can be shared via email or a common file directory for additional investigations using the Fabric Studio. This file can also be used to execute SQL queries and for analysis. Data Viewer files are saved under the LU VirtualDB_Data directory in: \Fabric\[project name]\Implementation\LogicalUnits\[LU name]\VirtualDB_Data.
Click for more information about Logical Units.
Note that the Data Viewer runs on the Fabric local server. Therefore you must deploy the LU to the Fabric local server before running the Data Viewer on this LU.
Click for more information about deploying LU to the Fabric debug server.
How Do I View Data in a Logical Unit?
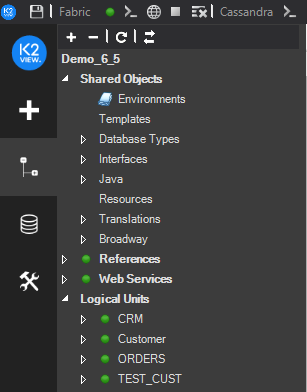
Go to the Project Tree, click Logical Units and verify that the LU has a green icon, indicating that it is deployed to the debug server. If the LU has a white icon, deploy it to the debug server before running the Data Viewer on it. Do either:
- Right click the LU > Deploy To debug.
- Click the Deploy icon on the top of the Fabric Debug panel.
Click
 next to the selected LU to open the Data Viewer window.
Set the Sync Mode in the top left pane. The default Sync mode is ON.
In the Instance ID field (top central pane) enter an Instance ID (an integer).
Click
 Play to generate a new Data Viewer file.
Fabric runs the GET LUI command on the debug server of the selected Instance ID. Each sync of LUI creates a new *.db SQLite file for the LU instance. The LU instance is displayed in the Instances Tree.
Play to generate a new Data Viewer file.
Fabric runs the GET LUI command on the debug server of the selected Instance ID. Each sync of LUI creates a new *.db SQLite file for the LU instance. The LU instance is displayed in the Instances Tree. Note that if you set the Sync Mode to OFF and the Instance ID does not exist in the debug server, the following error message is displayed:
Instance '[LU Name]:[Instance ID]' was not found and sync is disabled.
Double-click the Instance ID to open the Instances Tree dropdown list.
- Click the Instance DB file to display its tables under the Instance DB tree.
Double-click a table to display its data and then right click the table to open a context menu with the following options:
a. Show Data, displays the table’s data.
b. Show Schema, displays the table’s structure.
c. Show Indexes, displays the table’s indexes, if defined.
Click for more information about Logical Units.
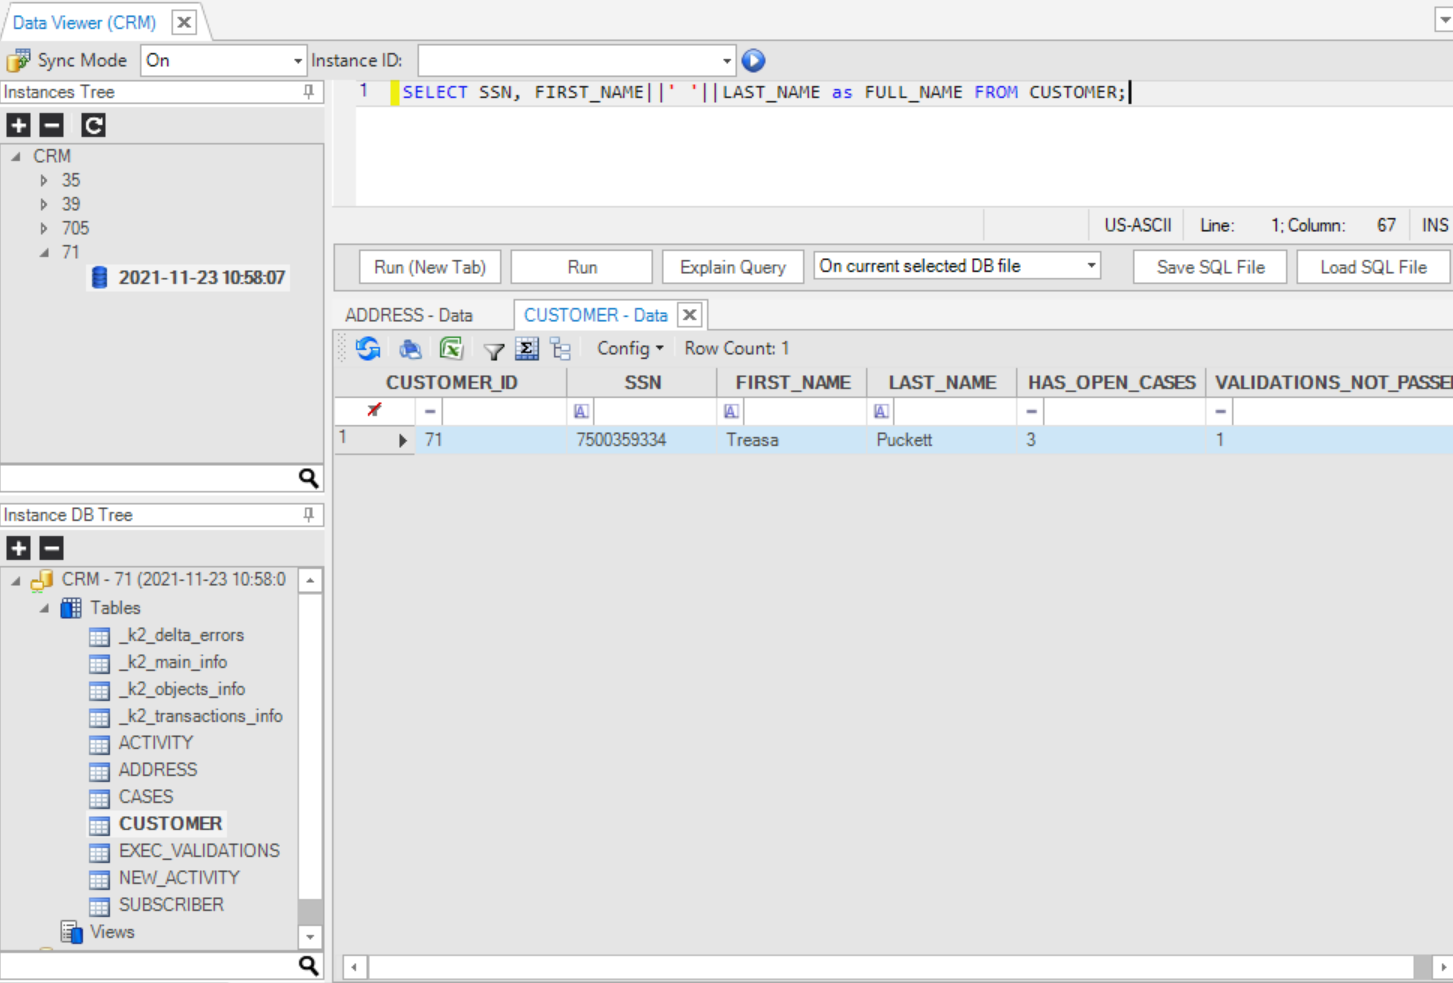
What Are the Data Viewer Components?
The Logical Unit Data Viewer has the following areas:
- Sync Mode and Instance ID.
- Instances Tree.
- Instance DB Tree.
- Scripting Area.
- Results Pane and Toolbar.
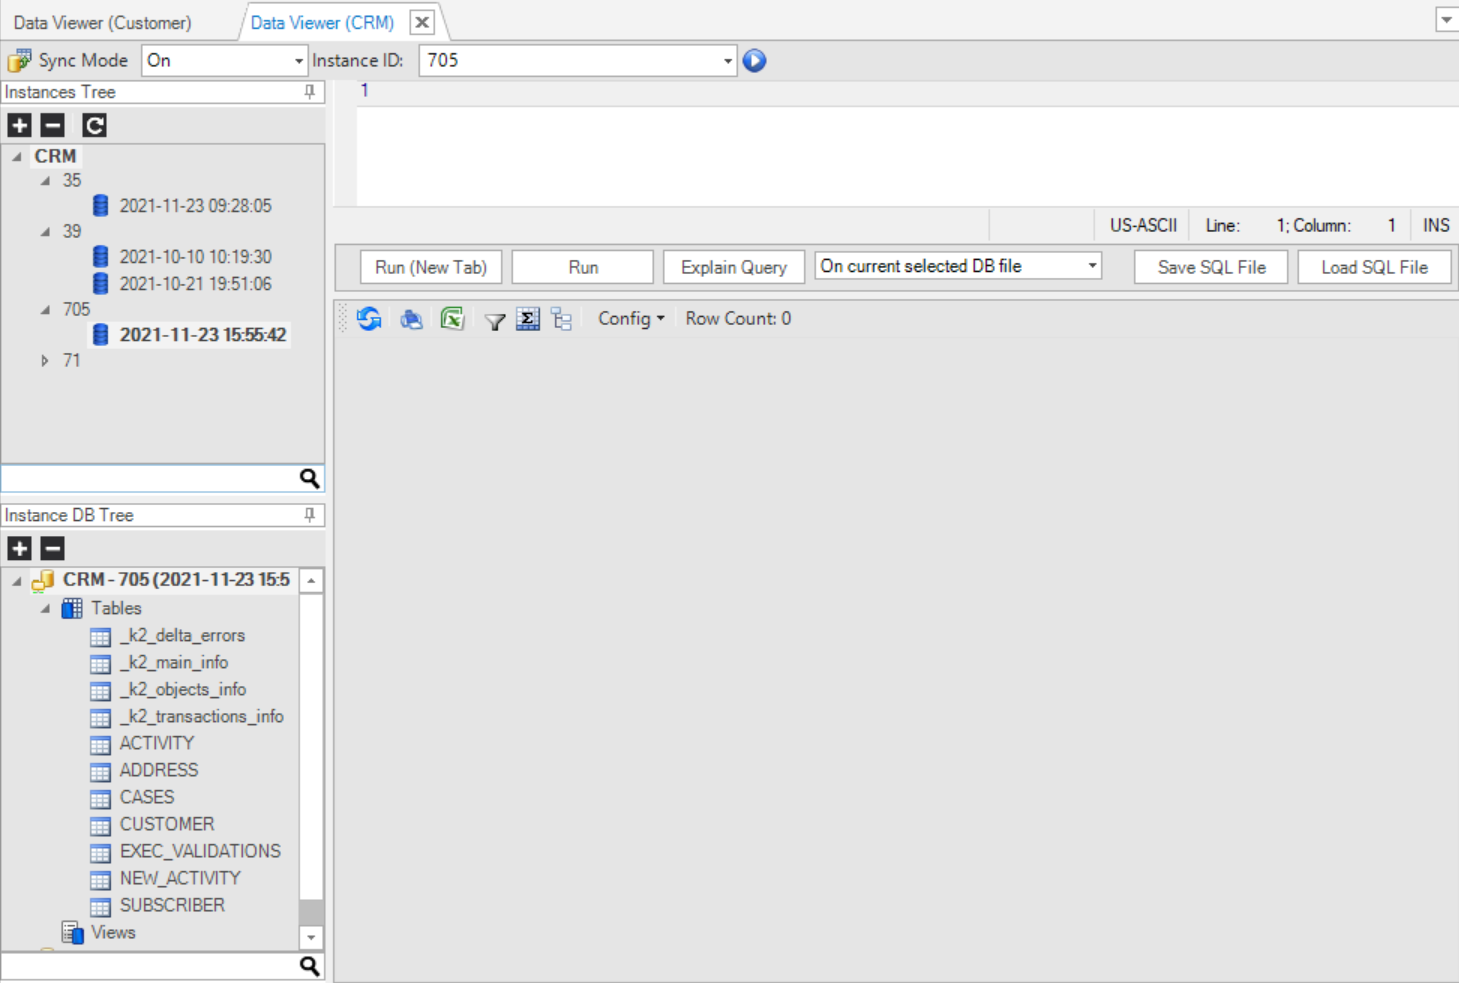
Sync Mode and Instance ID
This area has the following components:
Import DB File 
When clicked, allows you to browse to an external Data Viewer file and load it.
Sync Mode
Set the Sync Mode for the GET LUI command, initiated by the execution of the Data Viewer. The options are On, Off, and Force. The default mode is On.
Instance ID
To complete this field, do either:
Enter a specific Instance ID value.
Select a previously stored Instance ID from the dropdown list.
Write a project (java) function to generate the Instance ID . Note that this function must return a string as an output. Once you have created such a function, use the function name in the Instance ID field (that is, do not enter the code that comprises the function).
For example:
Create an instance ID by using the function: fnCreateInstID. This function takes an input value and adds 10:
  if (i_id!=null && !i_id.isEmpty()){
     return Integer.sum(Integer.valueOf(i_id),10)+"";
   }
  return "0";
More complicated functions can be written, of course, such as generating a random instance ID, or an instance ID that complies with other criteria (such as certain values).
Play
When  icon is clicked, the data file of the Instance ID is retrieved and saved for debugging.
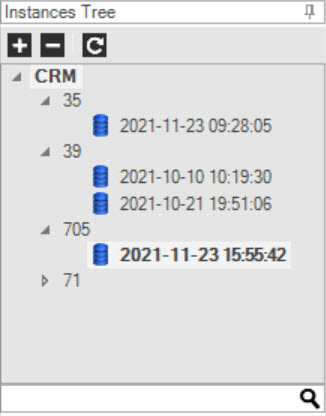
Instances Tree
The Instance Tree area (top left) displays a tree of available data files in the following order:
- LU.
- Instance.
- Dated file name.
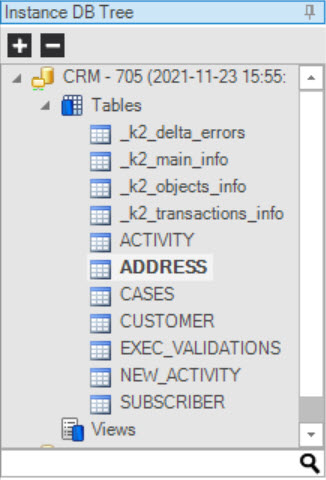
Instance DB Tree
The Instance DB Tree area (bottom left) displays the Table Tree which includes:
k2_delta_errors, holds information on errors, including when each error occured.
k2_main_info, holds basic information about the LU like LU Name and Instance ID.
k2_objects_info, holds information for each of the objects in the selected instance.
k2_transactions_info, holds basic information about each transaction (ID and timestamp).
Reference tables under k2_Ref. These are only displayed as part of the Instance DB tree when the reference object is enabled in the LU schema properties.
To display the values of a table in the tree, right click the table and select either:
- Show Data, to display the table or view it in the Results pane.
- Show Schema, to display the table structure in the Results pane.
- Show Indexes, to display the table indexes in the Results pane.
Results Pane and Toolbar
(Bottom right) Displays the data or schema requested with the row count.
|
Print results. |
|
Export results as an Excel file. |
|
Filter results by one or more columns. |
|
Toggle groupings. |
|
Toggle summaries. |
|
Refresh view. |


Scripting Area
The SQL scripting area is used to write and run SQL statements on a selected LUDB (upper right pane).
The following options are supported:
How Do I Run an SQL Statement in the Data Viewer?
Run and execute the SQL statement from the scripting area on the selected DB file:
- Enter the SQL statement using SQLite syntax into the Scripting area.
- Select the DB file to be used to run the statement from the dropdown list.
- Do the following:\ a. Click Run or Run on New Tab under the Scripting area.\ b. Press F5 or Ctrl + Enter. Separate multiple queries with ‘;’.
- View results in the Results pane.
How Do I Export a Logical Unit Data File?
- Go to the Instances Tree and right click the DB File.
- Click Export Selected DB Files and select the Location and File Name of the exported file (LUDB format).
- Save your changes.
Additional (Right Click) DB File Options
- Open DB opens the Instance DB Tree of the selected DB files.
- Delete Selected DB Files, deletes the selected Instance DB files from the project folder: Fabric\[project name]\Implementation\LogicalUnits\[LU name]\VirtualDB_Data.
Notes
The latest Data Viewer file can be used in the following components:
- New functions / Web Services, the latest Data Viewer is displayed in the Databases dropdown list whereby the LU table can be invoked on the code. Click for more information on How to Create a New Project Function.
- LU Schema, create a new table based on SQL Options to open the DB query where you can select the latest Data Viewer file. Click for more information about Adding a Table to a Schema.
- Population object / DB query, to display the latest Data Viewer file in the Database dropdown list. Click for more information about Creating a New Table Population.
- Debugging population objects. Click for more information about Debugging a Table Population.

Data Viewer
The Data Viewer enables you to view a Logical Unit database (LUDB), add debugging capabilities and improve testing and defect resolution times.
Since an LUDB is in-memory, it can be viewed by dumping it into an SQLite file which can be shared via email or a common file directory for additional investigations using the Fabric Studio. This file can also be used to execute SQL queries and for analysis. Data Viewer files are saved under the LU VirtualDB_Data directory in: \Fabric\[project name]\Implementation\LogicalUnits\[LU name]\VirtualDB_Data.
Click for more information about Logical Units.
Note that the Data Viewer runs on the Fabric local server. Therefore you must deploy the LU to the Fabric local server before running the Data Viewer on this LU.
Click for more information about deploying LU to the Fabric debug server.
How Do I View Data in a Logical Unit?
Go to the Project Tree, click Logical Units and verify that the LU has a green icon, indicating that it is deployed to the debug server. If the LU has a white icon, deploy it to the debug server before running the Data Viewer on it. Do either:
- Right click the LU > Deploy To debug.
- Click the Deploy icon on the top of the Fabric Debug panel.
Click
next to the selected LU to open the Data Viewer window.Set the Sync Mode in the top left pane. The default Sync mode is ON.
In the Instance ID field (top central pane) enter an Instance ID (an integer).
Click
Play to generate a new Data Viewer file.
Fabric runs the GET LUI command on the debug server of the selected Instance ID. Each sync of LUI creates a new *.db SQLite file for the LU instance. The LU instance is displayed in the Instances Tree. Note that if you set the Sync Mode to OFF and the Instance ID does not exist in the debug server, the following error message is displayed:
Instance '[LU Name]:[Instance ID]' was not found and sync is disabled.
Double-click the Instance ID to open the Instances Tree dropdown list.
- Click the Instance DB file to display its tables under the Instance DB tree.
Double-click a table to display its data and then right click the table to open a context menu with the following options:
a. Show Data, displays the table’s data.
b. Show Schema, displays the table’s structure.
c. Show Indexes, displays the table’s indexes, if defined.
Click for more information about Logical Units.
What Are the Data Viewer Components?
The Logical Unit Data Viewer has the following areas:
- Sync Mode and Instance ID.
- Instances Tree.
- Instance DB Tree.
- Scripting Area.
- Results Pane and Toolbar.
Sync Mode and Instance ID
This area has the following components:
Import DB File
When clicked, allows you to browse to an external Data Viewer file and load it.
Sync Mode
Set the Sync Mode for the GET LUI command, initiated by the execution of the Data Viewer. The options are On, Off, and Force. The default mode is On.
Instance ID
To complete this field, do either:
Enter a specific Instance ID value.
Select a previously stored Instance ID from the dropdown list.
Write a project (java) function to generate the Instance ID . Note that this function must return a string as an output. Once you have created such a function, use the function name in the Instance ID field (that is, do not enter the code that comprises the function).
For example:
Create an instance ID by using the function: fnCreateInstID. This function takes an input value and adds 10:
  if (i_id!=null && !i_id.isEmpty()){
     return Integer.sum(Integer.valueOf(i_id),10)+"";
   }
  return "0";
More complicated functions can be written, of course, such as generating a random instance ID, or an instance ID that complies with other criteria (such as certain values).
Play
When icon is clicked, the data file of the Instance ID is retrieved and saved for debugging.
Instances Tree
The Instance Tree area (top left) displays a tree of available data files in the following order:
- LU.
- Instance.
- Dated file name.
Instance DB Tree
The Instance DB Tree area (bottom left) displays the Table Tree which includes:
k2_delta_errors, holds information on errors, including when each error occured.
k2_main_info, holds basic information about the LU like LU Name and Instance ID.
k2_objects_info, holds information for each of the objects in the selected instance.
k2_transactions_info, holds basic information about each transaction (ID and timestamp).
Reference tables under k2_Ref. These are only displayed as part of the Instance DB tree when the reference object is enabled in the LU schema properties.
To display the values of a table in the tree, right click the table and select either:
- Show Data, to display the table or view it in the Results pane.
- Show Schema, to display the table structure in the Results pane.
- Show Indexes, to display the table indexes in the Results pane.
Results Pane and Toolbar
(Bottom right) Displays the data or schema requested with the row count.
|
Print results. |
|
Export results as an Excel file. |
|
Filter results by one or more columns. |
|
Toggle groupings. |
|
Toggle summaries. |
|
Refresh view. |
Scripting Area
The SQL scripting area is used to write and run SQL statements on a selected LUDB (upper right pane).
The following options are supported:
How Do I Run an SQL Statement in the Data Viewer?
Run and execute the SQL statement from the scripting area on the selected DB file:
- Enter the SQL statement using SQLite syntax into the Scripting area.
- Select the DB file to be used to run the statement from the dropdown list.
- Do the following:\ a. Click Run or Run on New Tab under the Scripting area.\ b. Press F5 or Ctrl + Enter. Separate multiple queries with ‘;’.
- View results in the Results pane.
How Do I Export a Logical Unit Data File?
- Go to the Instances Tree and right click the DB File.
- Click Export Selected DB Files and select the Location and File Name of the exported file (LUDB format).
- Save your changes.
Additional (Right Click) DB File Options
- Open DB opens the Instance DB Tree of the selected DB files.
- Delete Selected DB Files, deletes the selected Instance DB files from the project folder: Fabric\[project name]\Implementation\LogicalUnits\[LU name]\VirtualDB_Data.
Notes
The latest Data Viewer file can be used in the following components:
- New functions / Web Services, the latest Data Viewer is displayed in the Databases dropdown list whereby the LU table can be invoked on the code. Click for more information on How to Create a New Project Function.
- LU Schema, create a new table based on SQL Options to open the DB query where you can select the latest Data Viewer file. Click for more information about Adding a Table to a Schema.
- Population object / DB query, to display the latest Data Viewer file in the Database dropdown list. Click for more information about Creating a New Table Population.
- Debugging population objects. Click for more information about Debugging a Table Population.
