

Catalog Settings
The purpose of the Settings tab in the Catalog application is to enable viewing and editing various Catalog configurations. The Catalog includes product settings that can be updated to accommodate the Project's needs. The updates are saved in the project.
The Settings tab includes the following sections:
- Classifier Regex
- PII & Masking
- Sequences, available from V8.1
- Discovery Pipeline, available from V8.2
Classifier Regex Tab
The Classifier Regex tab allows to view and update the Profiling regular expression rules that are used by the Profiling built-in plugins, Data Regex Classifier and Metadata Regex Classifier.
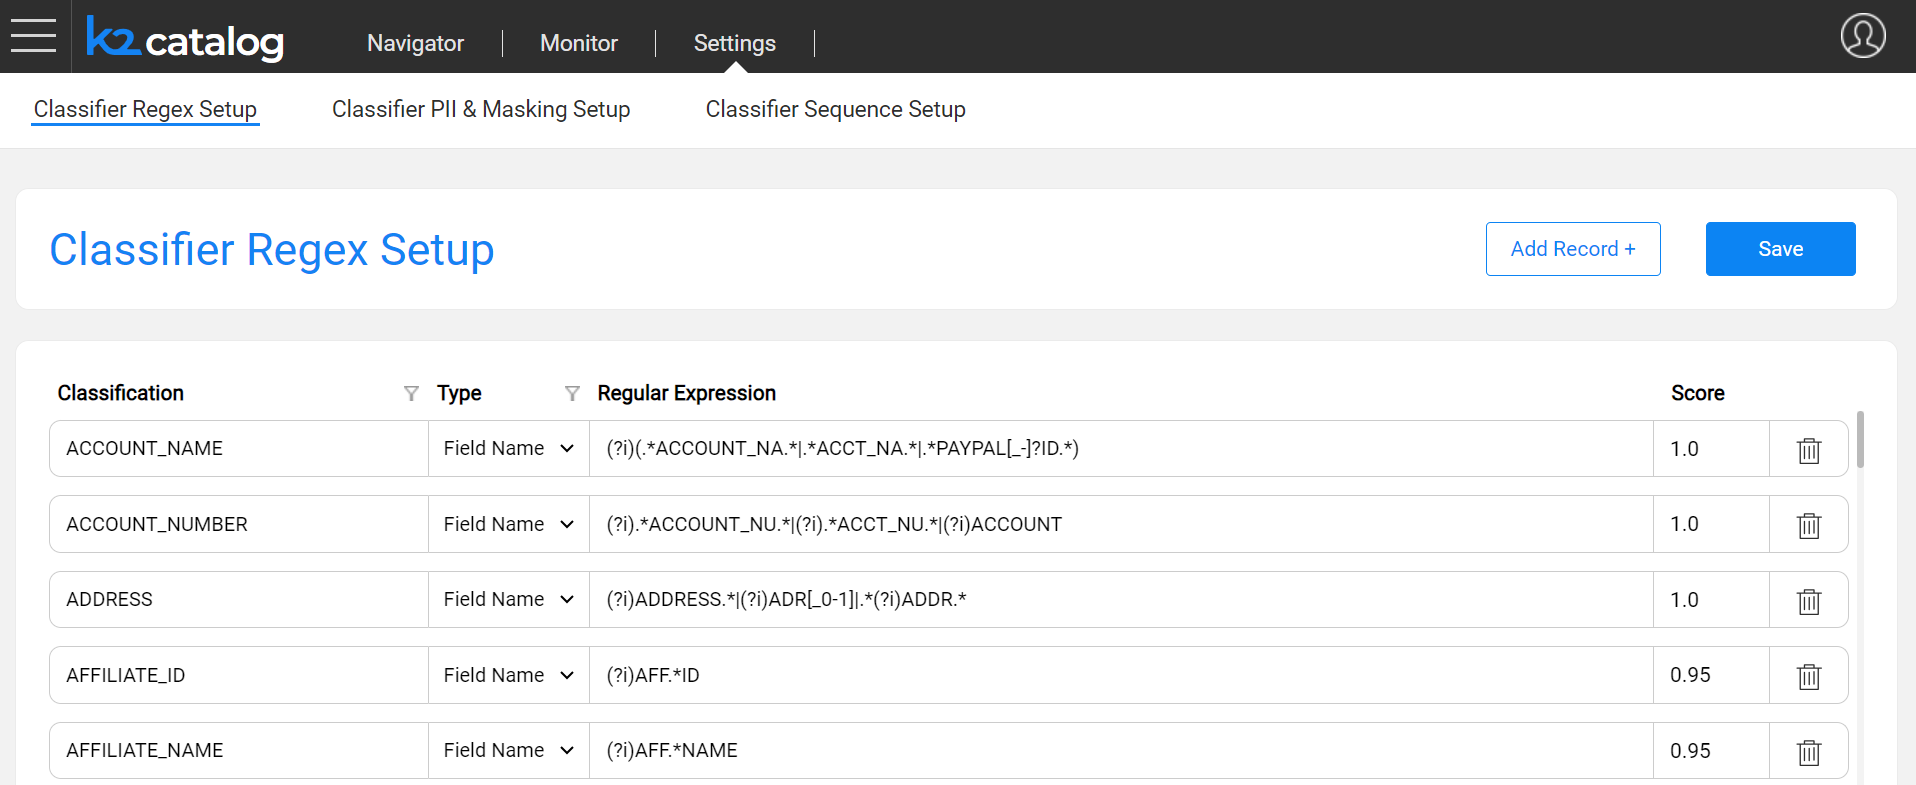
The columns of this tab are:
Classification, which defines the value of a Classification property added to the Catalog's fields as a result of the Profiling plugins.
Type, which can be either Field Name or Field Value:
- Entries defined as the Field Name type are used by the Metadata Regex Classifier plugin.
- Entries defined as the Field Value type are used by the Data Regex Classifier plugin.
Regular Expression, which defines the expression applied on the field, either its name or its value, depending on the Type.
Score, which defines the confidence level that the current rule is true.
Each Classification can have several definitions, with either the same or different Types.
Using this tab, you can either edit existing definitions or add new ones. The Classification value can be either new or selected from the list.
Once the Save button is clicked, the metadata_profiling and data_profiling MTables are updated in Fabric's memory and in the Implementation/SharedObjects/Interfaces/Discovery/MTablefolder of the Project tree.
Click here for more details about these Profiling plugins.
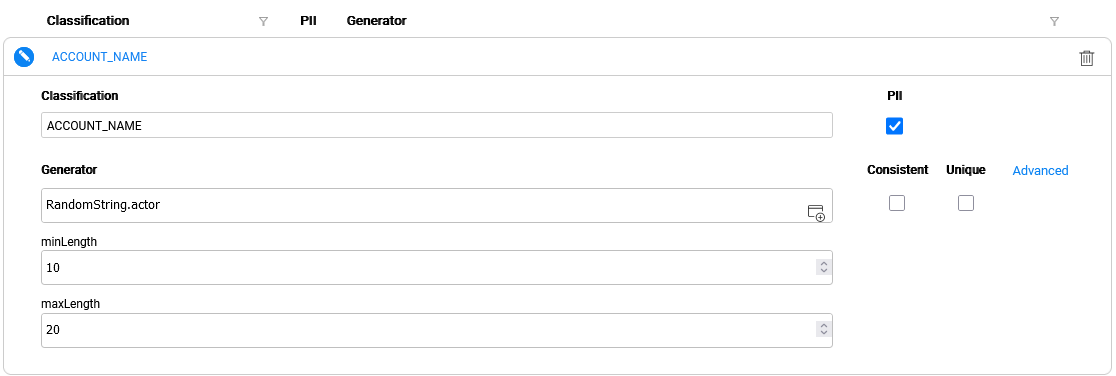
PII & Masking Tab
The PII & Masking tab allows to view and update the PII and the Catalog-based masking settings of each classification. The PII indicator is used by the Classification PII Marker built-in plugin. The Masking setup is used by the Catalog Masking actors as described later in this article.

Each Classification in this tab is unique, and it includes the following attributes:
- PII indicates whether the Classification is considered Personally Identifiable Information.
- Generator shows which actor or flow is applied by the Catalog masking mechanism for generating masking values. The generator runs in one of the following cases:
- Data masking
- Rule-based synthetic data generation
- Consistency Mode sets the definition of consistency, uniqueness and seed for a value that will be generated by the selected Generator. The values of the Consistency Mode are:
- Random (not consistent and not unique)
- Consistent using table (consistent and not unique)
- Consistent using seed (consistent with seed and not unique)
- Consistent and unique
Note that Consistent using seed value is only available when the selected Generator supports seed.
Click here for more information about data consistency.
In this tab, each classification can have only one definition (row). Note that you cannot create a sequence (via the Sequence Setup tab) with an identical name as the classification that appears in this tab, as both the classifications and the sequences are saved in the same MTable.
Masking Setup Guidelines
Click the  icon to expand the Generator and its parameters setup area (PII, Consistency Mode and other Advanced parameters), that will be used for generating a value. The Generator can be any existing built-in actor, a custom actor or a flow, which should be created under the Shared Objects in the Fabric Studio.
Upon invocation of a Catalog Masking actor - e.g., during a table population - the generated value is populated in a field with a given Classification. For instance, when a field is classified as a Social Security Number, you should set up the Generator for masking it. The Generator can be either the built-in RandomSSN.actor, or a custom actor or a flow.
When selecting an actor or a flow, its respective input parameters are dynamically added underneath it.
Guidelines for Creating a Masking Flow
The first input parameter of a masking flow (or a custom actor) - selected as a Generator - is considered as the value that should be masked, and not as a masking configuration parameter. Hence, it is hidden (and not dynamically added) when a masking flow is selected in the above Masking setup screen. This is applicable only for an input parameter of Link or External type.
Therefore, when creating a masking flow, its first input should be named 'value', even if this flow doesn't need to receive any input. This prevents the hiding of the first input from the Masking setup screen as explained above.
Below is a masking flow sample:

Once the Save button is clicked in the PII & Masking tab, the pii_profiling and catalog_classification_generators MTables are updated in Fabric's memory and in the Implementation/SharedObjects/Interfaces/Discovery/MTablefolder of the Project tree.
Click for more details about the Catalog masking mechanism.
Advanced Masking Settings
The purpose of the Advanced Masking Settings pop-up window is to allow the setting-up of additional masking parameters. The settings included in this window are:
- Masking indicators - determine the masking behavior during a flow run. They can be set either per population via the Catalog Masking Actor's inputs or per Classification via the Advanced Masking Settings screen. The Catalog definition of masking indicators overrides the setting of these indicators on the Catalog Masking Actor - for all the fields with the same Classification.
- Formatter Name and Parameters - set in order to enable the format-preserving masking.
- Pre-Execution Logic - an actor or a flow to be executed by the Catalog Masking Actor.
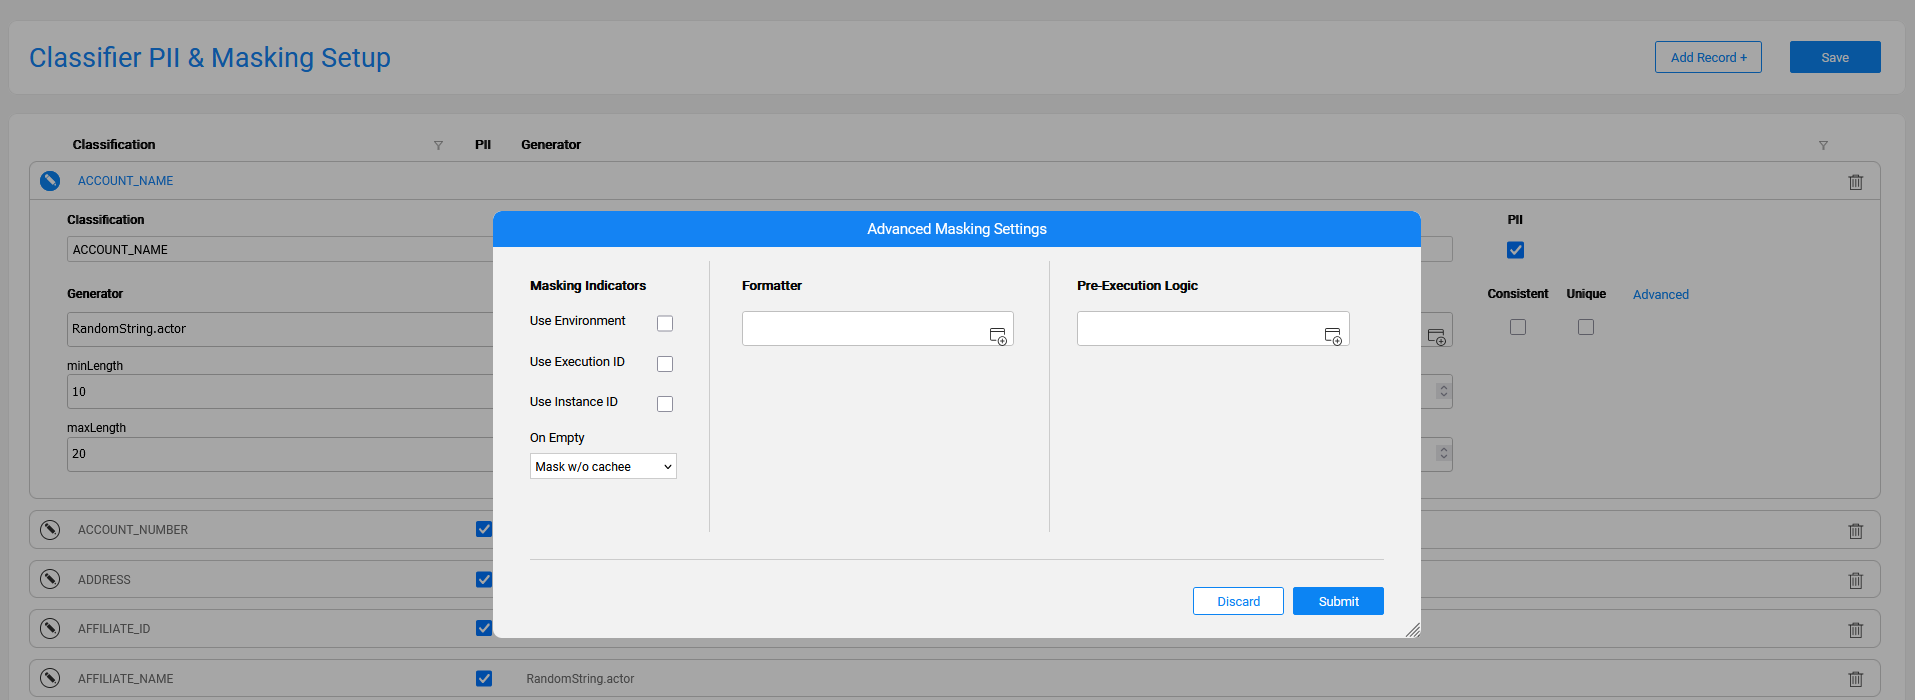
The Advanced Masking Settings are defined per each Classification by using the above pop-up window.
The Submit button in this window aggregates the data in the application’s client side until saving is done using the Save button in the PII & Masking tab.
Upon clicking the Save button in the PII & Masking tab, the pii_profiling and catalog_classification_generators MTables are updated in Fabric's memory and in the Implementation/SharedObjects/Interfaces/Discovery/MTablefolder of the Project tree.
Sequences Tab
The Sequences tab allows to set up the sequences that can be generated in a project as part of a population or any other flow. This tab doesn't have a product built-in list of sequences as the sequence names and their definitions are usually project-specific.
To create a sequence:
- Click the Add Record + button and populate a Sequence Name, Generator and its parameters (PII, Consistency Mode and the Advanced parameters, if needed), that will be used for generating a sequence value.
- Note that the Generator is pre-populated with the Sequence.actor though it can be updated to any existing built-in actor, a custom actor or a flow (the flow should be created under the project's Shared Objects).
- The sequenceId parameter of the Sequence.actor is populated with the same value that is stated in the Sequence Name, when it is typed for the first time. Later, each one of them can be changed to a different value, if needed.
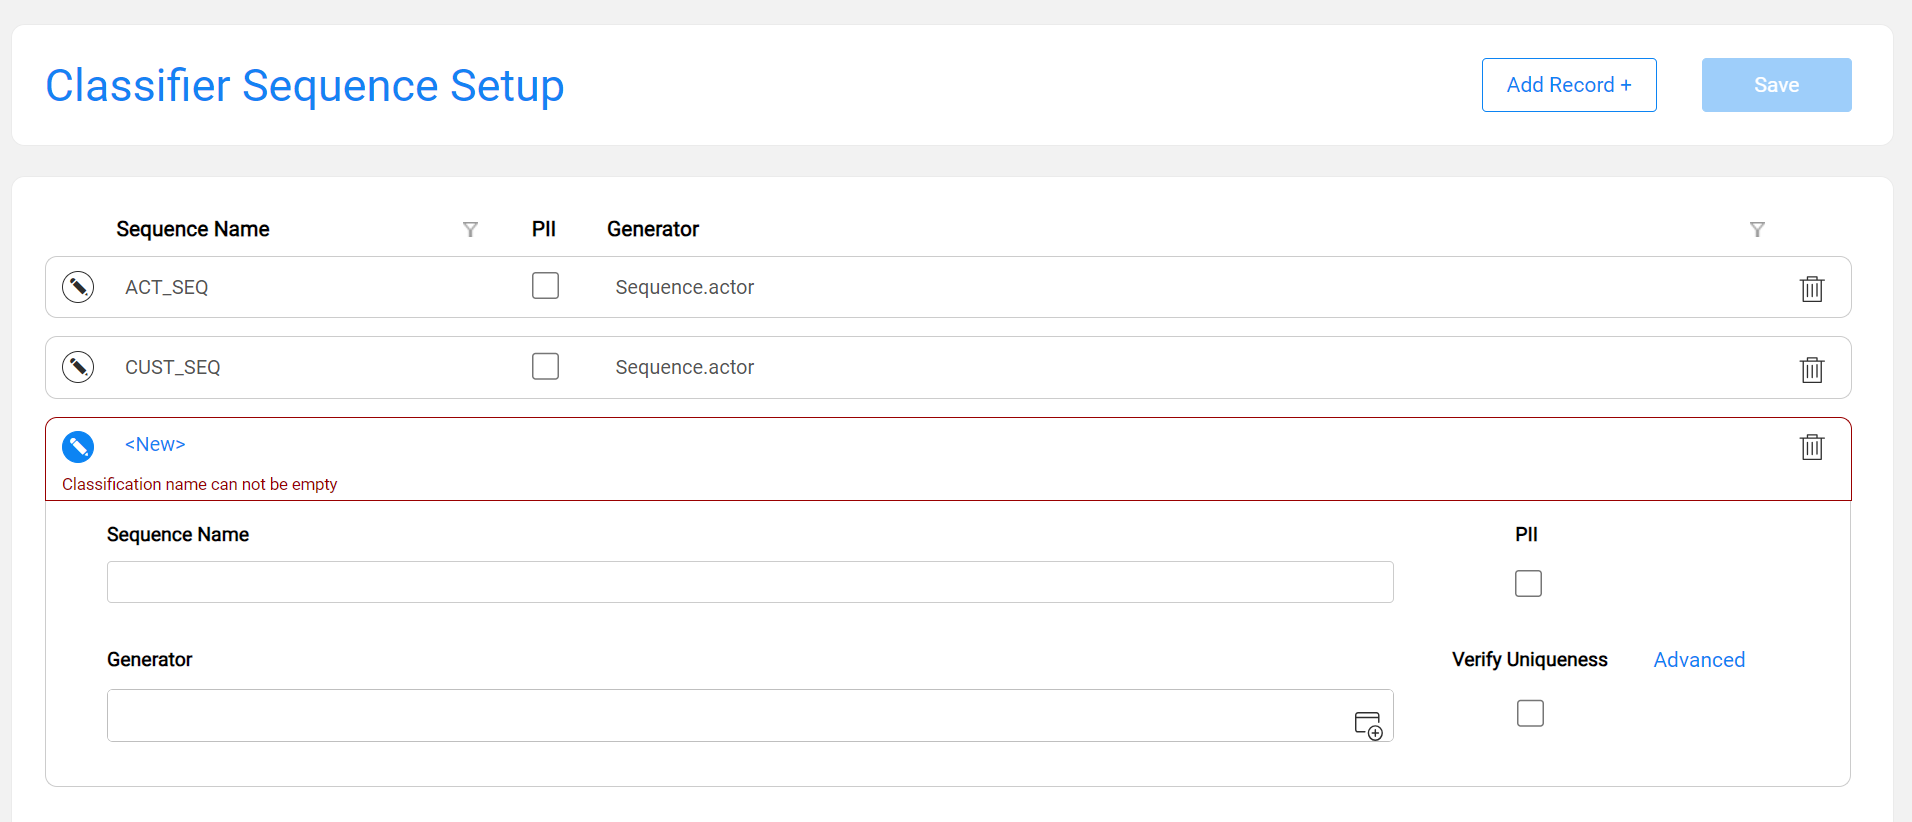
Each sequence can have only one definition (row). Note that you cannot create a classification (via the PII & Masking tab) with the same name as a sequence in this tab.
Currently, the Catalog doesn’t automatically identify the sequence fields. Thus, after a list of sequences has been set in the Sequences tab, the relevant Catalog fields should be manually marked as sequences, as follows:
- Click Actions > Edit Catalog.
- Navigate to the required field and click the
 icon to add a new property.
 - Select or type sequenceName as the property name.
- In the property value, select the name of the sequence that was set up via the Sequences tab.

Advanced Sequence Settings
The purpose of the Advanced Sequence Settings pop-up window is to set up additional sequence parameters; it is very similar to the Advanced Masking Settings pop-up window.

Upon clicking the Save button in the Classifier Sequence Setup tab, the pii_profiling and catalog_classification_generators MTables are updated in Fabric's memory and in the Implementation/SharedObjects/Interfaces/Discovery/MTablefolder of the Project tree.
The sequences are saved in the catalog_classification_generators MTable (same location as the masking classifications), with the following differences:
- The category of masking classifications is enable_masking.
- The category of non-PII sequences is enable_sequence.
- The category of PII-sequences is enable_masking_uniqueness.


Catalog Settings
The purpose of the Settings tab in the Catalog application is to enable viewing and editing various Catalog configurations. The Catalog includes product settings that can be updated to accommodate the Project's needs. The updates are saved in the project.
The Settings tab includes the following sections:
- Classifier Regex
- PII & Masking
- Sequences, available from V8.1
- Discovery Pipeline, available from V8.2
Classifier Regex Tab
The Classifier Regex tab allows to view and update the Profiling regular expression rules that are used by the Profiling built-in plugins, Data Regex Classifier and Metadata Regex Classifier.
The columns of this tab are:
Classification, which defines the value of a Classification property added to the Catalog's fields as a result of the Profiling plugins.
Type, which can be either Field Name or Field Value:
- Entries defined as the Field Name type are used by the Metadata Regex Classifier plugin.
- Entries defined as the Field Value type are used by the Data Regex Classifier plugin.
Regular Expression, which defines the expression applied on the field, either its name or its value, depending on the Type.
Score, which defines the confidence level that the current rule is true.
Each Classification can have several definitions, with either the same or different Types.
Using this tab, you can either edit existing definitions or add new ones. The Classification value can be either new or selected from the list.
Once the Save button is clicked, the metadata_profiling and data_profiling MTables are updated in Fabric's memory and in the Implementation/SharedObjects/Interfaces/Discovery/MTablefolder of the Project tree.
Click here for more details about these Profiling plugins.
PII & Masking Tab
The PII & Masking tab allows to view and update the PII and the Catalog-based masking settings of each classification. The PII indicator is used by the Classification PII Marker built-in plugin. The Masking setup is used by the Catalog Masking actors as described later in this article.
Each Classification in this tab is unique, and it includes the following attributes:
- PII indicates whether the Classification is considered Personally Identifiable Information.
- Generator shows which actor or flow is applied by the Catalog masking mechanism for generating masking values. The generator runs in one of the following cases:
- Data masking
- Rule-based synthetic data generation
- Consistency Mode sets the definition of consistency, uniqueness and seed for a value that will be generated by the selected Generator. The values of the Consistency Mode are:
- Random (not consistent and not unique)
- Consistent using table (consistent and not unique)
- Consistent using seed (consistent with seed and not unique)
- Consistent and unique
Note that Consistent using seed value is only available when the selected Generator supports seed.
Click here for more information about data consistency.
In this tab, each classification can have only one definition (row). Note that you cannot create a sequence (via the Sequence Setup tab) with an identical name as the classification that appears in this tab, as both the classifications and the sequences are saved in the same MTable.
Masking Setup Guidelines
Click the icon to expand the Generator and its parameters setup area (PII, Consistency Mode and other Advanced parameters), that will be used for generating a value. The Generator can be any existing built-in actor, a custom actor or a flow, which should be created under the Shared Objects in the Fabric Studio.
Upon invocation of a Catalog Masking actor - e.g., during a table population - the generated value is populated in a field with a given Classification. For instance, when a field is classified as a Social Security Number, you should set up the Generator for masking it. The Generator can be either the built-in RandomSSN.actor, or a custom actor or a flow.
When selecting an actor or a flow, its respective input parameters are dynamically added underneath it.
Guidelines for Creating a Masking Flow
The first input parameter of a masking flow (or a custom actor) - selected as a Generator - is considered as the value that should be masked, and not as a masking configuration parameter. Hence, it is hidden (and not dynamically added) when a masking flow is selected in the above Masking setup screen. This is applicable only for an input parameter of Link or External type.
Therefore, when creating a masking flow, its first input should be named 'value', even if this flow doesn't need to receive any input. This prevents the hiding of the first input from the Masking setup screen as explained above.
Below is a masking flow sample:
Once the Save button is clicked in the PII & Masking tab, the pii_profiling and catalog_classification_generators MTables are updated in Fabric's memory and in the Implementation/SharedObjects/Interfaces/Discovery/MTablefolder of the Project tree.
Click for more details about the Catalog masking mechanism.
Advanced Masking Settings
The purpose of the Advanced Masking Settings pop-up window is to allow the setting-up of additional masking parameters. The settings included in this window are:
- Masking indicators - determine the masking behavior during a flow run. They can be set either per population via the Catalog Masking Actor's inputs or per Classification via the Advanced Masking Settings screen. The Catalog definition of masking indicators overrides the setting of these indicators on the Catalog Masking Actor - for all the fields with the same Classification.
- Formatter Name and Parameters - set in order to enable the format-preserving masking.
- Pre-Execution Logic - an actor or a flow to be executed by the Catalog Masking Actor.
The Advanced Masking Settings are defined per each Classification by using the above pop-up window.
The Submit button in this window aggregates the data in the application’s client side until saving is done using the Save button in the PII & Masking tab.
Upon clicking the Save button in the PII & Masking tab, the pii_profiling and catalog_classification_generators MTables are updated in Fabric's memory and in the Implementation/SharedObjects/Interfaces/Discovery/MTablefolder of the Project tree.
Sequences Tab
The Sequences tab allows to set up the sequences that can be generated in a project as part of a population or any other flow. This tab doesn't have a product built-in list of sequences as the sequence names and their definitions are usually project-specific.
To create a sequence:
- Click the Add Record + button and populate a Sequence Name, Generator and its parameters (PII, Consistency Mode and the Advanced parameters, if needed), that will be used for generating a sequence value.
- Note that the Generator is pre-populated with the Sequence.actor though it can be updated to any existing built-in actor, a custom actor or a flow (the flow should be created under the project's Shared Objects).
- The sequenceId parameter of the Sequence.actor is populated with the same value that is stated in the Sequence Name, when it is typed for the first time. Later, each one of them can be changed to a different value, if needed.
Each sequence can have only one definition (row). Note that you cannot create a classification (via the PII & Masking tab) with the same name as a sequence in this tab.
Currently, the Catalog doesn’t automatically identify the sequence fields. Thus, after a list of sequences has been set in the Sequences tab, the relevant Catalog fields should be manually marked as sequences, as follows:
- Click Actions > Edit Catalog.
- Navigate to the required field and click the icon to add a new property.
- Select or type sequenceName as the property name.
- In the property value, select the name of the sequence that was set up via the Sequences tab.
Advanced Sequence Settings
The purpose of the Advanced Sequence Settings pop-up window is to set up additional sequence parameters; it is very similar to the Advanced Masking Settings pop-up window.
Upon clicking the Save button in the Classifier Sequence Setup tab, the pii_profiling and catalog_classification_generators MTables are updated in Fabric's memory and in the Implementation/SharedObjects/Interfaces/Discovery/MTablefolder of the Project tree.
The sequences are saved in the catalog_classification_generators MTable (same location as the masking classifications), with the following differences:
- The category of masking classifications is enable_masking.
- The category of non-PII sequences is enable_sequence.
- The category of PII-sequences is enable_masking_uniqueness.
